Epson 710C User Manual - Page 5
Appendix A-Connecting a Desktop Computer, Positioning the Projector - remote
 |
UPC - 010343821538
View all Epson 710C manuals
Add to My Manuals
Save this manual to your list of manuals |
Page 5 highlights
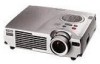
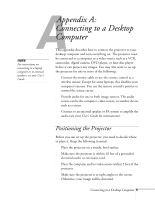
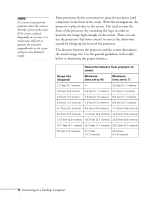
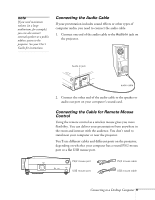
AAppendix A: Connecting to a Desktop Computer note For instructions on connecting to a laptop computer or to external speakers, see your User's Guide. This appendix describes how to connect the projector to your desktop computer and turn everything on. The projector must be connected to a computer or a video source such as a VCR, camcorder, digital camera, DVD player, or laser disc player before it can project any images. You may also want to set up the projector for one or more of the following: s Connect the mouse cable to use the remote control as a wireless mouse. Except for some laptops, this disables your computer's mouse. You use the remote control's pointer to control the screen cursor. s Provide audio for one or both image sources. The audio source can be the computer, video source, or another device such as a stereo. s Connect to an external speaker or PA system to amplify the audio (see your User's Guide for instructions). Positioning the Projector Before you can set up the projector, you need to decide where to place it. Keep the following in mind: s Place the projector on a sturdy, level surface. s Make sure the projector is within 10 feet of a grounded electrical outlet or extension cord. s Place the computer and/or video source within 5 feet of the projector. s Make sure the projector is at right angles to the screen. Otherwise, your image will be distorted. Connecting to a Desktop Computer 5
-
 1
1 -
 2
2 -
 3
3 -
 4
4 -
 5
5 -
 6
6 -
 7
7 -
 8
8 -
 9
9 -
 10
10 -
 11
11 -
12
-
13
-
14
-
15
-
16
-
17
-
18
-
19
-
20
-
21
-
22
-
23
-
24
-
25
-
26
-
27
-
28
-
29
-
30
-
31
-
32
-
33
-
34
-
35
-
36
-
37
-
38
-
39
-
40
-
41
-
42
-
43
-
44
-
45
-
46
-
47
-
48
-
49
-
50
-
51
-
52
-
53
-
54
-
55
-
56
-
57
-
58
-
59
-
60
-
61
-
62
-
63
-
64
-
65
-
66
-
67
-
68
-
69
-
70
-
71
-
72
-
73
-
74
-
75
-
76
-
77
-
78
-
79
-
80
-
81
-
82
-
83
-
84
-
85
-
86
-
87
-
88
-
89
-
90
-
91
-
92
-
93
-
94
-
95
-
96
-
97
-
98
-
99
-
100
-
101
-
102
-
103
-
104
-
105
-
106
-
107
-
108
-
109
-
110
-
111
-
112
-
113
-
114
-
115
-
116
-
117
-
118
-
119
-
120
-
121
-
122
-
123
-
124
 |
 |