Epson 710C User Manual - Page 91
Adjusting the Image, Repositioning the Image
 |
UPC - 010343821538
View all Epson 710C manuals
Add to My Manuals
Save this manual to your list of manuals |
Page 91 highlights
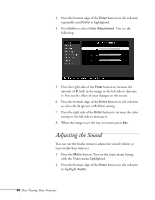
6. If you want to go back to the default settings on any menu, select Reset, press Enter, select Yes, and then press Enter. 7. Press the Esc button on the remote to go back to the main menu display. Your changes are saved automatically. 8. Press the Menu button to exit the menu system. note Slightly different settings are available on the Video menu when you're projecting from a video source, rather than from your computer. You can also adjust video settings from the projector's help system. Adjusting the Image You can adjust a number of image features with the Video menu, including: s Image positioning s Brightness s Contrast s Color Balance s Sharpness s Gamma Additional settings are available on the Video menu for tracking, sync, and auto setup. Normally you won't need to change these settings unless you have a problem with your projector. See the User's Guide Supplement for more information. Repositioning the Image Follow these steps to fine-tune the image position: 1. Press the Menu button. You see the main menu listing, with the Video menu highlighted (as shown on page 47). 2. Press Enter to select the Video menu. 48 Fine-Tuning Your Projector
-
 1
1 -
2
-
3
-
4
-
5
-
6
-
7
-
8
-
9
-
10
-
11
-
12
-
13
-
14
-
15
-
16
-
17
-
18
-
19
-
20
-
21
-
22
-
23
-
24
-
25
-
26
-
27
-
28
-
29
-
30
-
31
-
32
-
33
-
34
-
35
-
36
-
37
-
38
-
39
-
40
-
41
-
42
-
43
-
44
-
45
-
46
-
47
-
48
-
49
-
50
-
51
-
52
-
53
-
54
-
55
-
56
-
57
-
58
-
59
-
60
-
61
-
62
-
63
-
64
-
65
-
66
-
67
-
68
-
69
-
70
-
71
-
72
-
73
-
74
-
75
-
76
-
77
-
78
-
79
-
80
-
81
-
82
-
83
-
84
-
85
-
 86
86 -
 87
87 -
 88
88 -
 89
89 -
 90
90 -
 91
91 -
 92
92 -
 93
93 -
 94
94 -
 95
95 -
 96
96 -
97
-
98
-
99
-
100
-
101
-
102
-
103
-
104
-
105
-
106
-
107
-
108
-
109
-
110
-
111
-
112
-
113
-
114
-
115
-
116
-
117
-
118
-
119
-
120
-
121
-
122
-
123
-
124
 |
 |
