Epson 710C User Manual - Page 52
Installing Batteries in the Remote Control, Positioning the Projector
 |
UPC - 010343821538
View all Epson 710C manuals
Add to My Manuals
Save this manual to your list of manuals |
Page 52 highlights
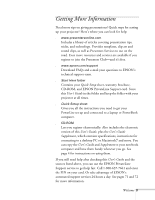
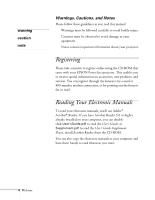
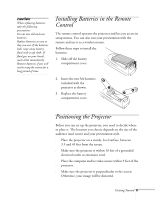
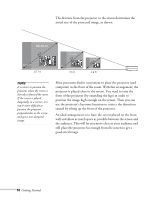
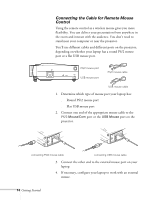
caution When replacing batteries, take the following precautions: Do not mix old and new batteries. Replace batteries as soon as they run out. If the batteries leak, wipe away battery fluid with a soft cloth. If fluid gets on your hands, wash them immediately. Remove batteries if you will not be using the remote for a long period of time. Installing Batteries in the Remote Control The remote control operates the projector and lets you access its setup menus. You can also run your presentation with the remote and use it as a wireless mouse. Follow these steps to install the batteries: 1. Slide off the battery compartment cover. 2. Insert the two AA batteries included with the projector as shown. 3. Replace the battery compartment cover. Positioning the Projector Before you can set up the projector, you need to decide where to place it. The location you choose depends on the size of the audience (and room) and your presentation style. s Place the projector on a sturdy, level surface, between 3.5 and 45 feet from the screen. s Make sure the projector is within 10 feet of a grounded electrical outlet or extension cord. s Place the computer and/or video source within 5 feet of the projector. s Make sure the projector is perpendicular to the screen. Otherwise, your image will be distorted. Getting Started 9
-
 1
1 -
2
-
3
-
4
-
5
-
6
-
7
-
8
-
9
-
10
-
11
-
12
-
13
-
14
-
15
-
16
-
17
-
18
-
19
-
20
-
21
-
22
-
23
-
24
-
25
-
26
-
27
-
28
-
29
-
30
-
31
-
32
-
33
-
34
-
35
-
36
-
37
-
38
-
39
-
40
-
41
-
42
-
43
-
44
-
45
-
46
-
 47
47 -
 48
48 -
 49
49 -
 50
50 -
 51
51 -
 52
52 -
 53
53 -
 54
54 -
 55
55 -
 56
56 -
 57
57 -
58
-
59
-
60
-
61
-
62
-
63
-
64
-
65
-
66
-
67
-
68
-
69
-
70
-
71
-
72
-
73
-
74
-
75
-
76
-
77
-
78
-
79
-
80
-
81
-
82
-
83
-
84
-
85
-
86
-
87
-
88
-
89
-
90
-
91
-
92
-
93
-
94
-
95
-
96
-
97
-
98
-
99
-
100
-
101
-
102
-
103
-
104
-
105
-
106
-
107
-
108
-
109
-
110
-
111
-
112
-
113
-
114
-
115
-
116
-
117
-
118
-
119
-
120
-
121
-
122
-
123
-
124
 |
 |