Epson 710C User Manual - Page 74
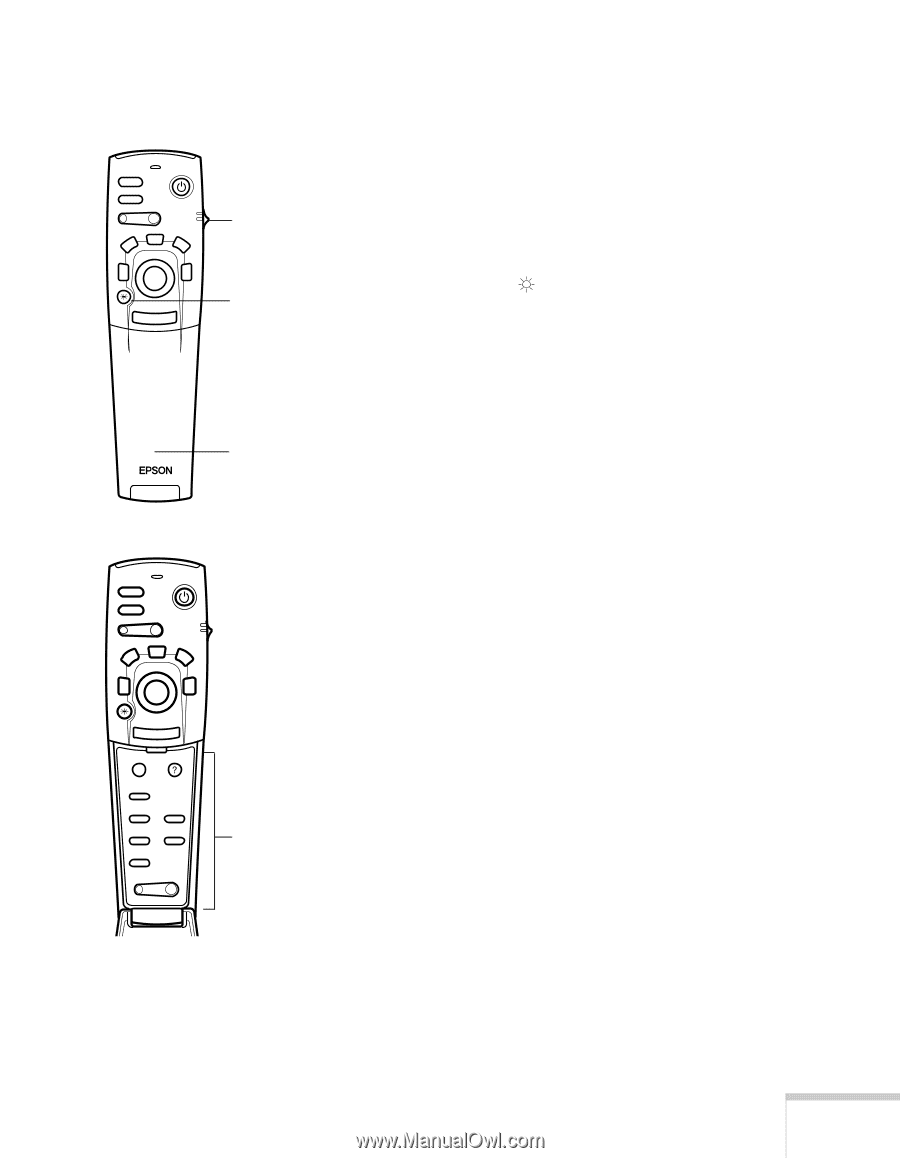
Operating the Projector with the Remote Control, your thumb. Or
 |
UPC - 010343821538
View all Epson 710C manuals
Add to My Manuals
Save this manual to your list of manuals |
Page 74 highlights
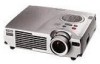
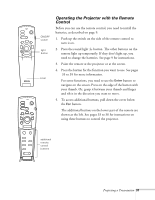
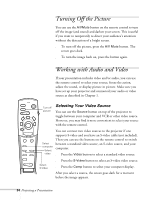
Freeze A/V Mute E-Zoom Power R/C ON OFF 3 2 5 4 1 Enter Esc Freeze A/V Mute E-Zoom Power R/C ON OFF 3 2 5 4 1 Enter ON/OFF switch light button cover Operating the Projector with the Remote Control Before you can use the remote control, you need to install the batteries, as described on page 9. 1. Push up the switch on the side of the remote control to turn it on. 2. Press the round light button. The other buttons on the remote light up temporarily. If they don't light up, you need to change the batteries. See page 9 for instructions. 3. Point the remote at the projector or at the screen. 4. Press the button for the function you want to use. See pages 33 to 39 for more information. For some functions, you need to use the Enter button to navigate on the screen. Press on the edge of the button with your thumb. Or, grasp it between your thumb and finger and tilt it in the direction you want to move. 5. To access additional buttons, pull down the cover below the Esc button. The additional buttons on the lower part of the remote are shown at the left. See pages 33 to 36 for instructions on using these buttons to control the projector. Esc Menu Help Comp S-Video Video Auto Resize P in P - Volume + additional remote control buttons Projecting a Presentation 31
-
 1
1 -
2
-
3
-
4
-
5
-
6
-
7
-
8
-
9
-
10
-
11
-
12
-
13
-
14
-
15
-
16
-
17
-
18
-
19
-
20
-
21
-
22
-
23
-
24
-
25
-
26
-
27
-
28
-
29
-
30
-
31
-
32
-
33
-
34
-
35
-
36
-
37
-
38
-
39
-
40
-
41
-
42
-
43
-
44
-
45
-
46
-
47
-
48
-
49
-
50
-
51
-
52
-
53
-
54
-
55
-
56
-
57
-
58
-
59
-
60
-
61
-
62
-
63
-
64
-
65
-
66
-
67
-
68
-
 69
69 -
 70
70 -
 71
71 -
 72
72 -
 73
73 -
 74
74 -
 75
75 -
 76
76 -
 77
77 -
 78
78 -
 79
79 -
80
-
81
-
82
-
83
-
84
-
85
-
86
-
87
-
88
-
89
-
90
-
91
-
92
-
93
-
94
-
95
-
96
-
97
-
98
-
99
-
100
-
101
-
102
-
103
-
104
-
105
-
106
-
107
-
108
-
109
-
110
-
111
-
112
-
113
-
114
-
115
-
116
-
117
-
118
-
119
-
120
-
121
-
122
-
123
-
124
 |
 |