Epson FX-2180 User Manual - Page 121
Document Properties dialog box, button. The More
 |
View all Epson FX-2180 manuals
Add to My Manuals
Save this manual to your list of manuals |
Page 121 highlights
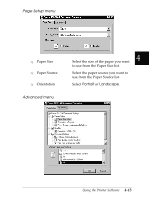
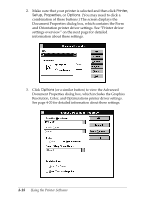
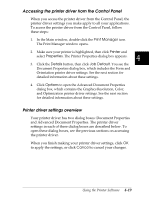
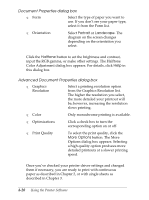
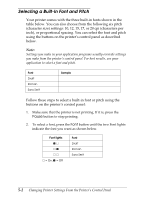
Document Properties dialog box T Form Select the type of paper you want to use. If you don't see your paper type, select it from the Form list. T Orientation Select Portrait or Landscape. The diagram on the screen changes depending on the orientation you select. Click the Halftone button to set the brightness and contrast, input the RGB gamma, or make other settings. The Halftone Color Adjustment dialog box appears. For details, click Help in this dialog box. Advanced Document Properties dialog box T Graphics Resolution Select a printing resolution option from the Graphics Resolution list. The higher the resolution you select, the more detailed your printout will be; however, increasing the resolution slows printing. T Color Only monochrome printing is available. T Optimizations Click a check box to turn the corresponding option on or off. T Print Quality To select the print quality, click the More Options button. The More Options dialog box appears. Selecting a high quality option produces more detailed printouts at a slower printing speed. Once you've checked your printer driver settings and changed them if necessary, you are ready to print with continuous paper as described in Chapter 2, or with single sheets as described in Chapter 3. 4-20 Using the Printer Software
-
 1
1 -
2
-
3
-
4
-
5
-
6
-
7
-
8
-
9
-
10
-
11
-
12
-
13
-
14
-
15
-
16
-
17
-
18
-
19
-
20
-
21
-
22
-
23
-
24
-
25
-
26
-
27
-
28
-
29
-
30
-
31
-
32
-
33
-
34
-
35
-
36
-
37
-
38
-
39
-
40
-
41
-
42
-
43
-
44
-
45
-
46
-
47
-
48
-
49
-
50
-
51
-
52
-
53
-
54
-
55
-
56
-
57
-
58
-
59
-
60
-
61
-
62
-
63
-
64
-
65
-
66
-
67
-
68
-
69
-
70
-
71
-
72
-
73
-
74
-
75
-
76
-
77
-
78
-
79
-
80
-
81
-
82
-
83
-
84
-
85
-
86
-
87
-
88
-
89
-
90
-
91
-
92
-
93
-
94
-
95
-
96
-
97
-
98
-
99
-
100
-
101
-
102
-
103
-
104
-
105
-
106
-
107
-
108
-
109
-
110
-
111
-
112
-
113
-
114
-
115
-
 116
116 -
 117
117 -
 118
118 -
 119
119 -
 120
120 -
 121
121 -
 122
122 -
 123
123 -
 124
124 -
 125
125 -
 126
126 -
127
-
128
-
129
-
130
-
131
-
132
-
133
-
134
-
135
-
136
-
137
-
138
-
139
-
140
-
141
-
142
-
143
-
144
-
145
-
146
-
147
-
148
-
149
-
150
-
151
-
152
-
153
-
154
-
155
-
156
-
157
-
158
-
159
-
160
-
161
-
162
-
163
-
164
-
165
-
166
-
167
-
168
-
169
-
170
-
171
-
172
-
173
-
174
-
175
-
176
-
177
-
178
-
179
-
180
-
181
-
182
-
183
-
184
-
185
-
186
-
187
-
188
-
189
-
190
-
191
-
192
-
193
-
194
-
195
-
196
-
197
-
198
-
199
-
200
-
201
-
202
-
203
-
204
-
205
-
206
-
207
-
208
-
209
-
210
-
211
-
212
-
213
-
214
-
215
-
216
-
217
-
218
-
219
-
220
-
221
-
222
-
223
-
224
-
225
-
226
-
227
 |
 |