Epson FX-2180 User Manual - Page 15
Printing on continuous paper, Using a push tractor
 |
View all Epson FX-2180 manuals
Add to My Manuals
Save this manual to your list of manuals |
Page 15 highlights
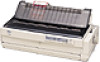
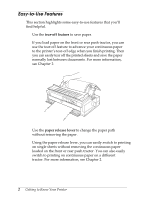
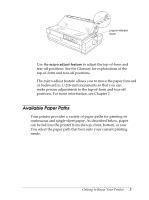
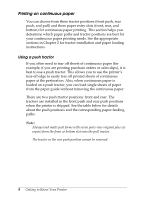
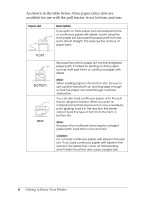
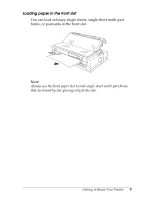
Printing on continuous paper You can choose from three tractor positions (front push, rear push, and pull) and three paper entry slots (front, rear, and bottom) for continuous paper printing. This section helps you determine which paper paths and tractor positions are best for your continuous paper printing needs. See the appropriate sections in Chapter 2 for tractor installation and paper loading instructions. Using a push tractor If you often need to tear off sheets of continuous paper (for example, if you are printing purchase orders or sales slips), it is best to use a push tractor. This allows you to use the printer's tear-off edge to easily tear off printed sheets of continuous paper at the perforation. Also, when continuous paper is loaded on a push tractor, you can load single sheets of paper from the paper guide without removing the continuous paper. There are two push tractor positions: front and rear. The tractors are installed in the front push and rear push positions when the printer is shipped. See the table below for details about the push positions and the corresponding paper-feeding paths. Note: o Always load multi-part forms with seven parts (one original plus six copies) from the front or bottom slot onto the pull tractor. o The tractor in the rear push position cannot be removed. 4 Getting to Know Your Printer
-
 1
1 -
2
-
3
-
4
-
5
-
6
-
7
-
8
-
9
-
 10
10 -
 11
11 -
 12
12 -
 13
13 -
 14
14 -
 15
15 -
 16
16 -
 17
17 -
 18
18 -
 19
19 -
 20
20 -
21
-
22
-
23
-
24
-
25
-
26
-
27
-
28
-
29
-
30
-
31
-
32
-
33
-
34
-
35
-
36
-
37
-
38
-
39
-
40
-
41
-
42
-
43
-
44
-
45
-
46
-
47
-
48
-
49
-
50
-
51
-
52
-
53
-
54
-
55
-
56
-
57
-
58
-
59
-
60
-
61
-
62
-
63
-
64
-
65
-
66
-
67
-
68
-
69
-
70
-
71
-
72
-
73
-
74
-
75
-
76
-
77
-
78
-
79
-
80
-
81
-
82
-
83
-
84
-
85
-
86
-
87
-
88
-
89
-
90
-
91
-
92
-
93
-
94
-
95
-
96
-
97
-
98
-
99
-
100
-
101
-
102
-
103
-
104
-
105
-
106
-
107
-
108
-
109
-
110
-
111
-
112
-
113
-
114
-
115
-
116
-
117
-
118
-
119
-
120
-
121
-
122
-
123
-
124
-
125
-
126
-
127
-
128
-
129
-
130
-
131
-
132
-
133
-
134
-
135
-
136
-
137
-
138
-
139
-
140
-
141
-
142
-
143
-
144
-
145
-
146
-
147
-
148
-
149
-
150
-
151
-
152
-
153
-
154
-
155
-
156
-
157
-
158
-
159
-
160
-
161
-
162
-
163
-
164
-
165
-
166
-
167
-
168
-
169
-
170
-
171
-
172
-
173
-
174
-
175
-
176
-
177
-
178
-
179
-
180
-
181
-
182
-
183
-
184
-
185
-
186
-
187
-
188
-
189
-
190
-
191
-
192
-
193
-
194
-
195
-
196
-
197
-
198
-
199
-
200
-
201
-
202
-
203
-
204
-
205
-
206
-
207
-
208
-
209
-
210
-
211
-
212
-
213
-
214
-
215
-
216
-
217
-
218
-
219
-
220
-
221
-
222
-
223
-
224
-
225
-
226
-
227
 |
 |