Epson FX-2180 User Manual - Page 86
Pause, a 9.5 mm 0.37 inch margin on the next
 |
View all Epson FX-2180 manuals
Add to My Manuals
Save this manual to your list of manuals |
Page 86 highlights
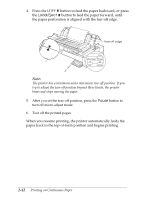
To adjust the top-of-form position for continuous paper loaded on the pull tractor, see the following example: First mark a point 6.5 mm (0.26 inch) above the paper's perforation; then position the paper so that the mark even with the top edge of the plastic ribbon cover. This gives you an 2 8.5 mm (0.33 inch) margin on the next page, meaning the printer starts printing 8.5 mm below the perforation. If you mark a point 5.5 mm (0.22 inch) above the perforation, you get a 9.5 mm (0.37 inch) margin on the next page. (0.26 inch) (0.33 inch) 6. After you set the top-of-form position, press the Pause button to exit micro adjust mode. Printing on Continuous Paper 2-39
-
 1
1 -
2
-
3
-
4
-
5
-
6
-
7
-
8
-
9
-
10
-
11
-
12
-
13
-
14
-
15
-
16
-
17
-
18
-
19
-
20
-
21
-
22
-
23
-
24
-
25
-
26
-
27
-
28
-
29
-
30
-
31
-
32
-
33
-
34
-
35
-
36
-
37
-
38
-
39
-
40
-
41
-
42
-
43
-
44
-
45
-
46
-
47
-
48
-
49
-
50
-
51
-
52
-
53
-
54
-
55
-
56
-
57
-
58
-
59
-
60
-
61
-
62
-
63
-
64
-
65
-
66
-
67
-
68
-
69
-
70
-
71
-
72
-
73
-
74
-
75
-
76
-
77
-
78
-
79
-
80
-
 81
81 -
 82
82 -
 83
83 -
 84
84 -
 85
85 -
 86
86 -
 87
87 -
 88
88 -
 89
89 -
 90
90 -
 91
91 -
92
-
93
-
94
-
95
-
96
-
97
-
98
-
99
-
100
-
101
-
102
-
103
-
104
-
105
-
106
-
107
-
108
-
109
-
110
-
111
-
112
-
113
-
114
-
115
-
116
-
117
-
118
-
119
-
120
-
121
-
122
-
123
-
124
-
125
-
126
-
127
-
128
-
129
-
130
-
131
-
132
-
133
-
134
-
135
-
136
-
137
-
138
-
139
-
140
-
141
-
142
-
143
-
144
-
145
-
146
-
147
-
148
-
149
-
150
-
151
-
152
-
153
-
154
-
155
-
156
-
157
-
158
-
159
-
160
-
161
-
162
-
163
-
164
-
165
-
166
-
167
-
168
-
169
-
170
-
171
-
172
-
173
-
174
-
175
-
176
-
177
-
178
-
179
-
180
-
181
-
182
-
183
-
184
-
185
-
186
-
187
-
188
-
189
-
190
-
191
-
192
-
193
-
194
-
195
-
196
-
197
-
198
-
199
-
200
-
201
-
202
-
203
-
204
-
205
-
206
-
207
-
208
-
209
-
210
-
211
-
212
-
213
-
214
-
215
-
216
-
217
-
218
-
219
-
220
-
221
-
222
-
223
-
224
-
225
-
226
-
227
 |
 |
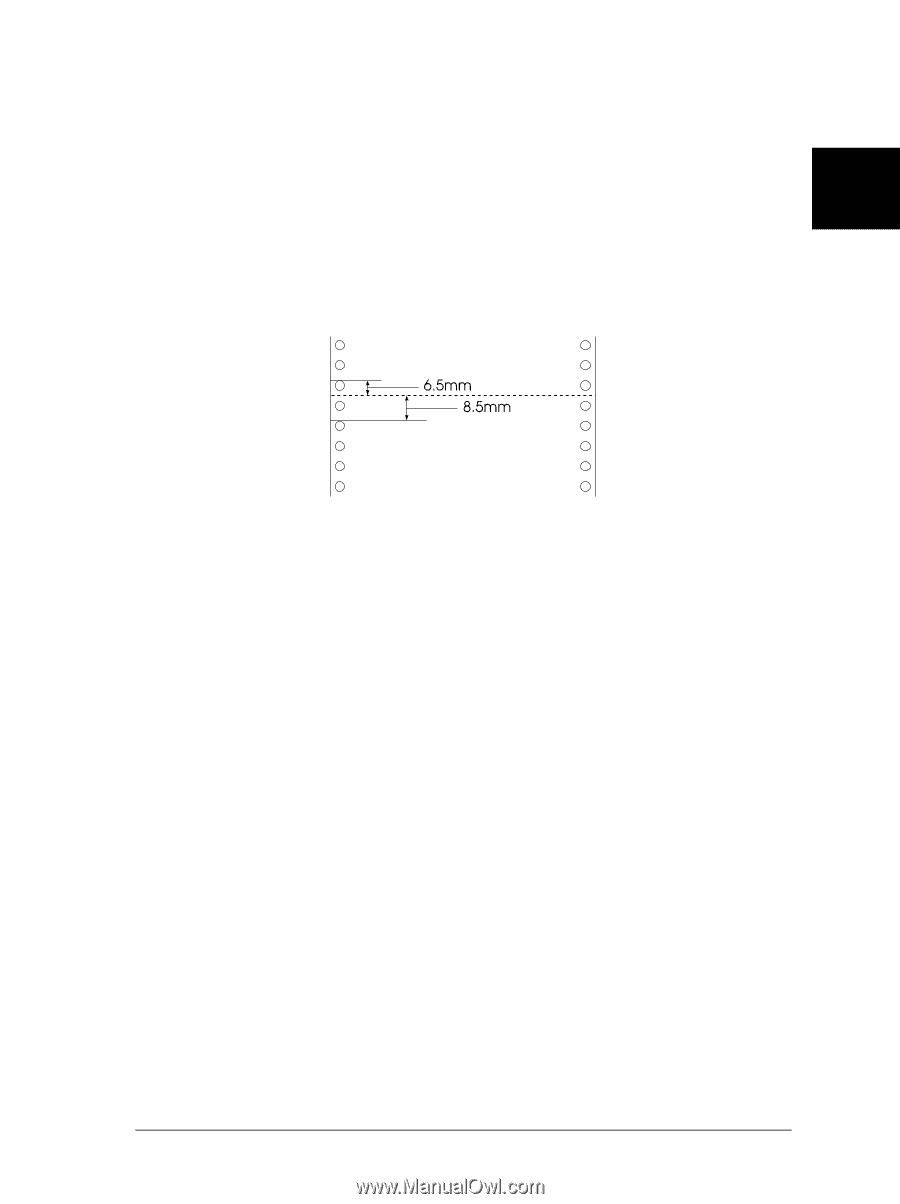
To adjust the top-of-form position for continuous paper
loaded on the pull tractor, see the following example:
First mark a point 6.5 mm (0.26 inch) above the paper’s
perforation; then position the paper so that the mark even
with the top edge of the plastic ribbon cover. This gives you an
8.5 mm (0.33 inch) margin on the next page, meaning the
printer starts printing 8.5 mm below the perforation. If you
mark a point 5.5 mm (0.22 inch) above the perforation, you get
a 9.5 mm (0.37 inch) margin on the next page.
6.
After you set the top-of-form position, press the
Pause
button
to exit micro adjust mode.
(0.26 inch)
(0.33 inch)
2
Printing on Continuous Paper
2-39