Epson FX-2180 User Manual - Page 174
Switching between continuous paper and single- sheet paper in the cut- sheet feeder
 |
View all Epson FX-2180 manuals
Add to My Manuals
Save this manual to your list of manuals |
Page 174 highlights
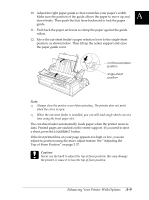
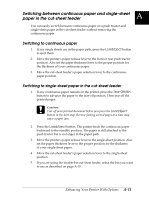
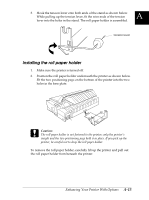
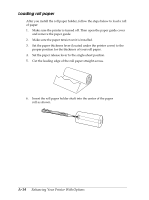
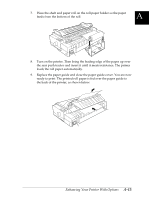
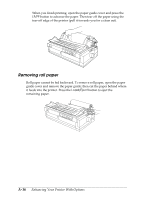
A Switching between continuous paper and single-sheet paper in the cut-sheet feeder You can easily switch between continuous paper on a push tractor and single-sheet paper in the cut-sheet feeder without removing the continuous paper. Switching to continuous paper 1. If any single sheets are in the paper path, press the Load/Eject button to eject them. 2. Move the printer's paper release lever to the front or rear push tractor position. Also set the paper thickness lever to the proper position for the thickness of your continuous paper. 3. Move the cut-sheet feeder's paper selection lever to the continuous paper position. Switching to single-sheet paper in the cut-sheet feeder 1. If any continuous paper remains in the printer, press the Tear Off/Bin button to advance the paper to the tear-off position. Then tear off the printed pages. c Caution: Tear off your printed document before you press the Load/Eject button in the next step. Reverse feeding several pages at a time may cause a paper jam. 2. Press the Load/Eject button. The printer feeds the continuous paper backward to the standby position. The paper is still attached to the push tractor but is no longer in the paper path. 3. Move the printer's paper release lever to the single-sheet position. Also set the paper thickness lever to the proper position for the thickness of your single-sheet paper. 4. Move the cut-sheet feeder's paper selection lever to the single-sheet position. 5. If you are using the double-bin cut-sheet feeder, select the bin you want to use as described on page A-10. Enhancing Your Printer With Options A-11
-
 1
1 -
2
-
3
-
4
-
5
-
6
-
7
-
8
-
9
-
10
-
11
-
12
-
13
-
14
-
15
-
16
-
17
-
18
-
19
-
20
-
21
-
22
-
23
-
24
-
25
-
26
-
27
-
28
-
29
-
30
-
31
-
32
-
33
-
34
-
35
-
36
-
37
-
38
-
39
-
40
-
41
-
42
-
43
-
44
-
45
-
46
-
47
-
48
-
49
-
50
-
51
-
52
-
53
-
54
-
55
-
56
-
57
-
58
-
59
-
60
-
61
-
62
-
63
-
64
-
65
-
66
-
67
-
68
-
69
-
70
-
71
-
72
-
73
-
74
-
75
-
76
-
77
-
78
-
79
-
80
-
81
-
82
-
83
-
84
-
85
-
86
-
87
-
88
-
89
-
90
-
91
-
92
-
93
-
94
-
95
-
96
-
97
-
98
-
99
-
100
-
101
-
102
-
103
-
104
-
105
-
106
-
107
-
108
-
109
-
110
-
111
-
112
-
113
-
114
-
115
-
116
-
117
-
118
-
119
-
120
-
121
-
122
-
123
-
124
-
125
-
126
-
127
-
128
-
129
-
130
-
131
-
132
-
133
-
134
-
135
-
136
-
137
-
138
-
139
-
140
-
141
-
142
-
143
-
144
-
145
-
146
-
147
-
148
-
149
-
150
-
151
-
152
-
153
-
154
-
155
-
156
-
157
-
158
-
159
-
160
-
161
-
162
-
163
-
164
-
165
-
166
-
167
-
168
-
 169
169 -
 170
170 -
 171
171 -
 172
172 -
 173
173 -
 174
174 -
 175
175 -
 176
176 -
 177
177 -
 178
178 -
 179
179 -
180
-
181
-
182
-
183
-
184
-
185
-
186
-
187
-
188
-
189
-
190
-
191
-
192
-
193
-
194
-
195
-
196
-
197
-
198
-
199
-
200
-
201
-
202
-
203
-
204
-
205
-
206
-
207
-
208
-
209
-
210
-
211
-
212
-
213
-
214
-
215
-
216
-
217
-
218
-
219
-
220
-
221
-
222
-
223
-
224
-
225
-
226
-
227
 |
 |