Epson FX-2180 User Manual - Page 122
Using the EPSON Remote! Utility, Installing EPSON Remote, Accessing EPSON Remote - drive
 |
View all Epson FX-2180 manuals
Add to My Manuals
Save this manual to your list of manuals |
Page 122 highlights
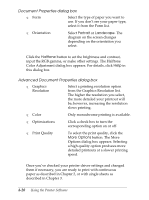
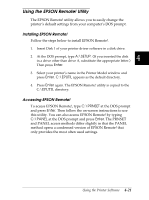
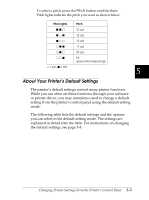
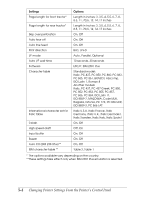
Using the EPSON Remote! Utility The EPSON Remote! utility allows you to easily change the printer's default settings from your computer's DOS prompt. Installing EPSON Remote! Follow the steps below to install EPSON Remote!. 1. Insert Disk 1 of your printer driver software in a disk drive. 4 2. At the DOS prompt, type A:\SETUP. (If you inserted the disk in a drive other than drive A, substitute the appropriate letter.) Then press Enter. 3. Select your printer's name in the Printer Model window and press Enter. C:\EPUTIL appears as the default directory. 4. Press Enter again. The EPSON Remote! utility is copied to the C:\EPUTIL directory. Accessing EPSON Remote! To access EPSON Remote!, type C:\PRNSET at the DOS prompt and press Enter. Then follow the on-screen instructions to use this utility. You can also access EPSON Remote! by typing C:\PANEL at the DOS prompt and press Enter. The PRNSET and PANEL access methods differ slightly in that the PANEL method opens a condensed version of EPSON Remote! that only provides the most often used settings. Using the Printer Software 4-21
-
 1
1 -
2
-
3
-
4
-
5
-
6
-
7
-
8
-
9
-
10
-
11
-
12
-
13
-
14
-
15
-
16
-
17
-
18
-
19
-
20
-
21
-
22
-
23
-
24
-
25
-
26
-
27
-
28
-
29
-
30
-
31
-
32
-
33
-
34
-
35
-
36
-
37
-
38
-
39
-
40
-
41
-
42
-
43
-
44
-
45
-
46
-
47
-
48
-
49
-
50
-
51
-
52
-
53
-
54
-
55
-
56
-
57
-
58
-
59
-
60
-
61
-
62
-
63
-
64
-
65
-
66
-
67
-
68
-
69
-
70
-
71
-
72
-
73
-
74
-
75
-
76
-
77
-
78
-
79
-
80
-
81
-
82
-
83
-
84
-
85
-
86
-
87
-
88
-
89
-
90
-
91
-
92
-
93
-
94
-
95
-
96
-
97
-
98
-
99
-
100
-
101
-
102
-
103
-
104
-
105
-
106
-
107
-
108
-
109
-
110
-
111
-
112
-
113
-
114
-
115
-
116
-
 117
117 -
 118
118 -
 119
119 -
 120
120 -
 121
121 -
 122
122 -
 123
123 -
 124
124 -
 125
125 -
 126
126 -
 127
127 -
128
-
129
-
130
-
131
-
132
-
133
-
134
-
135
-
136
-
137
-
138
-
139
-
140
-
141
-
142
-
143
-
144
-
145
-
146
-
147
-
148
-
149
-
150
-
151
-
152
-
153
-
154
-
155
-
156
-
157
-
158
-
159
-
160
-
161
-
162
-
163
-
164
-
165
-
166
-
167
-
168
-
169
-
170
-
171
-
172
-
173
-
174
-
175
-
176
-
177
-
178
-
179
-
180
-
181
-
182
-
183
-
184
-
185
-
186
-
187
-
188
-
189
-
190
-
191
-
192
-
193
-
194
-
195
-
196
-
197
-
198
-
199
-
200
-
201
-
202
-
203
-
204
-
205
-
206
-
207
-
208
-
209
-
210
-
211
-
212
-
213
-
214
-
215
-
216
-
217
-
218
-
219
-
220
-
221
-
222
-
223
-
224
-
225
-
226
-
227
 |
 |