Epson FX-2180 User Manual - Page 52
Loading Multi- Part Forms, the front or bottom slot and the pull tractor
 |
View all Epson FX-2180 manuals
Add to My Manuals
Save this manual to your list of manuals |
Page 52 highlights
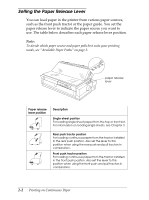
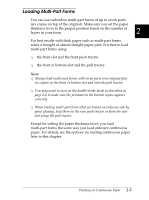
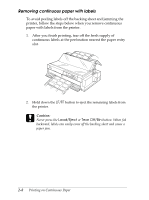
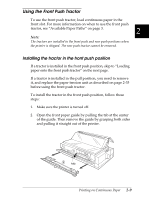
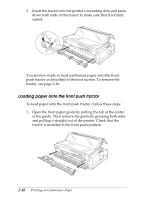
Loading Multi-Part Forms You can use carbonless multi-part forms of up to seven parts (six copies on top of the original). Make sure you set the paper thickness lever to the proper position based on the number of layers in your form. 2 For best results with thick paper such as multi-part forms, select a straight or almost straight paper path. It is best to load multi-part forms using: T the front slot and the front push tractor T the front or bottom slot and the pull tractor Note: T Always load multi-part forms with seven parts (one original plus six copies) in the front or bottom slot and onto the pull tractor. T You may want to turn on the double-strike mode as described on page 2-6 to make sure the printout on the bottom copies appears correctly. T When loading multi-part forms that are bound on only one side by point glueing, load them on the rear push tractor or from the rear slot using the pull tractor. Except for setting the paper thickness lever, you load multi-part forms the same way you load ordinary continuous paper. For details, see the sections on loading continuous paper later in this chapter. Printing on Continuous Paper 2-5
-
 1
1 -
2
-
3
-
4
-
5
-
6
-
7
-
8
-
9
-
10
-
11
-
12
-
13
-
14
-
15
-
16
-
17
-
18
-
19
-
20
-
21
-
22
-
23
-
24
-
25
-
26
-
27
-
28
-
29
-
30
-
31
-
32
-
33
-
34
-
35
-
36
-
37
-
38
-
39
-
40
-
41
-
42
-
43
-
44
-
45
-
46
-
 47
47 -
 48
48 -
 49
49 -
 50
50 -
 51
51 -
 52
52 -
 53
53 -
 54
54 -
 55
55 -
 56
56 -
 57
57 -
58
-
59
-
60
-
61
-
62
-
63
-
64
-
65
-
66
-
67
-
68
-
69
-
70
-
71
-
72
-
73
-
74
-
75
-
76
-
77
-
78
-
79
-
80
-
81
-
82
-
83
-
84
-
85
-
86
-
87
-
88
-
89
-
90
-
91
-
92
-
93
-
94
-
95
-
96
-
97
-
98
-
99
-
100
-
101
-
102
-
103
-
104
-
105
-
106
-
107
-
108
-
109
-
110
-
111
-
112
-
113
-
114
-
115
-
116
-
117
-
118
-
119
-
120
-
121
-
122
-
123
-
124
-
125
-
126
-
127
-
128
-
129
-
130
-
131
-
132
-
133
-
134
-
135
-
136
-
137
-
138
-
139
-
140
-
141
-
142
-
143
-
144
-
145
-
146
-
147
-
148
-
149
-
150
-
151
-
152
-
153
-
154
-
155
-
156
-
157
-
158
-
159
-
160
-
161
-
162
-
163
-
164
-
165
-
166
-
167
-
168
-
169
-
170
-
171
-
172
-
173
-
174
-
175
-
176
-
177
-
178
-
179
-
180
-
181
-
182
-
183
-
184
-
185
-
186
-
187
-
188
-
189
-
190
-
191
-
192
-
193
-
194
-
195
-
196
-
197
-
198
-
199
-
200
-
201
-
202
-
203
-
204
-
205
-
206
-
207
-
208
-
209
-
210
-
211
-
212
-
213
-
214
-
215
-
216
-
217
-
218
-
219
-
220
-
221
-
222
-
223
-
224
-
225
-
226
-
227
 |
 |