Epson Stylus Pro 3880 Designer Edition User's Guide - Page 104
Aligning the print head manually, Menu/Right, Paper Feed/Down, Ink Cover Open/Up
 |
View all Epson Stylus Pro 3880 Designer Edition manuals
Add to My Manuals
Save this manual to your list of manuals |
Page 104 highlights
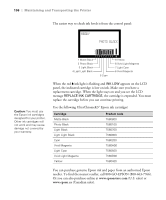
104 | Maintaining and Transporting the Printer 5. Press d or u to select the type of paper you loaded: PREM. GLOSSY/LUSTER, P Q INK JET PAPER (Epson Presentation Paper Matte), or ENHANCED MATTE PAPER (Ultra Premium Presentation Paper Matte). Then press r. 6. Press Enter to start printing. After printing is complete, the printer starts aligning the print head. It takes several minutes to run the head alignment. The printer's white beam sensor reads the alignment pattern and adjusts the printer automatically. Make sure you don't open the top cover or turn off the printer during this process. If you want to verify or fine-tune the alignment process, you can perform a manual head alignment. Aligning the print head manually When you want to use the non-Epson special media, you can perform the head alignment manually. To perform head alignment manually, follow the steps below. 1. Press the Menu/Right r button to enter Menu mode. 2. Press the Paper Feed/Down d or Ink Cover Open/Up u button to display HEAD ALIGNMENT, and press the Menu/Right r button. 3. Press the Paper Feed/Down d or Ink Cover Open/Up u button to select MANUAL, and then press the Menu/Right r button. 4. Press the Paper Feed/Down d or Ink Cover Open/Up u button to select actual paper thickness value between 0.1 mm and 0.5 mm. 5. Press the Menu/Right r button to register your value. 5-104
-
 1
1 -
2
-
3
-
4
-
5
-
6
-
7
-
8
-
9
-
10
-
11
-
12
-
13
-
14
-
15
-
16
-
17
-
18
-
19
-
20
-
21
-
22
-
23
-
24
-
25
-
26
-
27
-
28
-
29
-
30
-
31
-
32
-
33
-
34
-
35
-
36
-
37
-
38
-
39
-
40
-
41
-
42
-
43
-
44
-
45
-
46
-
47
-
48
-
49
-
50
-
51
-
52
-
53
-
54
-
55
-
56
-
57
-
58
-
59
-
60
-
61
-
62
-
63
-
64
-
65
-
66
-
67
-
68
-
69
-
70
-
71
-
72
-
73
-
74
-
75
-
76
-
77
-
78
-
79
-
80
-
81
-
82
-
83
-
84
-
85
-
86
-
87
-
88
-
89
-
90
-
91
-
92
-
93
-
94
-
95
-
96
-
97
-
98
-
 99
99 -
 100
100 -
 101
101 -
 102
102 -
 103
103 -
 104
104 -
 105
105 -
 106
106 -
 107
107 -
 108
108 -
 109
109 -
110
-
111
-
112
-
113
-
114
-
115
-
116
-
117
-
118
-
119
-
120
-
121
-
122
-
123
-
124
-
125
-
126
-
127
-
128
-
129
-
130
-
131
-
132
-
133
-
134
-
135
-
136
-
137
-
138
-
139
-
140
-
141
-
142
-
143
-
144
-
145
-
146
-
147
-
148
-
149
-
150
-
151
-
152
-
153
-
154
 |
 |
