Epson Stylus Pro 3880 Designer Edition User's Guide - Page 64
option as follows, Choose one of the following
 |
View all Epson Stylus Pro 3880 Designer Edition manuals
Add to My Manuals
Save this manual to your list of manuals |
Page 64 highlights
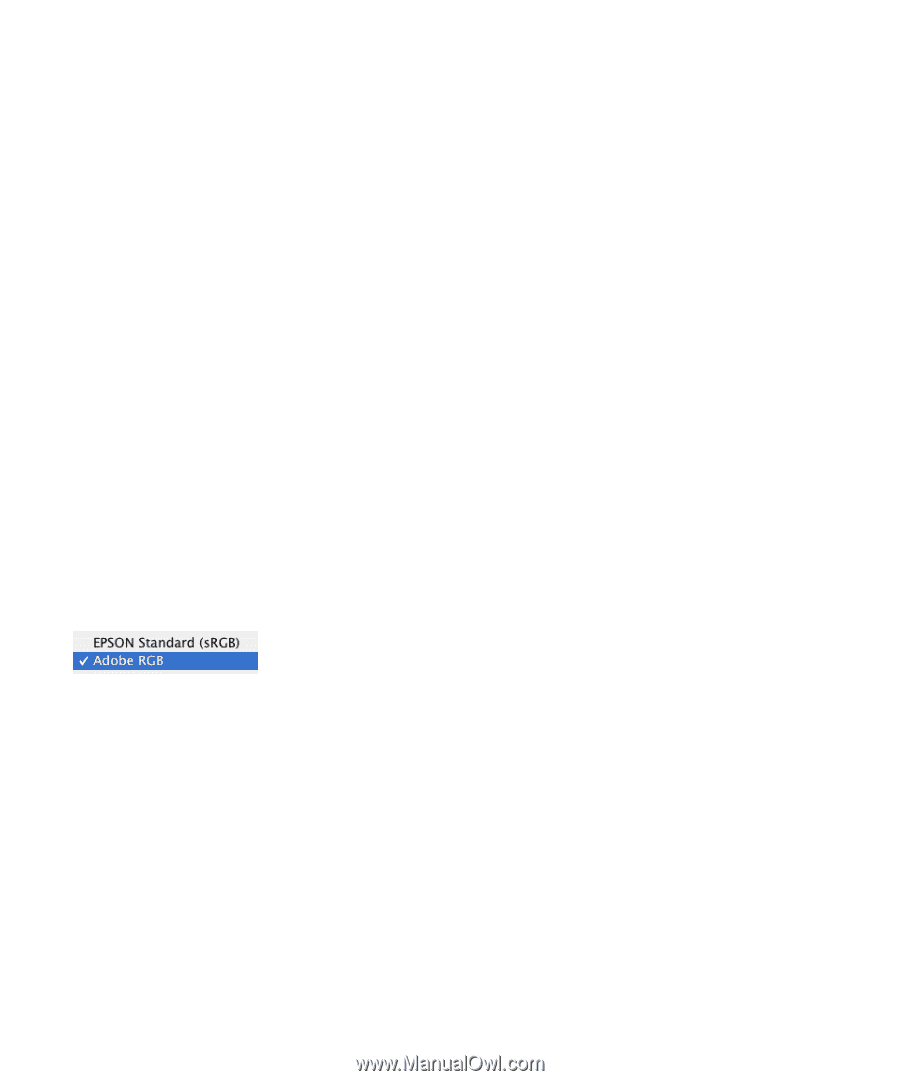
64 | Printing with Epson Drivers for Macintosh Note: Check the Epson Pro Imaging website at proimaging.epson.com or your authorized Epson dealer for other media that may be available. Note: The Print Quality settings available depend on the Media Type you selected. Choose lower print quality for faster printing, or SuperPhoto 2880dpi for best quality. 4. Select the Media Type that corresponds to the paper you are printing on. If you are using a color-managed workflow, make sure you choose media type and resolution settings that match the ICC profile you are using. If your paper is not listed, check the instructions included with the paper, or look on the Epson Pro Imaging website at proimaging.epson.com. If you are using non-Epson paper, choose the closest setting. You may have to experiment with different settings to determine which one is best for the media you're using. 5. For the Color setting, select Color for any type of photographic printing. Choose Advanced B&W Photo to print black-and-white photos on certain paper types; see page 70. (For paper types that don't support this option, print black-and-white photos with the Color setting.) Select Black only if you're printing line drawings or other non-photographic images. 6. Set the Mode option as follows: • Select Automatic to have the printer driver analyze the contents of your image or file and make the appropriate printing adjustments. If a Quality/Speed slider appears in the Mode box, set it according to the priorities of your print job. You can choose one of the mode settings shown at the left: EPSON Standard (sRGB) increases the contrast in images. Use this setting for most color photographs. Adobe RGB matches image colors to the Adobe RGB color standard. 7. Select Advanced Settings to access additional options, as described below. 8. Choose one of the following Print Quality settings: • Draft • Normal - 360dpi • Fine - 720dpi • SuperFine - 1440dpi 3-64
-
 1
1 -
2
-
3
-
4
-
5
-
6
-
7
-
8
-
9
-
10
-
11
-
12
-
13
-
14
-
15
-
16
-
17
-
18
-
19
-
20
-
21
-
22
-
23
-
24
-
25
-
26
-
27
-
28
-
29
-
30
-
31
-
32
-
33
-
34
-
35
-
36
-
37
-
38
-
39
-
40
-
41
-
42
-
43
-
44
-
45
-
46
-
47
-
48
-
49
-
50
-
51
-
52
-
53
-
54
-
55
-
56
-
57
-
58
-
 59
59 -
 60
60 -
 61
61 -
 62
62 -
 63
63 -
 64
64 -
 65
65 -
 66
66 -
 67
67 -
 68
68 -
 69
69 -
70
-
71
-
72
-
73
-
74
-
75
-
76
-
77
-
78
-
79
-
80
-
81
-
82
-
83
-
84
-
85
-
86
-
87
-
88
-
89
-
90
-
91
-
92
-
93
-
94
-
95
-
96
-
97
-
98
-
99
-
100
-
101
-
102
-
103
-
104
-
105
-
106
-
107
-
108
-
109
-
110
-
111
-
112
-
113
-
114
-
115
-
116
-
117
-
118
-
119
-
120
-
121
-
122
-
123
-
124
-
125
-
126
-
127
-
128
-
129
-
130
-
131
-
132
-
133
-
134
-
135
-
136
-
137
-
138
-
139
-
140
-
141
-
142
-
143
-
144
-
145
-
146
-
147
-
148
-
149
-
150
-
151
-
152
-
153
-
154
 |
 |