Epson Stylus Pro 3880 Designer Edition User's Guide - Page 15
Chap 1-Setting Up the Printer On a Network, Connecting to the Network
 |
View all Epson Stylus Pro 3880 Designer Edition manuals
Add to My Manuals
Save this manual to your list of manuals |
Page 15 highlights
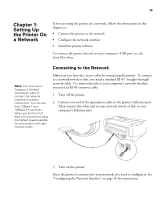
15 Chapter 1: Setting Up the Printer On a Network If you are using the printer on a network, follow the instructions in this chapter to: • Connect the printer to the network • Configure the network interface • Install the printer software To connect the printer directly to your computer's USB port, see the Start Here sheet. Connecting to the Network Note: You must use a Category 5 shielded twisted-pair cable to connect the network interface to prevent malfunction. You can use both 10Base-T and 100Base-TX networks. When you print a lot of data, we recommend using the highest speed available for your product with light network traffic. Make sure you have the correct cable for connecting the printer. To connect to a network switch or hub, you need a standard RJ-45 "straight-through" network cable. To connect directly to your computer's network interface, you need an RJ-45 crossover cable. 1. Turn off the printer. 2. Connect one end of the appropriate cable to the printer's Ethernet port. Then connect the other end to your network switch or hub or your computer's Ethernet port. 3. Turn on the printer. Once the printer is connected to your network, you need to configure it. See "Configuring the Network Interface" on page 16 for instructions. 15
-
 1
1 -
2
-
3
-
4
-
5
-
6
-
7
-
8
-
9
-
 10
10 -
 11
11 -
 12
12 -
 13
13 -
 14
14 -
 15
15 -
 16
16 -
 17
17 -
 18
18 -
 19
19 -
 20
20 -
21
-
22
-
23
-
24
-
25
-
26
-
27
-
28
-
29
-
30
-
31
-
32
-
33
-
34
-
35
-
36
-
37
-
38
-
39
-
40
-
41
-
42
-
43
-
44
-
45
-
46
-
47
-
48
-
49
-
50
-
51
-
52
-
53
-
54
-
55
-
56
-
57
-
58
-
59
-
60
-
61
-
62
-
63
-
64
-
65
-
66
-
67
-
68
-
69
-
70
-
71
-
72
-
73
-
74
-
75
-
76
-
77
-
78
-
79
-
80
-
81
-
82
-
83
-
84
-
85
-
86
-
87
-
88
-
89
-
90
-
91
-
92
-
93
-
94
-
95
-
96
-
97
-
98
-
99
-
100
-
101
-
102
-
103
-
104
-
105
-
106
-
107
-
108
-
109
-
110
-
111
-
112
-
113
-
114
-
115
-
116
-
117
-
118
-
119
-
120
-
121
-
122
-
123
-
124
-
125
-
126
-
127
-
128
-
129
-
130
-
131
-
132
-
133
-
134
-
135
-
136
-
137
-
138
-
139
-
140
-
141
-
142
-
143
-
144
-
145
-
146
-
147
-
148
-
149
-
150
-
151
-
152
-
153
-
154
 |
 |
