HTC DROID INCREDIBLE by Verizon User Manual (supporting Android 2.2) - Page 100
Attach, Picture, Camera, Video, Camcorder, Audio, Voice Recorder, Music & sounds, Location
 |
View all HTC DROID INCREDIBLE by Verizon manuals
Add to My Manuals
Save this manual to your list of manuals |
Page 100 highlights
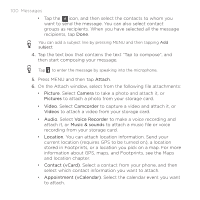
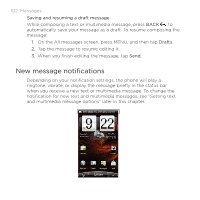
100 Messages Tap the icon, and then select the contacts to whom you want to send the message. You can also select contact groups as recipients. When you have selected all the message recipients, tap Done. You can add a subject line by pressing MENU and then tapping Add subject. 4. Tap the text box that contains the text "Tap to compose", and then start composing your message. Tap to enter the message by speaking into the microphone. 5. Press MENU and then tap Attach. 6. On the Attach window, select from the following file attachments: Picture. Select Camera to take a photo and attach it, or Pictures to attach a photo from your storage card. Video. Select Camcorder to capture a video and attach it, or Videos to attach a video from your storage card. Audio. Select Voice Recorder to make a voice recording and attach it, or Music & sounds to attach a music file or voice recording from your storage card. Location. You can attach location information. Send your current location (requires GPS to be turned on), a location stored in Footprints, or a location you pick on a map. For more information about GPS, maps, and Footprints, see the Maps and location chapter. Contact (vCard). Select a contact from your phone, and then select which contact information you want to attach. Appointment (vCalendar). Select the calendar event you want to attach.
-
 1
1 -
2
-
3
-
4
-
5
-
6
-
7
-
8
-
9
-
10
-
11
-
12
-
13
-
14
-
15
-
16
-
17
-
18
-
19
-
20
-
21
-
22
-
23
-
24
-
25
-
26
-
27
-
28
-
29
-
30
-
31
-
32
-
33
-
34
-
35
-
36
-
37
-
38
-
39
-
40
-
41
-
42
-
43
-
44
-
45
-
46
-
47
-
48
-
49
-
50
-
51
-
52
-
53
-
54
-
55
-
56
-
57
-
58
-
59
-
60
-
61
-
62
-
63
-
64
-
65
-
66
-
67
-
68
-
69
-
70
-
71
-
72
-
73
-
74
-
75
-
76
-
77
-
78
-
79
-
80
-
81
-
82
-
83
-
84
-
85
-
86
-
87
-
88
-
89
-
90
-
91
-
92
-
93
-
94
-
 95
95 -
 96
96 -
 97
97 -
 98
98 -
 99
99 -
 100
100 -
 101
101 -
 102
102 -
 103
103 -
 104
104 -
 105
105 -
106
-
107
-
108
-
109
-
110
-
111
-
112
-
113
-
114
-
115
-
116
-
117
-
118
-
119
-
120
-
121
-
122
-
123
-
124
-
125
-
126
-
127
-
128
-
129
-
130
-
131
-
132
-
133
-
134
-
135
-
136
-
137
-
138
-
139
-
140
-
141
-
142
-
143
-
144
-
145
-
146
-
147
-
148
-
149
-
150
-
151
-
152
-
153
-
154
-
155
-
156
-
157
-
158
-
159
-
160
-
161
-
162
-
163
-
164
-
165
-
166
-
167
-
168
-
169
-
170
-
171
-
172
-
173
-
174
-
175
-
176
-
177
-
178
-
179
-
180
-
181
-
182
-
183
-
184
-
185
-
186
-
187
-
188
-
189
-
190
-
191
-
192
-
193
-
194
-
195
-
196
-
197
-
198
-
199
-
200
-
201
-
202
-
203
-
204
-
205
-
206
-
207
-
208
-
209
-
210
-
211
-
212
-
213
-
214
-
215
-
216
-
217
-
218
-
219
-
220
-
221
-
222
-
223
-
224
-
225
-
226
-
227
-
228
-
229
-
230
-
231
-
232
-
233
-
234
-
235
-
236
-
237
-
238
-
239
-
240
-
241
-
242
-
243
-
244
-
245
-
246
-
247
-
248
-
249
-
250
-
251
-
252
-
253
-
254
-
255
-
256
-
257
-
258
-
259
-
260
-
261
-
262
-
263
-
264
-
265
-
266
-
267
-
268
-
269
-
270
-
271
-
272
-
273
-
274
-
275
-
276
-
277
-
278
-
279
-
280
-
281
-
282
-
283
-
284
-
285
-
286
-
287
-
288
-
289
-
290
-
291
-
292
-
293
-
294
-
295
-
296
-
297
-
298
-
299
-
300
-
301
-
302
-
303
-
304
-
305
-
306
-
307
-
308
 |
 |