HP 4300 Service Manual - Page 285
Output Paper Path Open, Perform Printer Maintenance - laserjet 4200 manual
 |
UPC - 808736312264
View all HP 4300 manuals
Add to My Manuals
Save this manual to your list of manuals |
Page 285 highlights
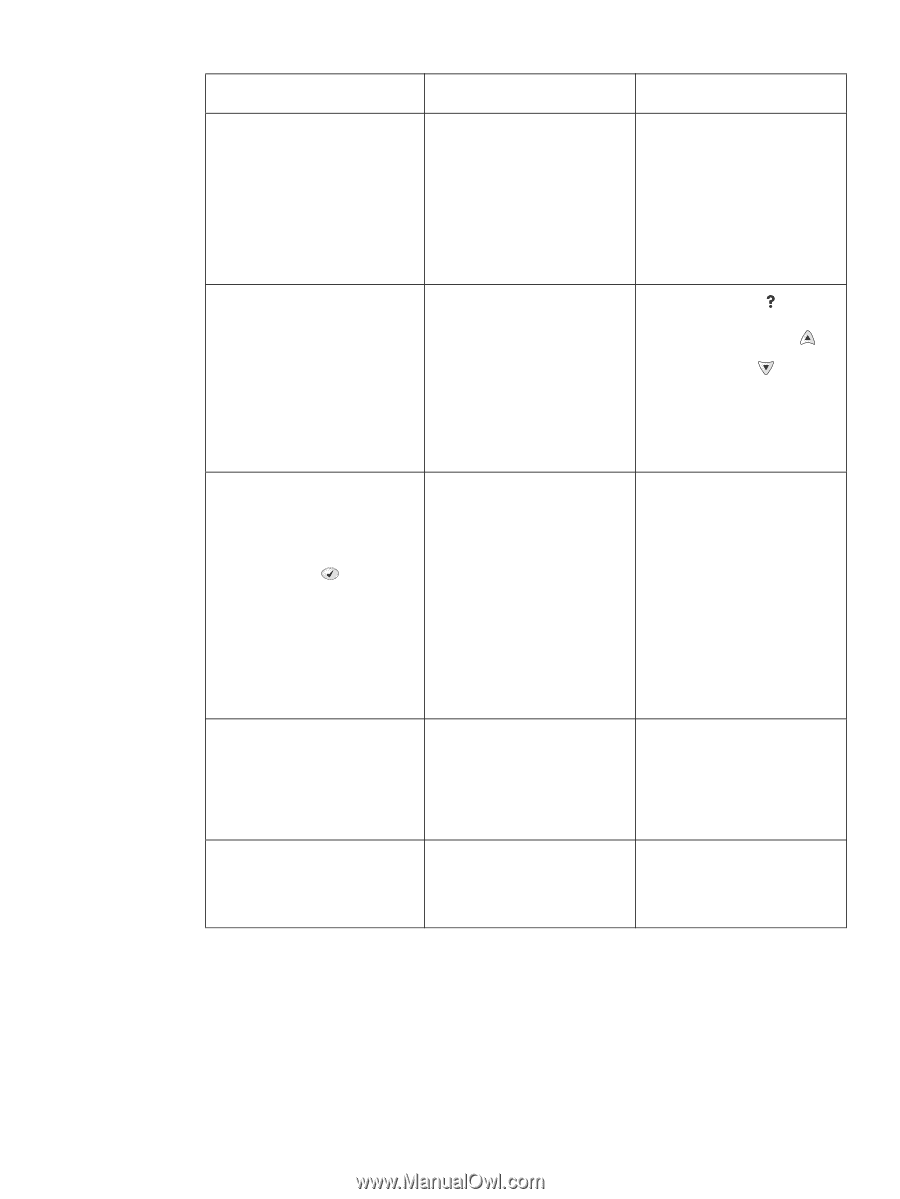
Table 41. Alphabetical printer messages (continued) Message Description Action OUTPUT BIN 1 FULL REMOVE ALL PAPER FROM BIN Note: The stacker or stapler/stacker LED blinks in amber. The stacker or stapler/stacker output bin is full and must be emptied in order to continue printing. 1. Remove the media from the output bin. 2. If the error persists, verify that the output bin flapper (the four plastic paddles hanging down in front of the output bin rollers) can move freely. 3. Replace the stacker or stapler/stacker. OUTPUT PAPER PATH OPEN The jam-access door or the staple 1. Press the HELP ( ) button cartridge door is open. for detailed information. Note: 2. Press the UP ARROW ( ) The stacker or stapler/stacker LED button and the blinks in amber. DOWN ARROW ( ) button to step through the instructions. 3. Close the open door. 4. If this message persists, replace the stacker or stapler/ stacker. PERFORM PRINTER MAINTENANCE alternates with READY For menus press To ensure optimum print quality, Install an HP LaserJet 4200/4300 the printer prompts you to perform printer maintenance kit. See the routine maintenance every instructions that come with this kit. 200,000 pages (default setting). -or- q Q2429A; 110 V printer kit for the HP LaserJet 4200 Continue printing and order a q Q2436A; 110 V printer kit printer maintenance kit for the HP LaserJet 4300 q Q2430A; 220 V printer kit for the HP LaserJet 4200 q Q2437A; 220 V printer kit For information about how to order a maintenance kit, see chapter 8 in this manual. for the HP LaserJet 4300 PERFORMING UPGRADE A firmware upgrade is in progress. CAUTION Do not turn the printer off until the printer returns to the Ready state. The printer will be damaged if the power is turned off during a firmware upgrade. PRINTING... REGISTRATION PAGE The printer is generating the registration page. The printer will return to the Ready state when the page is completed. Follow the instructions on the printed pages. Q2431-90912 Chapter 7 Troubleshooting 265
-
 1
1 -
2
-
3
-
4
-
5
-
6
-
7
-
8
-
9
-
10
-
11
-
12
-
13
-
14
-
15
-
16
-
17
-
18
-
19
-
20
-
21
-
22
-
23
-
24
-
25
-
26
-
27
-
28
-
29
-
30
-
31
-
32
-
33
-
34
-
35
-
36
-
37
-
38
-
39
-
40
-
41
-
42
-
43
-
44
-
45
-
46
-
47
-
48
-
49
-
50
-
51
-
52
-
53
-
54
-
55
-
56
-
57
-
58
-
59
-
60
-
61
-
62
-
63
-
64
-
65
-
66
-
67
-
68
-
69
-
70
-
71
-
72
-
73
-
74
-
75
-
76
-
77
-
78
-
79
-
80
-
81
-
82
-
83
-
84
-
85
-
86
-
87
-
88
-
89
-
90
-
91
-
92
-
93
-
94
-
95
-
96
-
97
-
98
-
99
-
100
-
101
-
102
-
103
-
104
-
105
-
106
-
107
-
108
-
109
-
110
-
111
-
112
-
113
-
114
-
115
-
116
-
117
-
118
-
119
-
120
-
121
-
122
-
123
-
124
-
125
-
126
-
127
-
128
-
129
-
130
-
131
-
132
-
133
-
134
-
135
-
136
-
137
-
138
-
139
-
140
-
141
-
142
-
143
-
144
-
145
-
146
-
147
-
148
-
149
-
150
-
151
-
152
-
153
-
154
-
155
-
156
-
157
-
158
-
159
-
160
-
161
-
162
-
163
-
164
-
165
-
166
-
167
-
168
-
169
-
170
-
171
-
172
-
173
-
174
-
175
-
176
-
177
-
178
-
179
-
180
-
181
-
182
-
183
-
184
-
185
-
186
-
187
-
188
-
189
-
190
-
191
-
192
-
193
-
194
-
195
-
196
-
197
-
198
-
199
-
200
-
201
-
202
-
203
-
204
-
205
-
206
-
207
-
208
-
209
-
210
-
211
-
212
-
213
-
214
-
215
-
216
-
217
-
218
-
219
-
220
-
221
-
222
-
223
-
224
-
225
-
226
-
227
-
228
-
229
-
230
-
231
-
232
-
233
-
234
-
235
-
236
-
237
-
238
-
239
-
240
-
241
-
242
-
243
-
244
-
245
-
246
-
247
-
248
-
249
-
250
-
251
-
252
-
253
-
254
-
255
-
256
-
257
-
258
-
259
-
260
-
261
-
262
-
263
-
264
-
265
-
266
-
267
-
268
-
269
-
270
-
271
-
272
-
273
-
274
-
275
-
276
-
277
-
278
-
279
-
 280
280 -
 281
281 -
 282
282 -
 283
283 -
 284
284 -
 285
285 -
 286
286 -
 287
287 -
 288
288 -
 289
289 -
 290
290 -
291
-
292
-
293
-
294
-
295
-
296
-
297
-
298
-
299
-
300
-
301
-
302
-
303
-
304
-
305
-
306
-
307
-
308
-
309
-
310
-
311
-
312
-
313
-
314
-
315
-
316
-
317
-
318
-
319
-
320
-
321
-
322
-
323
-
324
-
325
-
326
-
327
-
328
-
329
-
330
-
331
-
332
-
333
-
334
-
335
-
336
-
337
-
338
-
339
-
340
-
341
-
342
-
343
-
344
-
345
-
346
-
347
-
348
-
349
-
350
-
351
-
352
-
353
-
354
-
355
-
356
-
357
-
358
-
359
-
360
-
361
-
362
-
363
-
364
-
365
-
366
-
367
-
368
-
369
-
370
-
371
-
372
-
373
-
374
-
375
-
376
-
377
-
378
-
379
-
380
-
381
-
382
-
383
-
384
-
385
-
386
-
387
-
388
-
389
-
390
-
391
-
392
-
393
-
394
-
395
-
396
-
397
-
398
-
399
-
400
-
401
-
402
-
403
-
404
-
405
-
406
-
407
-
408
-
409
-
410
-
411
-
412
-
413
-
414
-
415
-
416
-
417
-
418
-
419
-
420
-
421
-
422
-
423
-
424
-
425
-
426
-
427
-
428
-
429
-
430
-
431
-
432
-
433
-
434
-
435
-
436
-
437
-
438
-
439
-
440
-
441
-
442
-
443
-
444
-
445
-
446
-
447
-
448
-
449
-
450
-
451
-
452
 |
 |