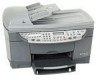
HP 7110 HP Officejet 7100 series all-in-one - (English) Reference Guide - Page 11
make a copy, enhance your copy - officejet en
 |
View all HP 7110 manuals
Add to My Manuals
Save this manual to your list of manuals |
Page 11 highlights
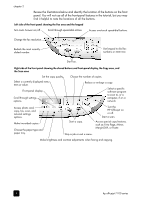
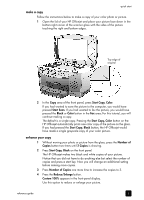
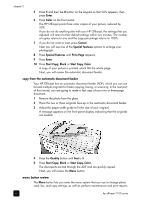
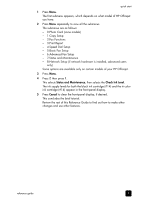
quick start make a copy Follow the instructions below to make a copy of your color photo or picture. 1 Open the lid of your HP Officejet and place your picture face down in the bottom-right corner of the scanner glass with the sides of the picture touching the right and bottom edges. Top edge of original 2 In the Copy area of the front panel, press Start Copy, Color. If you had wanted to save the picture to the computer, you would have pressed Start Scan. If you had wanted to fax the picture, you would have pressed the Black or Color button in the Fax area. For this tutorial, you will continue making a copy. The default is a single copy. Pressing the Start Copy, Color button on the HP Officejet automatically prints one color copy of the picture on the glass. If you had pressed the Start Copy, Black button, the HP Officejet would have made a single grayscale copy of your color picture. enhance your copy 1 Without moving your photo or picture from the glass, press the Number of Copies button two times until 2 Copies is showing. 2 Press Start Copy, Black on the front panel. The HP Officejet makes two black and white copies of your picture. Notice that you did not have to do anything else but select the number of copies and press a start key. Now you will change an additional setting before making more copies. 3 Press Number of Copies one more time to increase the copies to 3. 4 Press the Reduce/Enlarge button. Custom 100% appears in the front-panel display. Use this option to reduce or enlarge your picture. reference guide 5
-
 1
1 -
2
-
3
-
4
-
5
-
 6
6 -
 7
7 -
 8
8 -
 9
9 -
 10
10 -
 11
11 -
 12
12 -
 13
13 -
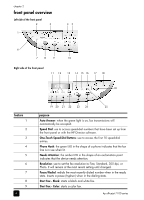 14
14 -
 15
15 -
 16
16 -
17
-
18
-
19
-
20
-
21
-
22
-
23
-
24
-
25
-
26
-
27
-
28
-
29
-
30
-
31
-
32
-
33
-
34
-
35
-
36
-
37
-
38
-
39
-
40
-
41
-
42
-
43
-
44
-
45
-
46
-
47
-
48
-
49
-
50
-
51
-
52
-
53
-
54
-
55
-
56
-
57
-
58
-
59
-
60
-
61
-
62
-
63
-
64
-
65
-
66
-
67
-
68
-
69
-
70
-
71
-
72
-
73
-
74
-
75
-
76
-
77
-
78
-
79
-
80
-
81
-
82
-
83
-
84
-
85
-
86
-
87
-
88
-
89
-
90
-
91
-
92
-
93
-
94
-
95
-
96
 |
 |
