HP 7110 HP Officejet 7100 series all-in-one - (English) Reference Guide - Page 72
clean the printheads, clean the ink cartridge contacts, Perform 4800 Optimized DPI Alignment - officejet scanner error
 |
View all HP 7110 manuals
Add to My Manuals
Save this manual to your list of manuals |
Page 72 highlights
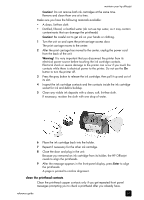
chapter 8 3 Load the top of the second alignment sheet, which is named Instructions to Perform 4800 Optimized DPI Alignment, face down on the scanner glass in the front, right corner. 4 Press Enter on the front panel when prompted. 5 The process may take a several minutes. When 4800 optimized align complete displays, the alignment process is complete. to troubleshoot the alignment process If an error occurs after the first alignment page is printed, you may receive an error message on the display of the front panel or a blank page will print. Verify the following items: - Make sure that you have removed the nozzle tape from all printheads. - Make sure that you are using clean sheets of A4 or letter sized plain white paper. Do not use special, photo, odd-sized, color, or previously marked paper. - If you have two input trays, make sure that you have the plain white paper loaded in the upper tray. - Make sure that the paper in the input tray is not skewing during the printing of the alignment pattern. If necessary, reload the paper in the input tray. If an error occurs after you scan the second alignment page, verify the following items: - Be sure that you are using the Instructions to Perform 4800 Optimized DPI Alignment page when performing the scanning process. - Make sure that you have positioned the second alignment page properly on the scanner glass. The alignment page should be placed on the front, right corner of the glass. The scan will fail if the page is positioned improperly or placed print side up. - Make sure that the paper in the input tray is not skewing during the printing of the alignment pattern. If necessary, reload the paper in the input tray. After correcting the problem, restart the alignment process. clean the printheads Use this feature when the Self-Test Report shows streaking or white lines through any of the colored bars. Do not clean printheads unnecessarily. This wastes ink and shortens the life of your printheads. 1 Press Menu. 2 Press 7, then press 2. This selects the Status and Maintenance menu, then selects the Clean PrintHeads option. If copy or print quality still seem poor after you clean the printheads, replace the printhead that is affected. clean the ink cartridge contacts Clean the ink cartridge contacts only if you get repeated front panel messages prompting you to check a cartridge after you already have. 66 hp officejet 7100 series
-
 1
1 -
2
-
3
-
4
-
5
-
6
-
7
-
8
-
9
-
10
-
11
-
12
-
13
-
14
-
15
-
16
-
17
-
18
-
19
-
20
-
21
-
22
-
23
-
24
-
25
-
26
-
27
-
28
-
29
-
30
-
31
-
32
-
33
-
34
-
35
-
36
-
37
-
38
-
39
-
40
-
41
-
42
-
43
-
44
-
45
-
46
-
47
-
48
-
49
-
50
-
51
-
52
-
53
-
54
-
55
-
56
-
57
-
58
-
59
-
60
-
61
-
62
-
63
-
64
-
65
-
66
-
 67
67 -
 68
68 -
 69
69 -
 70
70 -
 71
71 -
 72
72 -
 73
73 -
 74
74 -
 75
75 -
 76
76 -
 77
77 -
78
-
79
-
80
-
81
-
82
-
83
-
84
-
85
-
86
-
87
-
88
-
89
-
90
-
91
-
92
-
93
-
94
-
95
-
96
 |
 |
