HP 7110 HP Officejet 7100 series all-in-one - (English) Reference Guide - Page 25
load paper, Lift the output tray up until it catches in the raised position, and slide - review
 |
View all HP 7110 manuals
Add to My Manuals
Save this manual to your list of manuals |
Page 25 highlights
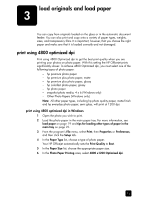
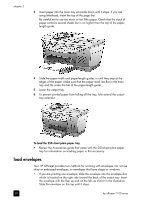
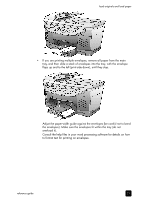
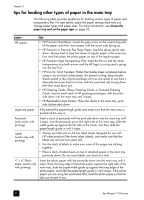
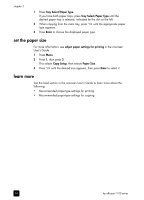
load originals and load paper load paper Following is the basic procedure for loading paper. There are specific considerations for loading certain types of paper, transparency film, and envelopes. After you review this procedure, see tips for loading other types of paper in the main tray on page 22 and load envelopes on page 20. For best results, adjust the paper settings each time you change paper types or paper sizes. For more information, see choose the paper tray and set the paper type on page 23. If you have the HP 250-sheet plain paper tray, you can load paper into both the main paper tray and the 250-sheet plain paper tray. If you have the 250-sheet plain paper tray, you should use it for plain paper only. Please refer to the Accessories guide that comes with the paper tray for information about installing the tray, loading paper, and adjusting paper-width and paper-length guides. Caution! You must also have the two-sided printing accessory installed to use the 250-sheet plain paper tray. to load the main paper tray 1 Lift the output tray up until it catches in the raised position, and slide the paper-width and paper-length guides to their outermost positions. 2 Tap the stack on a flat surface to align the edges of the paper, and then check the paper for the following: - Make sure it is free of rips, dust, wrinkles, and curled or bent edges. - Make sure all the paper in the stack is the same size and type, unless you are working with photo paper. reference guide 19
-
 1
1 -
2
-
3
-
4
-
5
-
6
-
7
-
8
-
9
-
10
-
11
-
12
-
13
-
14
-
15
-
16
-
17
-
18
-
19
-
 20
20 -
 21
21 -
 22
22 -
 23
23 -
 24
24 -
 25
25 -
 26
26 -
 27
27 -
 28
28 -
 29
29 -
 30
30 -
31
-
32
-
33
-
34
-
35
-
36
-
37
-
38
-
39
-
40
-
41
-
42
-
43
-
44
-
45
-
46
-
47
-
48
-
49
-
50
-
51
-
52
-
53
-
54
-
55
-
56
-
57
-
58
-
59
-
60
-
61
-
62
-
63
-
64
-
65
-
66
-
67
-
68
-
69
-
70
-
71
-
72
-
73
-
74
-
75
-
76
-
77
-
78
-
79
-
80
-
81
-
82
-
83
-
84
-
85
-
86
-
87
-
88
-
89
-
90
-
91
-
92
-
93
-
94
-
95
-
96
 |
 |
