HP 7110 HP Officejet 7100 series all-in-one - (English) Reference Guide - Page 66
If there is plastic tape on the failed printhead, remove the plastic tape. - officejet printheads
 |
View all HP 7110 manuals
Add to My Manuals
Save this manual to your list of manuals |
Page 66 highlights
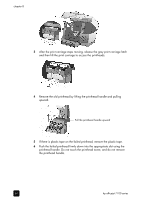
chapter 8 3 After the print carriage stops moving, release the gray print carriage latch and then lift the print carriage to access the printheads. 4 Remove the old printhead by lifting the printhead handle and pulling upward. Pull the printhead handle upward 5 If there is plastic tape on the failed printhead, remove the plastic tape. 6 Push the failed printhead firmly down into the appropriate slot using the printhead handle. Do not touch the printhead tower, and do not remove the printhead handle. 60 hp officejet 7100 series
-
 1
1 -
2
-
3
-
4
-
5
-
6
-
7
-
8
-
9
-
10
-
11
-
12
-
13
-
14
-
15
-
16
-
17
-
18
-
19
-
20
-
21
-
22
-
23
-
24
-
25
-
26
-
27
-
28
-
29
-
30
-
31
-
32
-
33
-
34
-
35
-
36
-
37
-
38
-
39
-
40
-
41
-
42
-
43
-
44
-
45
-
46
-
47
-
48
-
49
-
50
-
51
-
52
-
53
-
54
-
55
-
56
-
57
-
58
-
59
-
60
-
 61
61 -
 62
62 -
 63
63 -
 64
64 -
 65
65 -
 66
66 -
 67
67 -
 68
68 -
 69
69 -
 70
70 -
 71
71 -
72
-
73
-
74
-
75
-
76
-
77
-
78
-
79
-
80
-
81
-
82
-
83
-
84
-
85
-
86
-
87
-
88
-
89
-
90
-
91
-
92
-
93
-
94
-
95
-
96
 |
 |

hp officejet 7100 series
chapter 8
60
3
After the print carriage stops moving, release the gray print carriage latch
and then lift the print carriage to access the printheads.
4
Remove the old printhead by lifting the printhead handle and pulling
upward.
5
If there is plastic tape on the failed printhead, remove the plastic tape.
6
Push the failed printhead firmly down into the appropriate slot using the
printhead handle. Do not touch the printhead tower, and do not remove
the printhead handle.
Pull the printhead handle upward