HP 7110 HP Officejet 7100 series all-in-one - (English) Reference Guide - Page 64
install the automatic document feeder, work with printheads and ink cartridges - supply expired
 |
View all HP 7110 manuals
Add to My Manuals
Save this manual to your list of manuals |
Page 64 highlights
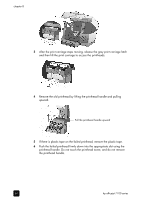
chapter 8 install the automatic document feeder If you remove the automatic document feeder tray for any reason, you can replace it easily. Use the illustration below, and make sure the tray snaps into place. work with printheads and ink cartridges As you discovered when you installed your HP Officejet, the ink delivery system consists of both ink cartridges, which contain the ink, and printheads, which control the print quality. To ensure the best print quality from your HP Officejet, you well need to preform some simple maintenance procedures, and when prompted by a front-panel message, replace the ink cartridges or printheads. print a self-test report If you are experiencing problems with printing, before cleaning or replacing the ink cartridges or printheads, you should print a self-test report. This report provides useful information about both your ink cartridges and your printheads, including status information, installation and expiration dates, and ink levels. It is useful to know the ink cartridge expiration dates, so you can purchase replacements before that date. 1 Press Menu. 2 Press 3, and then press 5. This selects the Print Report menu, then selects Self-Test Report. A self-test report is printed for your HP Officejet, which may indicate the source of any problems you may be having. For example, you may notice that one color does not print evenly across the page, which may indicate a problem with the corresponding printhead. check the ink level An easy way to check the ink supply level can be done from the front panel. 1 Press Menu. 2 Press 7, then press 1. This selects the Status and Maintenance menu, then selects the Check Ink Level option. A message in the front-panel display lets you know how much ink you have left, for both black (#14) and tri-color ink (#14) cartridges. 3 Press Cancel to exit the menu. 58 hp officejet 7100 series
-
 1
1 -
2
-
3
-
4
-
5
-
6
-
7
-
8
-
9
-
10
-
11
-
12
-
13
-
14
-
15
-
16
-
17
-
18
-
19
-
20
-
21
-
22
-
23
-
24
-
25
-
26
-
27
-
28
-
29
-
30
-
31
-
32
-
33
-
34
-
35
-
36
-
37
-
38
-
39
-
40
-
41
-
42
-
43
-
44
-
45
-
46
-
47
-
48
-
49
-
50
-
51
-
52
-
53
-
54
-
55
-
56
-
57
-
58
-
 59
59 -
 60
60 -
 61
61 -
 62
62 -
 63
63 -
 64
64 -
 65
65 -
 66
66 -
 67
67 -
 68
68 -
 69
69 -
70
-
71
-
72
-
73
-
74
-
75
-
76
-
77
-
78
-
79
-
80
-
81
-
82
-
83
-
84
-
85
-
86
-
87
-
88
-
89
-
90
-
91
-
92
-
93
-
94
-
95
-
96
 |
 |
