HP DesignJet Z2600 User guide - Page 112
Locate the carriage on the right side of the printer., When the carriage has stopped moving
 |
View all HP DesignJet Z2600 manuals
Add to My Manuals
Save this manual to your list of manuals |
Page 112 highlights
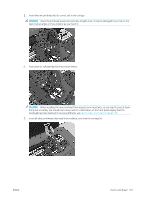
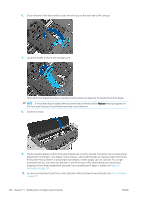
1. From the front panel, press , then , then Replace printheads. Alternatively, press , then , then Ink > Replace printheads. 2. The printer moves the carriage into the correct position. CAUTION: If the carriage is left in the removal position for more than three minutes without inserting or removing any printheads, it tries to move back to its normal position in the right-hand end. 3. When the carriage has stopped moving, the front-panel display asks you to open the window. 4. Locate the carriage on the right side of the printer. 5. Pull the handle up and toward you to release the wire loop. 6. Push the handle back to raise the lid. 104 Chapter 13 Handling ink cartridges and printheads ENWW
-
 1
1 -
2
-
3
-
4
-
5
-
6
-
7
-
8
-
9
-
10
-
11
-
12
-
13
-
14
-
15
-
16
-
17
-
18
-
19
-
20
-
21
-
22
-
23
-
24
-
25
-
26
-
27
-
28
-
29
-
30
-
31
-
32
-
33
-
34
-
35
-
36
-
37
-
38
-
39
-
40
-
41
-
42
-
43
-
44
-
45
-
46
-
47
-
48
-
49
-
50
-
51
-
52
-
53
-
54
-
55
-
56
-
57
-
58
-
59
-
60
-
61
-
62
-
63
-
64
-
65
-
66
-
67
-
68
-
69
-
70
-
71
-
72
-
73
-
74
-
75
-
76
-
77
-
78
-
79
-
80
-
81
-
82
-
83
-
84
-
85
-
86
-
87
-
88
-
89
-
90
-
91
-
92
-
93
-
94
-
95
-
96
-
97
-
98
-
99
-
100
-
101
-
102
-
103
-
104
-
105
-
106
-
 107
107 -
 108
108 -
 109
109 -
 110
110 -
 111
111 -
 112
112 -
 113
113 -
 114
114 -
 115
115 -
 116
116 -
 117
117 -
118
-
119
-
120
-
121
-
122
-
123
-
124
-
125
-
126
-
127
-
128
-
129
-
130
-
131
-
132
-
133
-
134
-
135
-
136
-
137
-
138
-
139
-
140
-
141
-
142
-
143
-
144
-
145
-
146
-
147
-
148
-
149
-
150
-
151
-
152
-
153
-
154
-
155
-
156
-
157
-
158
-
159
-
160
-
161
-
162
-
163
-
164
-
165
-
166
-
167
-
168
-
169
-
170
-
171
-
172
-
173
-
174
-
175
-
176
-
177
-
178
-
179
-
180
-
181
-
182
-
183
-
184
 |
 |

1.
From the front panel, press
, then
, then
Replace printheads
.
Alternatively, press
, then
, then
Ink
>
Replace printheads
.
2.
The printer moves the carriage into the correct position.
CAUTION:
If the carriage is left in the removal position for more than three minutes without inserting or
removing any printheads, it tries to move back to its normal position in the right-hand end.
3.
When the carriage has stopped moving, the front-panel display asks you to open the window.
4.
Locate the carriage on the right side of the printer.
5.
Pull the handle up and toward you to release the wire loop.
6.
Push the handle back to raise the lid.
104
Chapter 13
Handling ink cartridges and printheads
ENWW