HP DesignJet Z2600 User guide - Page 95
Using AutoCAD, Properties, Device and Document Settings, Custom Properties, Paper/Quality
 |
View all HP DesignJet Z2600 manuals
Add to My Manuals
Save this manual to your list of manuals |
Page 95 highlights
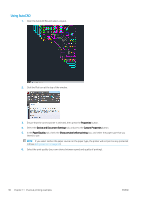
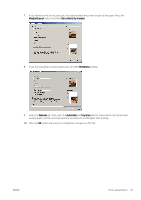
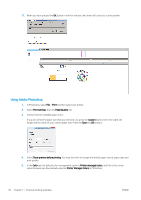
Using AutoCAD 1. The AutoCAD window can show a model or layout. Normally a layout is printed rather than the model. 2. Click the Plot icon at the top of the window. 3. The Plot window opens. 4. You can see further options by pressing the circular button in the lower right corner of the window. NOTE: The Quality option here does not refer to the final print quality but to the quality of AutoCAD viewport objects that are sent for printing. 5. Press the Properties button. 6. Select the Device and Document Settings tab, and press the Custom Properties button. 7. In the Paper/Quality tab, check the Show preview before printing box, and select the paper type that you intend to use. NOTE: If you select neither the paper source nor the paper type, the printer will not print on any protected roll (see Roll protection on page 62). 8. Select the print quality (your own choice between speed and quality of printing). ENWW Print a project 87
-
 1
1 -
2
-
3
-
4
-
5
-
6
-
7
-
8
-
9
-
10
-
11
-
12
-
13
-
14
-
15
-
16
-
17
-
18
-
19
-
20
-
21
-
22
-
23
-
24
-
25
-
26
-
27
-
28
-
29
-
30
-
31
-
32
-
33
-
34
-
35
-
36
-
37
-
38
-
39
-
40
-
41
-
42
-
43
-
44
-
45
-
46
-
47
-
48
-
49
-
50
-
51
-
52
-
53
-
54
-
55
-
56
-
57
-
58
-
59
-
60
-
61
-
62
-
63
-
64
-
65
-
66
-
67
-
68
-
69
-
70
-
71
-
72
-
73
-
74
-
75
-
76
-
77
-
78
-
79
-
80
-
81
-
82
-
83
-
84
-
85
-
86
-
87
-
88
-
89
-
 90
90 -
 91
91 -
 92
92 -
 93
93 -
 94
94 -
 95
95 -
 96
96 -
 97
97 -
 98
98 -
 99
99 -
 100
100 -
101
-
102
-
103
-
104
-
105
-
106
-
107
-
108
-
109
-
110
-
111
-
112
-
113
-
114
-
115
-
116
-
117
-
118
-
119
-
120
-
121
-
122
-
123
-
124
-
125
-
126
-
127
-
128
-
129
-
130
-
131
-
132
-
133
-
134
-
135
-
136
-
137
-
138
-
139
-
140
-
141
-
142
-
143
-
144
-
145
-
146
-
147
-
148
-
149
-
150
-
151
-
152
-
153
-
154
-
155
-
156
-
157
-
158
-
159
-
160
-
161
-
162
-
163
-
164
-
165
-
166
-
167
-
168
-
169
-
170
-
171
-
172
-
173
-
174
-
175
-
176
-
177
-
178
-
179
-
180
-
181
-
182
-
183
-
184
 |
 |
