HP DesignJet Z2600 User guide - Page 53
Printing paper info, Move the paper, on the screen. In the HP DesignJet Utility for Mac OS X, select
 |
View all HP DesignJet Z2600 manuals
Add to My Manuals
Save this manual to your list of manuals |
Page 53 highlights
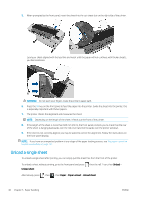
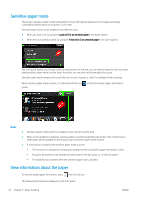
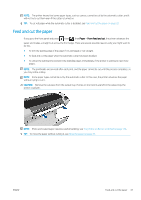
● Starwheels: Print with the starwheels up or down. ● Cutter: Enable or disable the cutter. ● Global Ink Limit: Initially it can be left as it is and modified later on, based on printing results. Some paper types are available with different ink limits (less/normal/more ink). Ink limits are generally proportional to color gamut volume, but a higher ink limit can cause printing artifacts (bleed, coalescence, etc.) in some cases. HP papers have fine-tuned ink limits while other papers use generic ink limits. NOTE: When an option is grayed out, that means that it is not available for the selected paper type. 8. Click Next under Windows, Continue under Mac OS. 9. If the paper type permits, the printer performs a color calibration (about 10 minutes). Now that you have created the paper preset, you will be able to select the paper type from the front panel and from the Mac OS X driver under the Custom paper category. The ICC profile for the new paper type will be ready to use by your application. You can export the new paper preset to your computer and use it on other HP DesignJet printers of the same model. In the Color Center, select Paper Preset Management > Export Paper Preset, then follow the instructions on the screen. In the HP DesignJet Utility for Mac OS X, select Paper Preset Management > Export Paper Preset. To install the preset on another printer, see To install a downloaded paper preset on page 43. Printing paper info Enable the Printing paper info option to record the printer's estimate of the remaining roll length, paper width and type. The information is a combination of barcode and text that is printed on the leading edge of the roll when the paper is unloaded from the printer. NOTE: The paper-length estimate is available only if the printer registered the amount of paper that was on the roll when you loaded it. To provide this information to the printer, specify the roll length on the front panel when loading the paper, or load a roll that has the paper-data barcode printed on it. NOTE: The barcode and text are printed on the roll only when the loading and unloading processes are started from the front panel's Paper menu. NOTE: This option can be expected to work only with papers that are completely opaque and cuttable. It may fail with transparent or translucent papers; it is disabled when an uncuttable paper type is loaded. To enable the Printing paper info option, go to the front panel and press preferences > Paper options > Enable printing paper info. , then , then Setup > Printing NOTE: Enabling this option slightly changes the paper loading and unloading procedures. Move the paper If the printer is idle (ready to print), you can move the paper forwards or backwards from the front panel. You may want to do this in order to have more or less white space between the last print and the next one. To move the paper, press , then , then Paper > Move paper. ENWW Printing paper info 45
-
 1
1 -
2
-
3
-
4
-
5
-
6
-
7
-
8
-
9
-
10
-
11
-
12
-
13
-
14
-
15
-
16
-
17
-
18
-
19
-
20
-
21
-
22
-
23
-
24
-
25
-
26
-
27
-
28
-
29
-
30
-
31
-
32
-
33
-
34
-
35
-
36
-
37
-
38
-
39
-
40
-
41
-
42
-
43
-
44
-
45
-
46
-
47
-
 48
48 -
 49
49 -
 50
50 -
 51
51 -
 52
52 -
 53
53 -
 54
54 -
 55
55 -
 56
56 -
 57
57 -
 58
58 -
59
-
60
-
61
-
62
-
63
-
64
-
65
-
66
-
67
-
68
-
69
-
70
-
71
-
72
-
73
-
74
-
75
-
76
-
77
-
78
-
79
-
80
-
81
-
82
-
83
-
84
-
85
-
86
-
87
-
88
-
89
-
90
-
91
-
92
-
93
-
94
-
95
-
96
-
97
-
98
-
99
-
100
-
101
-
102
-
103
-
104
-
105
-
106
-
107
-
108
-
109
-
110
-
111
-
112
-
113
-
114
-
115
-
116
-
117
-
118
-
119
-
120
-
121
-
122
-
123
-
124
-
125
-
126
-
127
-
128
-
129
-
130
-
131
-
132
-
133
-
134
-
135
-
136
-
137
-
138
-
139
-
140
-
141
-
142
-
143
-
144
-
145
-
146
-
147
-
148
-
149
-
150
-
151
-
152
-
153
-
154
-
155
-
156
-
157
-
158
-
159
-
160
-
161
-
162
-
163
-
164
-
165
-
166
-
167
-
168
-
169
-
170
-
171
-
172
-
173
-
174
-
175
-
176
-
177
-
178
-
179
-
180
-
181
-
182
-
183
-
184
 |
 |
