HP DesignJet Z2600 User guide - Page 89
Print a draft for revision with the correct scale, Using Adobe Acrobat
 |
View all HP DesignJet Z2600 manuals
Add to My Manuals
Save this manual to your list of manuals |
Page 89 highlights
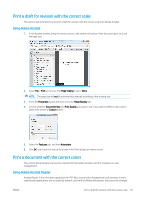
Print a draft for revision with the correct scale This section demonstrates how to print a draft for revision with the correct scale from Adobe Acrobat. Using Adobe Acrobat 1. In the Acrobat window, bring the mouse cursor to the bottom left corner of the document pane to check the page size. 2. Select File > Print and ensure that Page Scaling is set to None. NOTE: The page size will not be automatically selected according to the drawing size. 3. Press the Properties button and then select the Paper/Quality tab. 4. Choose whatever Document Size and Print Quality you want to use. If you want to define a new custom paper size, press the Custom button. 5. Select the Features tab, and then Autorotate. 6. Click OK, and check that the print preview in the Print dialog box seems correct. Print a document with the correct colors This section demonstrates how to print a document from Adobe Acrobat, with the emphasis on color management. Using Adobe Acrobat Reader Acrobat Reader is the most basic application for PDF files; several color management tools common in more sophisticated applications are not explicitly present, and work by default with presets that cannot be changed. ENWW Print a draft for revision with the correct scale 81
-
 1
1 -
2
-
3
-
4
-
5
-
6
-
7
-
8
-
9
-
10
-
11
-
12
-
13
-
14
-
15
-
16
-
17
-
18
-
19
-
20
-
21
-
22
-
23
-
24
-
25
-
26
-
27
-
28
-
29
-
30
-
31
-
32
-
33
-
34
-
35
-
36
-
37
-
38
-
39
-
40
-
41
-
42
-
43
-
44
-
45
-
46
-
47
-
48
-
49
-
50
-
51
-
52
-
53
-
54
-
55
-
56
-
57
-
58
-
59
-
60
-
61
-
62
-
63
-
64
-
65
-
66
-
67
-
68
-
69
-
70
-
71
-
72
-
73
-
74
-
75
-
76
-
77
-
78
-
79
-
80
-
81
-
82
-
83
-
 84
84 -
 85
85 -
 86
86 -
 87
87 -
 88
88 -
 89
89 -
 90
90 -
 91
91 -
 92
92 -
 93
93 -
 94
94 -
95
-
96
-
97
-
98
-
99
-
100
-
101
-
102
-
103
-
104
-
105
-
106
-
107
-
108
-
109
-
110
-
111
-
112
-
113
-
114
-
115
-
116
-
117
-
118
-
119
-
120
-
121
-
122
-
123
-
124
-
125
-
126
-
127
-
128
-
129
-
130
-
131
-
132
-
133
-
134
-
135
-
136
-
137
-
138
-
139
-
140
-
141
-
142
-
143
-
144
-
145
-
146
-
147
-
148
-
149
-
150
-
151
-
152
-
153
-
154
-
155
-
156
-
157
-
158
-
159
-
160
-
161
-
162
-
163
-
164
-
165
-
166
-
167
-
168
-
169
-
170
-
171
-
172
-
173
-
174
-
175
-
176
-
177
-
178
-
179
-
180
-
181
-
182
-
183
-
184
 |
 |
