HP LH4r HP Netserver LC 2000 Installation Guide - Page 14
System/E or System/U, or Alternative Rack Mounting,
 |
View all HP LH4r manuals
Add to My Manuals
Save this manual to your list of manuals |
Page 14 highlights
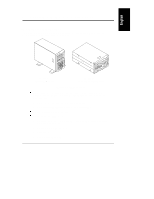
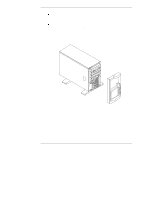
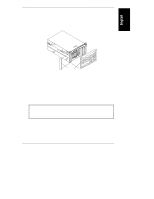
Chapter 1 Setting Up the HP NetServer 3. If you have optional items to add to the HP NetServer (memory, accessory boards, mass storage, or processors), remove the bezel and the top cover. ◊ If there are no optional items to install, skip to Step 12. ◊ Refer to Chapter 3, "Opening and Closing the HP NetServer." 4. If you have items such as a processor, DIMMs, and accessory boards to install, do so at this time. All these items are installed on the system board without removing it and can be installed at the same time. Refer to Chapter 5, "Installing Additional Memory," Chapter 6, "Installing Additional Boards," and Chapter 7, "Installing Additional Processors." 5. If you are adding internal mass storage devices such as hard drives or tape back up devices into the front of the HP NetServer, do so next. Refer to Chapter 4, "Installing Mass Storage Devices." 6. Reconnect internal cables as needed. 7. Install the HP NetServer LC 2000r into the rack. Refer to Chapter 8, "Rack-Mounting the HP NetServer," for the Rack System/E or System/U, or Chapter 13, "Alternative Rack Mounting," for the HP Systems Rack. 8. If the rack-mount system accepts the Cable Management Arm, install it onto the rear of the rack and the HP NetServer. Refer to Chapter 8, "Rack-Mounting the HP NetServer," for a Rack System/E or System/U, or Chapter 13, "Alternative Rack Mounting," for the HP Systems Rack. 9. If a cover was removed earlier, replace the cover, but not the bezel. Refer to Chapter 3, "Opening and Closing the HP NetServer." 10. Install the SCSI Hot-Swap hard drives into the front of the HP NetServer. The bezel must be removed to install the SCSI Hot-Swap drives. Refer to Chapter 4, "Installing Mass Storage Devices." 11. Replace the bezel. Refer to Chapter 3, "Opening and Closing the HP NetServer." 12. If a second power supply (optional) is required, install it into the rear of the HP NetServer. Refer to the Power Supply accessory guide. 6
-
 1
1 -
2
-
3
-
4
-
5
-
6
-
7
-
8
-
 9
9 -
 10
10 -
 11
11 -
 12
12 -
 13
13 -
 14
14 -
 15
15 -
 16
16 -
 17
17 -
 18
18 -
 19
19 -
20
-
21
-
22
-
23
-
24
-
25
-
26
-
27
-
28
-
29
-
30
-
31
-
32
-
33
-
34
-
35
-
36
-
37
-
38
-
39
-
40
-
41
-
42
-
43
-
44
-
45
-
46
-
47
-
48
-
49
-
50
-
51
-
52
-
53
-
54
-
55
-
56
-
57
-
58
-
59
-
60
-
61
-
62
-
63
-
64
-
65
-
66
-
67
-
68
-
69
-
70
-
71
-
72
-
73
-
74
-
75
-
76
-
77
-
78
-
79
-
80
-
81
-
82
-
83
-
84
-
85
-
86
-
87
-
88
-
89
-
90
-
91
-
92
-
93
-
94
-
95
-
96
-
97
-
98
-
99
-
100
-
101
-
102
-
103
-
104
-
105
-
106
-
107
-
108
-
109
-
110
-
111
-
112
-
113
-
114
-
115
-
116
-
117
-
118
-
119
-
120
-
121
-
122
-
123
-
124
-
125
-
126
-
127
-
128
-
129
-
130
-
131
-
132
-
133
-
134
-
135
-
136
-
137
-
138
-
139
-
140
-
141
-
142
-
143
-
144
-
145
-
146
-
147
-
148
-
149
-
150
-
151
-
152
-
153
-
154
-
155
-
156
-
157
-
158
-
159
-
160
-
161
-
162
-
163
-
164
-
165
-
166
-
167
-
168
-
169
-
170
-
171
-
172
-
173
-
174
-
175
-
176
-
177
-
178
-
179
-
180
-
181
-
182
-
183
-
184
-
185
-
186
-
187
-
188
-
189
-
190
-
191
-
192
-
193
-
194
 |
 |
