HP LH4r HP Netserver LC 2000 Installation Guide - Page 26
Applying Power to the HP NetServer
 |
View all HP LH4r manuals
Add to My Manuals
Save this manual to your list of manuals |
Page 26 highlights
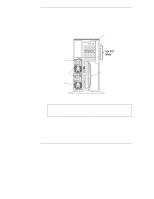
Chapter 2 Controls, Ports, and Indicators Applying Power to the HP NetServer Powering Up the HP NetServer 1. Ensure the HP NetServer's power cord or power cords are connected to the power source. See Figure 2-4. 2. Press the Power button on the front control panel. See Figure 2-1 or 2-2. NOTE Each time AC power is applied (power cord is plugged in), there is a 15 second delay (self test) before the front control panel will respond to your actions. Powering Down the HP NetServer 1. Log off all users and, if necessary, back-up files. 2. Follow instructions in your network operating system (NOS) documentation to gracefully shut down all networking software and applications. 3. Press the power switch on the HP NetServer's control panel when prompted by the operating system. Normally, this completes the shutdown procedure. NOTE The power supply will continue to provide standby voltage to the HP NetServer until the power cord(s) is/are disconnected. Connecting AC Power to Multiple-Server Configurations The HP NetServer temporarily draws a large "inrush current," when first connected to an AC power source. This also occurs when the NetServer is in a standby mode (power is turned off and the power cord is plugged into AC power). The inrush current is much greater than the NetServer's normal operating current and generally, the AC power source can handle the normal inrush current. However, if you install several HP NetServers on one circuit, precautions are necessary. If there is a power failure and power is then restored, all the servers immediately begin to draw inrush current at the same time. If the circuit breakers on the incoming power line have insufficient capability, the breaker may trip and thus prevent the servers from powering up. When preparing your site for installation, allow for the additional inrush current. See "Power Requirements" in Appendix A. 18
-
 1
1 -
2
-
3
-
4
-
5
-
6
-
7
-
8
-
9
-
10
-
11
-
12
-
13
-
14
-
15
-
16
-
17
-
18
-
19
-
20
-
 21
21 -
 22
22 -
 23
23 -
 24
24 -
 25
25 -
 26
26 -
 27
27 -
 28
28 -
 29
29 -
 30
30 -
 31
31 -
32
-
33
-
34
-
35
-
36
-
37
-
38
-
39
-
40
-
41
-
42
-
43
-
44
-
45
-
46
-
47
-
48
-
49
-
50
-
51
-
52
-
53
-
54
-
55
-
56
-
57
-
58
-
59
-
60
-
61
-
62
-
63
-
64
-
65
-
66
-
67
-
68
-
69
-
70
-
71
-
72
-
73
-
74
-
75
-
76
-
77
-
78
-
79
-
80
-
81
-
82
-
83
-
84
-
85
-
86
-
87
-
88
-
89
-
90
-
91
-
92
-
93
-
94
-
95
-
96
-
97
-
98
-
99
-
100
-
101
-
102
-
103
-
104
-
105
-
106
-
107
-
108
-
109
-
110
-
111
-
112
-
113
-
114
-
115
-
116
-
117
-
118
-
119
-
120
-
121
-
122
-
123
-
124
-
125
-
126
-
127
-
128
-
129
-
130
-
131
-
132
-
133
-
134
-
135
-
136
-
137
-
138
-
139
-
140
-
141
-
142
-
143
-
144
-
145
-
146
-
147
-
148
-
149
-
150
-
151
-
152
-
153
-
154
-
155
-
156
-
157
-
158
-
159
-
160
-
161
-
162
-
163
-
164
-
165
-
166
-
167
-
168
-
169
-
170
-
171
-
172
-
173
-
174
-
175
-
176
-
177
-
178
-
179
-
180
-
181
-
182
-
183
-
184
-
185
-
186
-
187
-
188
-
189
-
190
-
191
-
192
-
193
-
194
 |
 |
