HP LaserJet M1005 Service Manual - Page 132
Solving image-quality problems, Checking the print cartridge
 |
View all HP LaserJet M1005 manuals
Add to My Manuals
Save this manual to your list of manuals |
Page 132 highlights
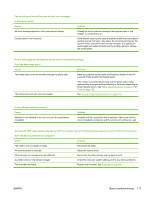
Solving image-quality problems If the problem occurs when printing, see Solving print image-quality problems on page 116. If the problem occurs when copying or scanning, see Solving scanning (copying) image-quality problems on page 124. NOTE Some image-quality problems can be isolated by performing device functional tests. See Functional checks on page 135. Image quality problems can also be caused by using cables that are not certified USB-Hi speed cables. Checking the print cartridge Image-formation defects are frequently the result of problems in the print cartridge. If the source of the defect is not immediately evident, always replace the print cartridge before troubleshooting image defects. Use the following checklist to make sure that the print cartridge is still operable. ● Make sure that the print cartridge is seated properly. ● Check the print cartridge to see if it has been disassembled or refilled. ● Inspect the print cartridge to see if toner is leaking through worn seals. ● Check the surface of the photosensitive drum in the cartridge to see if it has been damaged or scratched. Touching the drum contaminates the photosensitive surface and can cause spotting and image defects. ● Blurred areas on printed pages indicate that the photosensitive drum in the cartridge has been overexposed to light. Because overexposure to light causes permanent damage to the photosensitive drum, the cartridge should be replaced. To redistribute the toner in the print cartridge Before installing a new print cartridge or when the toner begins to run low, redistribute the toner by rotating the cartridge back and forth five or six times. Solving print image-quality problems Use the following tables to help solve problems with printed pages. NOTE Some image-quality problems can be isolated by performing device functional tests. See Functional checks on page 135. Image-quality problems can also be caused by using cables that are not certified USB-Hi speed cables. Print image-quality problems Pages do not print. Cause The device is not plugged in, or the power switch is not on. Solution Make sure that the device is plugged into a working wall outlet or power strip and that the power switch is turned on. 116 Chapter 7 Troubleshooting ENWW
-
 1
1 -
2
-
3
-
4
-
5
-
6
-
7
-
8
-
9
-
10
-
11
-
12
-
13
-
14
-
15
-
16
-
17
-
18
-
19
-
20
-
21
-
22
-
23
-
24
-
25
-
26
-
27
-
28
-
29
-
30
-
31
-
32
-
33
-
34
-
35
-
36
-
37
-
38
-
39
-
40
-
41
-
42
-
43
-
44
-
45
-
46
-
47
-
48
-
49
-
50
-
51
-
52
-
53
-
54
-
55
-
56
-
57
-
58
-
59
-
60
-
61
-
62
-
63
-
64
-
65
-
66
-
67
-
68
-
69
-
70
-
71
-
72
-
73
-
74
-
75
-
76
-
77
-
78
-
79
-
80
-
81
-
82
-
83
-
84
-
85
-
86
-
87
-
88
-
89
-
90
-
91
-
92
-
93
-
94
-
95
-
96
-
97
-
98
-
99
-
100
-
101
-
102
-
103
-
104
-
105
-
106
-
107
-
108
-
109
-
110
-
111
-
112
-
113
-
114
-
115
-
116
-
117
-
118
-
119
-
120
-
121
-
122
-
123
-
124
-
125
-
126
-
 127
127 -
 128
128 -
 129
129 -
 130
130 -
 131
131 -
 132
132 -
 133
133 -
 134
134 -
 135
135 -
 136
136 -
 137
137 -
138
-
139
-
140
-
141
-
142
-
143
-
144
-
145
-
146
-
147
-
148
-
149
-
150
-
151
-
152
-
153
-
154
-
155
-
156
-
157
-
158
-
159
-
160
-
161
-
162
-
163
-
164
-
165
-
166
-
167
-
168
-
169
-
170
-
171
-
172
-
173
-
174
-
175
-
176
-
177
-
178
-
179
-
180
-
181
-
182
-
183
-
184
-
185
-
186
-
187
-
188
-
189
-
190
-
191
-
192
-
193
-
194
-
195
-
196
-
197
-
198
-
199
-
200
-
201
-
202
-
203
-
204
-
205
-
206
-
207
-
208
-
209
-
210
-
211
-
212
-
213
-
214
-
215
-
216
-
217
-
218
-
219
-
220
-
221
-
222
-
223
-
224
 |
 |