HP LaserJet M1005 Service Manual - Page 151
Functional checks, Half self-test functional check, To perform a half self-test check
 |
View all HP LaserJet M1005 manuals
Add to My Manuals
Save this manual to your list of manuals |
Page 151 highlights
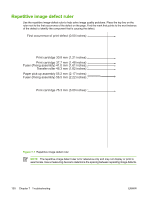
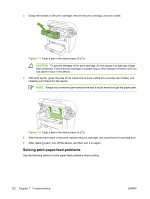
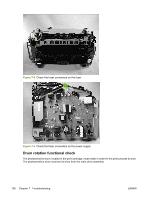
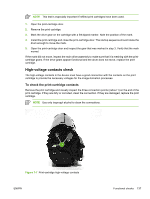
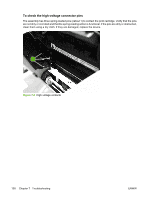
Functional checks Use the following procedures to help diagnose and solve problems that occur in the print engine. Half self-test functional check The purpose of the half self-test check is to determine which image-formation process is malfunctioning. The image-formation process can be subdivided into the following stages: ● conditioning stage (charges the drum) ● writing stage (writes a latent image to the drum with the laser) ● development stage (forms a toner image on the drum) ● transfer stage (transfers the image to paper) ● separation stage (separates the media from the drum) ● fusing stage (applies heat and pressure to make the image on paper permanent) ● cleaning stage (removes excess toner from the drum) To perform a half self-test check 1. Print a configuration report. See Troubleshooting tools on page 140. 2. Open the print cartridge door after the paper advances halfway through the device (about 5 seconds after the motor begins rotation). The leading edge of the paper should have advanced past the print cartridge. 3. Remove the print cartridge. 4. Open the print cartridge drum shield to view the drum surface. If a dark and distinct toner image is present on the drum surface, assume that the first three functions of the image-formation process are functioning (through the development stage). Troubleshoot the failure as a transfer or fusing problem. To perform other checks If, during the half self-test check, no image is present on the photosensitive drum, perform these checks: 1. Make sure that you removed the entire length of the sealing tape from the print cartridge before you installed the cartridge. 2. Perform a drum-rotation functional check. (See Drum rotation functional check on page 136.) 3. Perform a high-voltage power-supply check. (See High-voltage contacts check on page 137.) If the checks indicate a transfer problem, replace the transfer roller. If the checks indicate a fuser problem, first make sure to check the two wire-harness connectors (J102 and J204; callout 1) on the power supply. ENWW Functional checks 135
-
 1
1 -
2
-
3
-
4
-
5
-
6
-
7
-
8
-
9
-
10
-
11
-
12
-
13
-
14
-
15
-
16
-
17
-
18
-
19
-
20
-
21
-
22
-
23
-
24
-
25
-
26
-
27
-
28
-
29
-
30
-
31
-
32
-
33
-
34
-
35
-
36
-
37
-
38
-
39
-
40
-
41
-
42
-
43
-
44
-
45
-
46
-
47
-
48
-
49
-
50
-
51
-
52
-
53
-
54
-
55
-
56
-
57
-
58
-
59
-
60
-
61
-
62
-
63
-
64
-
65
-
66
-
67
-
68
-
69
-
70
-
71
-
72
-
73
-
74
-
75
-
76
-
77
-
78
-
79
-
80
-
81
-
82
-
83
-
84
-
85
-
86
-
87
-
88
-
89
-
90
-
91
-
92
-
93
-
94
-
95
-
96
-
97
-
98
-
99
-
100
-
101
-
102
-
103
-
104
-
105
-
106
-
107
-
108
-
109
-
110
-
111
-
112
-
113
-
114
-
115
-
116
-
117
-
118
-
119
-
120
-
121
-
122
-
123
-
124
-
125
-
126
-
127
-
128
-
129
-
130
-
131
-
132
-
133
-
134
-
135
-
136
-
137
-
138
-
139
-
140
-
141
-
142
-
143
-
144
-
145
-
 146
146 -
 147
147 -
 148
148 -
 149
149 -
 150
150 -
 151
151 -
 152
152 -
 153
153 -
 154
154 -
 155
155 -
 156
156 -
157
-
158
-
159
-
160
-
161
-
162
-
163
-
164
-
165
-
166
-
167
-
168
-
169
-
170
-
171
-
172
-
173
-
174
-
175
-
176
-
177
-
178
-
179
-
180
-
181
-
182
-
183
-
184
-
185
-
186
-
187
-
188
-
189
-
190
-
191
-
192
-
193
-
194
-
195
-
196
-
197
-
198
-
199
-
200
-
201
-
202
-
203
-
204
-
205
-
206
-
207
-
208
-
209
-
210
-
211
-
212
-
213
-
214
-
215
-
216
-
217
-
218
-
219
-
220
-
221
-
222
-
223
-
224
 |
 |