HP LaserJet M1005 Service Manual - Page 153
High-voltage contacts check, To check the print-cartridge contacts
 |
View all HP LaserJet M1005 manuals
Add to My Manuals
Save this manual to your list of manuals |
Page 153 highlights
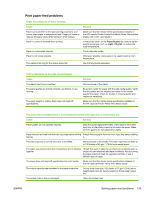
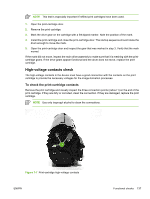
NOTE This test is especially important if refilled print cartridges have been used. 1. Open the print-cartridge door. 2. Remove the print cartridge. 3. Mark the drive gear on the cartridge with a felt-tipped marker. Note the position of the mark. 4. Install the print cartridge and close the print-cartridge door. The startup sequence should rotate the drum enough to move the mark. 5. Open the print-cartridge door and inspect the gear that was marked in step 3. Verify that the mark moved. If the mark did not move, inspect the main drive assembly to make sure that it is meshing with the printcartridge gears. If the drive gears appear functional and the drum does not move, replace the print cartridge. High-voltage contacts check The high-voltage contacts in the device must have a good connection with the contacts on the print cartridge to provide the necessary voltages for the image-formation processes. To check the print-cartridge contacts Remove the print cartridge and visually inspect the three connection points (callout 1) on the end of the print cartridge. If they are dirty or corroded, clean the connection. If they are damaged, replace the print cartridge. NOTE Use only isopropyl alcohol to clean the connections. Figure 7-7 Print-cartridge high-voltage contacts ENWW Functional checks 137
-
 1
1 -
2
-
3
-
4
-
5
-
6
-
7
-
8
-
9
-
10
-
11
-
12
-
13
-
14
-
15
-
16
-
17
-
18
-
19
-
20
-
21
-
22
-
23
-
24
-
25
-
26
-
27
-
28
-
29
-
30
-
31
-
32
-
33
-
34
-
35
-
36
-
37
-
38
-
39
-
40
-
41
-
42
-
43
-
44
-
45
-
46
-
47
-
48
-
49
-
50
-
51
-
52
-
53
-
54
-
55
-
56
-
57
-
58
-
59
-
60
-
61
-
62
-
63
-
64
-
65
-
66
-
67
-
68
-
69
-
70
-
71
-
72
-
73
-
74
-
75
-
76
-
77
-
78
-
79
-
80
-
81
-
82
-
83
-
84
-
85
-
86
-
87
-
88
-
89
-
90
-
91
-
92
-
93
-
94
-
95
-
96
-
97
-
98
-
99
-
100
-
101
-
102
-
103
-
104
-
105
-
106
-
107
-
108
-
109
-
110
-
111
-
112
-
113
-
114
-
115
-
116
-
117
-
118
-
119
-
120
-
121
-
122
-
123
-
124
-
125
-
126
-
127
-
128
-
129
-
130
-
131
-
132
-
133
-
134
-
135
-
136
-
137
-
138
-
139
-
140
-
141
-
142
-
143
-
144
-
145
-
146
-
147
-
 148
148 -
 149
149 -
 150
150 -
 151
151 -
 152
152 -
 153
153 -
 154
154 -
 155
155 -
 156
156 -
 157
157 -
 158
158 -
159
-
160
-
161
-
162
-
163
-
164
-
165
-
166
-
167
-
168
-
169
-
170
-
171
-
172
-
173
-
174
-
175
-
176
-
177
-
178
-
179
-
180
-
181
-
182
-
183
-
184
-
185
-
186
-
187
-
188
-
189
-
190
-
191
-
192
-
193
-
194
-
195
-
196
-
197
-
198
-
199
-
200
-
201
-
202
-
203
-
204
-
205
-
206
-
207
-
208
-
209
-
210
-
211
-
212
-
213
-
214
-
215
-
216
-
217
-
218
-
219
-
220
-
221
-
222
-
223
-
224
 |
 |