HP Officejet Pro 3620 User Guide - Page 97
Clear paper jams, CAUTION, To clear a jam inside the printer
 |
View all HP Officejet Pro 3620 manuals
Add to My Manuals
Save this manual to your list of manuals |
Page 97 highlights
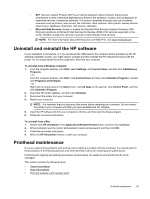
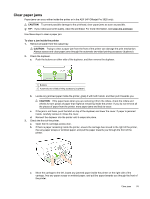
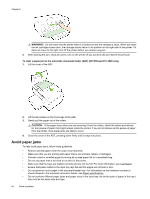
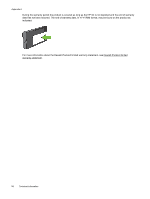
Clear paper jams Paper jams can occur either inside the printer or in the ADF (HP Officejet Pro 3620 only). CAUTION: To prevent possible damage to the printhead, clear paper jams as soon as possible. TIP: If you notice poor print quality, clean the printhead. For more information, see Clean the printhead. Use these steps to clear a paper jam. To clear a jam inside the printer 1. Remove all paper from the output tray. CAUTION: Trying to clear a paper jam from the front of the printer can damage the print mechanism. Always access and clear paper jams through the automatic two-sided printing accessory (duplexer). 2. Check the duplexer. a. Push the buttons on either side of the duplexer, and then remove the duplexer. 1 Buttons 2 Automatic two-sided printing accessory (duplexer) b. Locate any jammed paper inside the printer, grasp it with both hands, and then pull it towards you. CAUTION: If the paper tears when you are removing it from the rollers, check the rollers and wheels for torn pieces of paper that might be remaining inside the printer. If you do not remove all the pieces of paper from the printer, more paper jams are likely to occur. c. If the jam is not there, push the latch on top of the duplexer and lower the cover. If paper is jammed inside, carefully remove it. Close the cover. d. Reinsert the duplexer into the printer until it snaps into place. 3. Check the front of the printer. a. Open the ink cartridge access door. b. If there is paper remaining inside the printer, ensure the carriage has moved to the right of the printer, free any paper scraps or wrinkled paper, and pull the paper towards you through the front of the printer. c. Move the carriage to the left, locate any jammed paper inside the printer on the right side of the carriage, free any paper scraps or wrinkled paper, and pull the paper towards you through the front of the printer. Clear jams 93
-
 1
1 -
2
-
3
-
4
-
5
-
6
-
7
-
8
-
9
-
10
-
11
-
12
-
13
-
14
-
15
-
16
-
17
-
18
-
19
-
20
-
21
-
22
-
23
-
24
-
25
-
26
-
27
-
28
-
29
-
30
-
31
-
32
-
33
-
34
-
35
-
36
-
37
-
38
-
39
-
40
-
41
-
42
-
43
-
44
-
45
-
46
-
47
-
48
-
49
-
50
-
51
-
52
-
53
-
54
-
55
-
56
-
57
-
58
-
59
-
60
-
61
-
62
-
63
-
64
-
65
-
66
-
67
-
68
-
69
-
70
-
71
-
72
-
73
-
74
-
75
-
76
-
77
-
78
-
79
-
80
-
81
-
82
-
83
-
84
-
85
-
86
-
87
-
88
-
89
-
90
-
91
-
 92
92 -
 93
93 -
 94
94 -
 95
95 -
 96
96 -
 97
97 -
 98
98 -
 99
99 -
 100
100 -
 101
101 -
 102
102 -
103
-
104
-
105
-
106
-
107
-
108
-
109
-
110
-
111
-
112
-
113
-
114
-
115
-
116
-
117
-
118
-
119
-
120
-
121
-
122
-
123
-
124
-
125
-
126
-
127
-
128
-
129
-
130
-
131
-
132
-
133
-
134
-
135
-
136
-
137
-
138
-
139
-
140
-
141
-
142
-
143
-
144
-
145
-
146
-
147
-
148
-
149
-
150
-
151
-
152
-
153
-
154
-
155
-
156
-
157
-
158
-
159
-
160
-
161
-
162
-
163
-
164
-
165
-
166
-
167
-
168
-
169
-
170
 |
 |