HP Photosmart R717 HP Photosmart R717 Digital Camera with HP Instant Share - U - Page 109
Save/Print, Windows, HP Instant Share Setup, Cancel, Instant Share, Setup, Start, Macintosh
 |
View all HP Photosmart R717 manuals
Add to My Manuals
Save this manual to your list of manuals |
Page 109 highlights
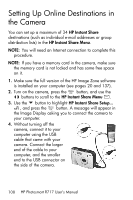
Another way to connect the camera to the computer is with the optional HP Photosmart R-series dock-simply put the camera in the dock and press the Save/Print button on the dock. 5. The next step is slightly different on a Windows and Macintosh computer: • Windows: Connecting the camera to the computer activates the HP Instant Share Setup program. If some other dialog box appears in addition, close that dialog box by clicking Cancel. In the Instant Share Setup program, click Start, then simply follow the directions on the screen to set up destinations on the computer and save them to your camera. • Macintosh: Connecting the camera to the computer activates the HP Instant Share Setup Assistant. Click Continue, then simply follow the directions on the screen to set up destinations on the computer and save them to your camera. Using HP Instant Share 109
-
 1
1 -
2
-
3
-
4
-
5
-
6
-
7
-
8
-
9
-
10
-
11
-
12
-
13
-
14
-
15
-
16
-
17
-
18
-
19
-
20
-
21
-
22
-
23
-
24
-
25
-
26
-
27
-
28
-
29
-
30
-
31
-
32
-
33
-
34
-
35
-
36
-
37
-
38
-
39
-
40
-
41
-
42
-
43
-
44
-
45
-
46
-
47
-
48
-
49
-
50
-
51
-
52
-
53
-
54
-
55
-
56
-
57
-
58
-
59
-
60
-
61
-
62
-
63
-
64
-
65
-
66
-
67
-
68
-
69
-
70
-
71
-
72
-
73
-
74
-
75
-
76
-
77
-
78
-
79
-
80
-
81
-
82
-
83
-
84
-
85
-
86
-
87
-
88
-
89
-
90
-
91
-
92
-
93
-
94
-
95
-
96
-
97
-
98
-
99
-
100
-
101
-
102
-
103
-
 104
104 -
 105
105 -
 106
106 -
 107
107 -
 108
108 -
 109
109 -
 110
110 -
 111
111 -
 112
112 -
 113
113 -
 114
114 -
115
-
116
-
117
-
118
-
119
-
120
-
121
-
122
-
123
-
124
-
125
-
126
-
127
-
128
-
129
-
130
-
131
-
132
-
133
-
134
-
135
-
136
-
137
-
138
-
139
-
140
-
141
-
142
-
143
-
144
-
145
-
146
-
147
-
148
-
149
-
150
-
151
-
152
-
153
-
154
-
155
-
156
-
157
-
158
-
159
-
160
-
161
-
162
-
163
-
164
-
165
-
166
-
167
-
168
-
169
-
170
-
171
-
172
-
173
-
174
-
175
-
176
-
177
-
178
-
179
-
180
-
181
-
182
-
183
-
184
-
185
-
186
-
187
-
188
-
189
-
190
-
191
-
192
-
193
-
194
-
195
-
196
-
197
-
198
-
199
-
200
-
201
-
202
-
203
-
204
-
205
-
206
-
207
-
208
-
209
-
210
-
211
-
212
-
213
-
214
-
215
-
216
-
217
 |
 |