HP Photosmart R717 HP Photosmart R717 Digital Camera with HP Instant Share - U - Page 39
Focusing the Camera, Obtaining Optimum Focus and Exposure, Exposure
 |
View all HP Photosmart R717 manuals
Add to My Manuals
Save this manual to your list of manuals |
Page 39 highlights
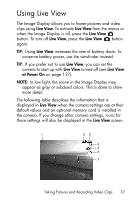
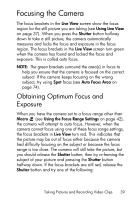
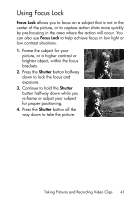
Focusing the Camera The focus brackets in the Live View screen show the focus region for the still picture you are taking (see Using Live View on page 37). When you press the Shutter button halfway down to take a still picture, the camera automatically measures and locks the focus and exposure in the focus region. The focus brackets in the Live View screen turn green when the camera has found and locked the focus and exposure. This is called auto focus. NOTE: The green brackets surround the area(s) in focus to help you ensure that the camera is focused on the correct subject. If the camera keeps focusing on the wrong subject, try using Spot focus (see Auto Focus Area on page 74). Obtaining Optimum Focus and Exposure When you have the camera set to a focus range other than Macro (see Using the Focus Range Settings on page 42), the camera will attempt to auto focus. However, when the camera cannot focus using one of these focus range settings, the focus brackets in Live View turn red. This indicates that the picture may be out of focus either because the camera had difficulty focusing on the subject or because the focus range is too close. The camera will still take the picture, but you should release the Shutter button, then try re-framing the subject of your picture and pressing the Shutter button halfway down. If the focus brackets are still red, release the Shutter button and try one of the following: Taking Pictures and Recording Video Clips 39
-
 1
1 -
2
-
3
-
4
-
5
-
6
-
7
-
8
-
9
-
10
-
11
-
12
-
13
-
14
-
15
-
16
-
17
-
18
-
19
-
20
-
21
-
22
-
23
-
24
-
25
-
26
-
27
-
28
-
29
-
30
-
31
-
32
-
33
-
 34
34 -
 35
35 -
 36
36 -
 37
37 -
 38
38 -
 39
39 -
 40
40 -
 41
41 -
 42
42 -
 43
43 -
 44
44 -
45
-
46
-
47
-
48
-
49
-
50
-
51
-
52
-
53
-
54
-
55
-
56
-
57
-
58
-
59
-
60
-
61
-
62
-
63
-
64
-
65
-
66
-
67
-
68
-
69
-
70
-
71
-
72
-
73
-
74
-
75
-
76
-
77
-
78
-
79
-
80
-
81
-
82
-
83
-
84
-
85
-
86
-
87
-
88
-
89
-
90
-
91
-
92
-
93
-
94
-
95
-
96
-
97
-
98
-
99
-
100
-
101
-
102
-
103
-
104
-
105
-
106
-
107
-
108
-
109
-
110
-
111
-
112
-
113
-
114
-
115
-
116
-
117
-
118
-
119
-
120
-
121
-
122
-
123
-
124
-
125
-
126
-
127
-
128
-
129
-
130
-
131
-
132
-
133
-
134
-
135
-
136
-
137
-
138
-
139
-
140
-
141
-
142
-
143
-
144
-
145
-
146
-
147
-
148
-
149
-
150
-
151
-
152
-
153
-
154
-
155
-
156
-
157
-
158
-
159
-
160
-
161
-
162
-
163
-
164
-
165
-
166
-
167
-
168
-
169
-
170
-
171
-
172
-
173
-
174
-
175
-
176
-
177
-
178
-
179
-
180
-
181
-
182
-
183
-
184
-
185
-
186
-
187
-
188
-
189
-
190
-
191
-
192
-
193
-
194
-
195
-
196
-
197
-
198
-
199
-
200
-
201
-
202
-
203
-
204
-
205
-
206
-
207
-
208
-
209
-
210
-
211
-
212
-
213
-
214
-
215
-
216
-
217
 |
 |