HP Photosmart R717 HP Photosmart R717 Digital Camera with HP Instant Share - U - Page 141
Using a Memory Card Reader, Transferring Images to a Windows Computer Using a, Memory Card Reader
 |
View all HP Photosmart R717 manuals
Add to My Manuals
Save this manual to your list of manuals |
Page 141 highlights
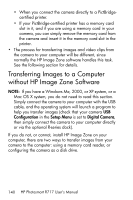
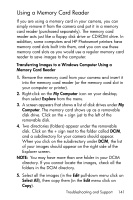
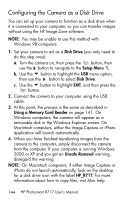
Using a Memory Card Reader If you are using a memory card in your camera, you can simply remove it from the camera and put it in a memory card reader (purchased separately). The memory card reader acts just like a floppy disk drive or CD-ROM drive. In addition, some computers and HP Photosmart printers have memory card slots built into them, and you can use these memory card slots as you would use a regular memory card reader to save images to the computer. Transferring Images to a Windows Computer Using a Memory Card Reader 1. Remove the memory card from your camera and insert it into the memory card reader (or the memory card slot in your computer or printer). 2. Right-click on the My Computer icon on your desktop, then select Explore from the menu. 3. A screen appears that shows a list of disk drives under My Computer. The memory card shows up as a removable disk drive. Click on the + sign just to the left of the removable disk. 4. Two directories (folders) appear under the removable disk. Click on the + sign next to the folder called DCIM, and a subdirectory for your camera should appear. When you click on the subdirectory under DCIM, the list of your images should appear on the right side of the Explorer screen. NOTE: You may have more than one folder in your DCIM directory. If you cannot locate the images, check all the folders in the DCIM directory. 5. Select all the images (in the Edit pull-down menu click on Select All), then copy them (in the Edit menu click on Copy). Troubleshooting and Support 141
-
 1
1 -
2
-
3
-
4
-
5
-
6
-
7
-
8
-
9
-
10
-
11
-
12
-
13
-
14
-
15
-
16
-
17
-
18
-
19
-
20
-
21
-
22
-
23
-
24
-
25
-
26
-
27
-
28
-
29
-
30
-
31
-
32
-
33
-
34
-
35
-
36
-
37
-
38
-
39
-
40
-
41
-
42
-
43
-
44
-
45
-
46
-
47
-
48
-
49
-
50
-
51
-
52
-
53
-
54
-
55
-
56
-
57
-
58
-
59
-
60
-
61
-
62
-
63
-
64
-
65
-
66
-
67
-
68
-
69
-
70
-
71
-
72
-
73
-
74
-
75
-
76
-
77
-
78
-
79
-
80
-
81
-
82
-
83
-
84
-
85
-
86
-
87
-
88
-
89
-
90
-
91
-
92
-
93
-
94
-
95
-
96
-
97
-
98
-
99
-
100
-
101
-
102
-
103
-
104
-
105
-
106
-
107
-
108
-
109
-
110
-
111
-
112
-
113
-
114
-
115
-
116
-
117
-
118
-
119
-
120
-
121
-
122
-
123
-
124
-
125
-
126
-
127
-
128
-
129
-
130
-
131
-
132
-
133
-
134
-
135
-
 136
136 -
 137
137 -
 138
138 -
 139
139 -
 140
140 -
 141
141 -
 142
142 -
 143
143 -
 144
144 -
 145
145 -
 146
146 -
147
-
148
-
149
-
150
-
151
-
152
-
153
-
154
-
155
-
156
-
157
-
158
-
159
-
160
-
161
-
162
-
163
-
164
-
165
-
166
-
167
-
168
-
169
-
170
-
171
-
172
-
173
-
174
-
175
-
176
-
177
-
178
-
179
-
180
-
181
-
182
-
183
-
184
-
185
-
186
-
187
-
188
-
189
-
190
-
191
-
192
-
193
-
194
-
195
-
196
-
197
-
198
-
199
-
200
-
201
-
202
-
203
-
204
-
205
-
206
-
207
-
208
-
209
-
210
-
211
-
212
-
213
-
214
-
215
-
216
-
217
 |
 |