HP Photosmart R717 HP Photosmart R717 Digital Camera with HP Instant Share - U - Page 61
Using the Capture Menu
 |
View all HP Photosmart R717 manuals
Add to My Manuals
Save this manual to your list of manuals |
Page 61 highlights
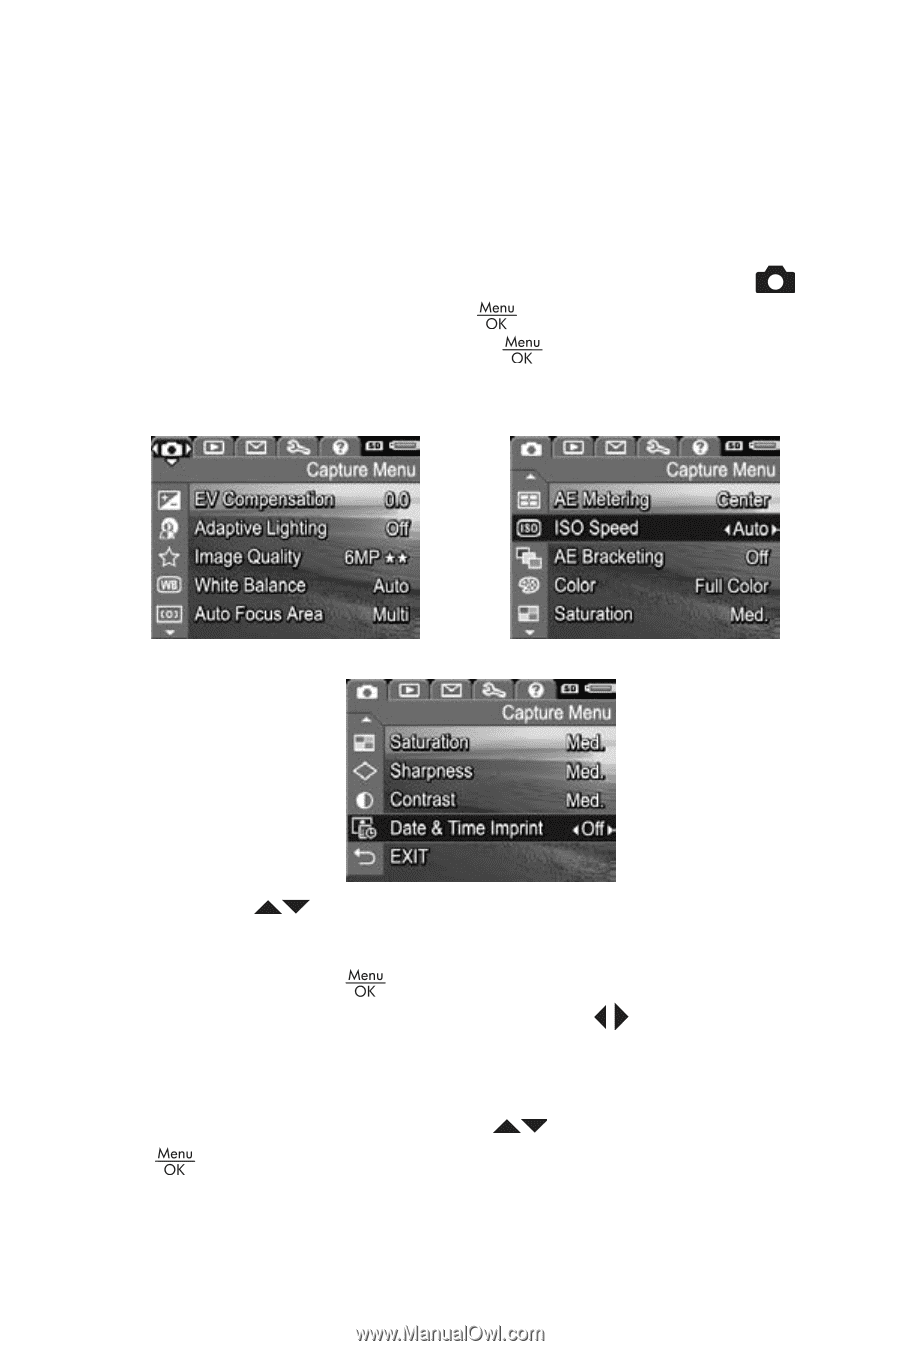
Using the Capture Menu The Capture Menu allows you to adjust various camera settings that affect the characteristics of the images and video clips you capture with your camera. 1. To display the Capture Menu, press the Live View button, and then press the button. If Live View is already on, simply press the button. Screen 1: Screen 2: Screen 3: 2. Use the options. buttons to scroll through the Capture Menu 3. Either press the button to select a highlighted option and display its sub-menu, or use the buttons to change the setting for the highlighted option without going to its sub-menu. 4. Within a sub-menu, use the buttons and then the button to change the setting for the Capture Menu option. Taking Pictures and Recording Video Clips 61
-
 1
1 -
2
-
3
-
4
-
5
-
6
-
7
-
8
-
9
-
10
-
11
-
12
-
13
-
14
-
15
-
16
-
17
-
18
-
19
-
20
-
21
-
22
-
23
-
24
-
25
-
26
-
27
-
28
-
29
-
30
-
31
-
32
-
33
-
34
-
35
-
36
-
37
-
38
-
39
-
40
-
41
-
42
-
43
-
44
-
45
-
46
-
47
-
48
-
49
-
50
-
51
-
52
-
53
-
54
-
55
-
 56
56 -
 57
57 -
 58
58 -
 59
59 -
 60
60 -
 61
61 -
 62
62 -
 63
63 -
 64
64 -
 65
65 -
 66
66 -
67
-
68
-
69
-
70
-
71
-
72
-
73
-
74
-
75
-
76
-
77
-
78
-
79
-
80
-
81
-
82
-
83
-
84
-
85
-
86
-
87
-
88
-
89
-
90
-
91
-
92
-
93
-
94
-
95
-
96
-
97
-
98
-
99
-
100
-
101
-
102
-
103
-
104
-
105
-
106
-
107
-
108
-
109
-
110
-
111
-
112
-
113
-
114
-
115
-
116
-
117
-
118
-
119
-
120
-
121
-
122
-
123
-
124
-
125
-
126
-
127
-
128
-
129
-
130
-
131
-
132
-
133
-
134
-
135
-
136
-
137
-
138
-
139
-
140
-
141
-
142
-
143
-
144
-
145
-
146
-
147
-
148
-
149
-
150
-
151
-
152
-
153
-
154
-
155
-
156
-
157
-
158
-
159
-
160
-
161
-
162
-
163
-
164
-
165
-
166
-
167
-
168
-
169
-
170
-
171
-
172
-
173
-
174
-
175
-
176
-
177
-
178
-
179
-
180
-
181
-
182
-
183
-
184
-
185
-
186
-
187
-
188
-
189
-
190
-
191
-
192
-
193
-
194
-
195
-
196
-
197
-
198
-
199
-
200
-
201
-
202
-
203
-
204
-
205
-
206
-
207
-
208
-
209
-
210
-
211
-
212
-
213
-
214
-
215
-
216
-
217
 |
 |
61
Taking Pictures and Recording Video Clips
Using the Capture Menu
The
Capture Menu
allows you to adjust various camera
settings that affect the characteristics of the images and
video clips you capture with your camera.
1.
To display the
Capture Menu
, press the
Live View
button, and then press the
button. If
Live View
is
already on, simply press the
button.
2.
Use the
buttons to scroll through the
Capture Menu
options.
3.
Either press the
button to select a highlighted option
and display its sub-menu, or use the
buttons to
change the setting for the highlighted option without
going to its sub-menu.
4.
Within a sub-menu, use the
buttons and then the
button to change the setting for the
Capture Menu
option.
Screen 1:
Screen 2:
Screen 3: