HP Photosmart R717 HP Photosmart R717 Digital Camera with HP Instant Share - U - Page 47
Setting the Flash
 |
View all HP Photosmart R717 manuals
Add to My Manuals
Save this manual to your list of manuals |
Page 47 highlights
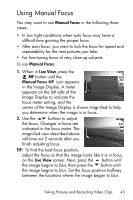
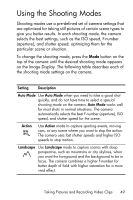
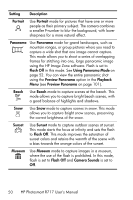
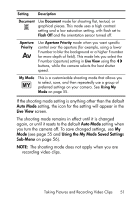
Setting the Flash The Flash button allows you to cycle through the flash settings on the camera. To change the flash setting, press the Flash button until the desired setting appears on the Image Display. The following table describes each of the flash settings on the camera. Setting Auto Flash Description The camera measures the light level and uses the flash if necessary. Red-Eye The camera measures the light level and uses the flash with red-eye reduction if necessary (for a description of red-eye reduction, see Red Eye on page 48). Flash On The camera always uses flash. If the light is behind your subject, you can use this setting to increase the light on the front of your subject. This is called fill-flash. Flash Off The camera will not use flash, no matter the lighting conditions. Use this setting to capture poorly lit subjects that are beyond the flash range, or to capture existinglight scenes. Exposure times may be increased when using this setting, so you should use a tripod to avoid blurry pictures from camera shake. Night The camera uses the flash with red-eye reduction if necessary to illuminate objects in the foreground (see Red Eye on page 48 for a description of red-eye reduction). The camera then continues to expose as if the flash had not been used, to gather the light. Exposure times may be increased when using this setting; therefore it is recommended that you use a tripod to avoid camera shake. Taking Pictures and Recording Video Clips 47
-
 1
1 -
2
-
3
-
4
-
5
-
6
-
7
-
8
-
9
-
10
-
11
-
12
-
13
-
14
-
15
-
16
-
17
-
18
-
19
-
20
-
21
-
22
-
23
-
24
-
25
-
26
-
27
-
28
-
29
-
30
-
31
-
32
-
33
-
34
-
35
-
36
-
37
-
38
-
39
-
40
-
41
-
 42
42 -
 43
43 -
 44
44 -
 45
45 -
 46
46 -
 47
47 -
 48
48 -
 49
49 -
 50
50 -
 51
51 -
 52
52 -
53
-
54
-
55
-
56
-
57
-
58
-
59
-
60
-
61
-
62
-
63
-
64
-
65
-
66
-
67
-
68
-
69
-
70
-
71
-
72
-
73
-
74
-
75
-
76
-
77
-
78
-
79
-
80
-
81
-
82
-
83
-
84
-
85
-
86
-
87
-
88
-
89
-
90
-
91
-
92
-
93
-
94
-
95
-
96
-
97
-
98
-
99
-
100
-
101
-
102
-
103
-
104
-
105
-
106
-
107
-
108
-
109
-
110
-
111
-
112
-
113
-
114
-
115
-
116
-
117
-
118
-
119
-
120
-
121
-
122
-
123
-
124
-
125
-
126
-
127
-
128
-
129
-
130
-
131
-
132
-
133
-
134
-
135
-
136
-
137
-
138
-
139
-
140
-
141
-
142
-
143
-
144
-
145
-
146
-
147
-
148
-
149
-
150
-
151
-
152
-
153
-
154
-
155
-
156
-
157
-
158
-
159
-
160
-
161
-
162
-
163
-
164
-
165
-
166
-
167
-
168
-
169
-
170
-
171
-
172
-
173
-
174
-
175
-
176
-
177
-
178
-
179
-
180
-
181
-
182
-
183
-
184
-
185
-
186
-
187
-
188
-
189
-
190
-
191
-
192
-
193
-
194
-
195
-
196
-
197
-
198
-
199
-
200
-
201
-
202
-
203
-
204
-
205
-
206
-
207
-
208
-
209
-
210
-
211
-
212
-
213
-
214
-
215
-
216
-
217
 |
 |