HP Photosmart R717 HP Photosmart R717 Digital Camera with HP Instant Share - U - Page 18
Install and Format a Memory Card (Optional - user s manual
 |
View all HP Photosmart R717 manuals
Add to My Manuals
Save this manual to your list of manuals |
Page 18 highlights
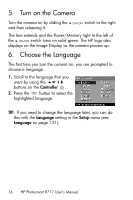
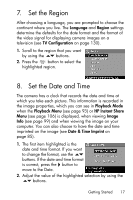
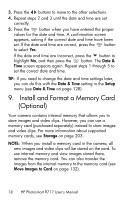
3. Press the buttons to move to the other selections. 4. Repeat steps 2 and 3 until the date and time are set correctly. 5. Press the button when you have entered the proper values for the date and time. A confirmation screen appears, asking if the correct date and time have been set. If the date and time are correct, press the button to select Yes. If the date and time are incorrect, press the button to highlight No, and then press the button. The Date & Time screen appears again. Repeat steps 1 through 5 to set the correct date and time. TIP: If you need to change the date and time settings later, you can do this with the Date & Time setting in the Setup menu (see Date & Time on page 128). 9. Install and Format a Memory Card (Optional) Your camera contains internal memory that allows you to store images and video clips. However, you can use a memory card (purchased separately) instead to store images and video clips. For more information about supported memory cards, see Storage on page 203. NOTE: When you install a memory card in the camera, all new images and video clips will be stored on the card. To use internal memory and view images stored there, remove the memory card. You can also transfer the images from the internal memory to the memory card (see Move Images to Card on page 132). 18 HP Photosmart R717 User's Manual
-
 1
1 -
2
-
3
-
4
-
5
-
6
-
7
-
8
-
9
-
10
-
11
-
12
-
 13
13 -
 14
14 -
 15
15 -
 16
16 -
 17
17 -
 18
18 -
 19
19 -
 20
20 -
 21
21 -
 22
22 -
 23
23 -
24
-
25
-
26
-
27
-
28
-
29
-
30
-
31
-
32
-
33
-
34
-
35
-
36
-
37
-
38
-
39
-
40
-
41
-
42
-
43
-
44
-
45
-
46
-
47
-
48
-
49
-
50
-
51
-
52
-
53
-
54
-
55
-
56
-
57
-
58
-
59
-
60
-
61
-
62
-
63
-
64
-
65
-
66
-
67
-
68
-
69
-
70
-
71
-
72
-
73
-
74
-
75
-
76
-
77
-
78
-
79
-
80
-
81
-
82
-
83
-
84
-
85
-
86
-
87
-
88
-
89
-
90
-
91
-
92
-
93
-
94
-
95
-
96
-
97
-
98
-
99
-
100
-
101
-
102
-
103
-
104
-
105
-
106
-
107
-
108
-
109
-
110
-
111
-
112
-
113
-
114
-
115
-
116
-
117
-
118
-
119
-
120
-
121
-
122
-
123
-
124
-
125
-
126
-
127
-
128
-
129
-
130
-
131
-
132
-
133
-
134
-
135
-
136
-
137
-
138
-
139
-
140
-
141
-
142
-
143
-
144
-
145
-
146
-
147
-
148
-
149
-
150
-
151
-
152
-
153
-
154
-
155
-
156
-
157
-
158
-
159
-
160
-
161
-
162
-
163
-
164
-
165
-
166
-
167
-
168
-
169
-
170
-
171
-
172
-
173
-
174
-
175
-
176
-
177
-
178
-
179
-
180
-
181
-
182
-
183
-
184
-
185
-
186
-
187
-
188
-
189
-
190
-
191
-
192
-
193
-
194
-
195
-
196
-
197
-
198
-
199
-
200
-
201
-
202
-
203
-
204
-
205
-
206
-
207
-
208
-
209
-
210
-
211
-
212
-
213
-
214
-
215
-
216
-
217
 |
 |