HP Photosmart R717 HP Photosmart R717 Digital Camera with HP Instant Share - U - Page 63
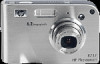
EV Compensation
 |
View all HP Photosmart R717 manuals
Add to My Manuals
Save this manual to your list of manuals |
Page 63 highlights
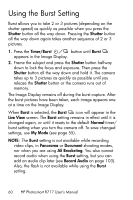
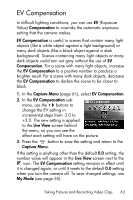
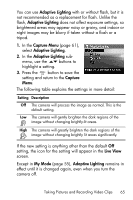
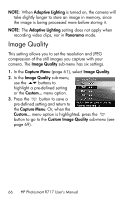
EV Compensation In difficult lighting conditions, you can use EV (Exposure Value) Compensation to override the automatic exposure setting that the camera makes. EV Compensation is useful in scenes that contain many light objects (like a white object against a light background) or many dark objects (like a black object against a dark background). Scenes containing many light objects or many dark objects could turn out gray without the use of EV Compensation. For a scene with many light objects, increase the EV Compensation to a positive number to produce a brighter result. For a scene with many dark objects, decrease the EV Compensation to darken the scene to be closer to black. 1. In the Capture Menu (page 61), select EV Compensation. 2. In the EV Compensation sub- menu, use the buttons to change the EV setting in incremental steps from -3.0 to +3.0. The new setting is applied to the Live View screen behind the menu, so you can see the effect each setting will have on the picture. 3. Press the button to save the setting and return to the Capture Menu. If the setting is anything other than the default 0.0 setting, the number value will appear in the Live View screen next to the icon. The EV Compensation setting remains in effect until it is changed again, or until it resets to the default 0.0 setting when you turn the camera off. To save changed settings, use My Mode (see page 55). Taking Pictures and Recording Video Clips 63
-
 1
1 -
2
-
3
-
4
-
5
-
6
-
7
-
8
-
9
-
10
-
11
-
12
-
13
-
14
-
15
-
16
-
17
-
18
-
19
-
20
-
21
-
22
-
23
-
24
-
25
-
26
-
27
-
28
-
29
-
30
-
31
-
32
-
33
-
34
-
35
-
36
-
37
-
38
-
39
-
40
-
41
-
42
-
43
-
44
-
45
-
46
-
47
-
48
-
49
-
50
-
51
-
52
-
53
-
54
-
55
-
56
-
57
-
 58
58 -
 59
59 -
 60
60 -
 61
61 -
 62
62 -
 63
63 -
 64
64 -
 65
65 -
 66
66 -
 67
67 -
 68
68 -
69
-
70
-
71
-
72
-
73
-
74
-
75
-
76
-
77
-
78
-
79
-
80
-
81
-
82
-
83
-
84
-
85
-
86
-
87
-
88
-
89
-
90
-
91
-
92
-
93
-
94
-
95
-
96
-
97
-
98
-
99
-
100
-
101
-
102
-
103
-
104
-
105
-
106
-
107
-
108
-
109
-
110
-
111
-
112
-
113
-
114
-
115
-
116
-
117
-
118
-
119
-
120
-
121
-
122
-
123
-
124
-
125
-
126
-
127
-
128
-
129
-
130
-
131
-
132
-
133
-
134
-
135
-
136
-
137
-
138
-
139
-
140
-
141
-
142
-
143
-
144
-
145
-
146
-
147
-
148
-
149
-
150
-
151
-
152
-
153
-
154
-
155
-
156
-
157
-
158
-
159
-
160
-
161
-
162
-
163
-
164
-
165
-
166
-
167
-
168
-
169
-
170
-
171
-
172
-
173
-
174
-
175
-
176
-
177
-
178
-
179
-
180
-
181
-
182
-
183
-
184
-
185
-
186
-
187
-
188
-
189
-
190
-
191
-
192
-
193
-
194
-
195
-
196
-
197
-
198
-
199
-
200
-
201
-
202
-
203
-
204
-
205
-
206
-
207
-
208
-
209
-
210
-
211
-
212
-
213
-
214
-
215
-
216
-
217
 |
 |