Netgear AC1750 User Manual - Page 117
Set up a default DMZ server
 |
View all Netgear AC1750 manuals
Add to My Manuals
Save this manual to your list of manuals |
Page 117 highlights
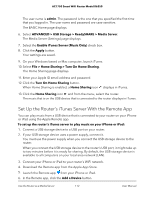
AC1750 Smart WiFi Router Model R6350 A login window opens. 3. Enter the router user name and password. The user name is admin. The password is the one that you specified the first time that you logged in. The user name and password are case-sensitive. The BASIC Home page displays. 4. Select ADVANCED > Setup > WAN Setup. The WAN Setup page displays. 5. To enable a port scan and disable DoS protection, select the Disable Port Scan and DoS Protection check box. 6. To enable the router to respond to a ping, select the Respond to Ping on Internet Port check box. 7. Click the Apply button. Your settings are saved. Set up a default DMZ server The default DMZ server feature is helpful when you are using some online games and videoconferencing applications that are incompatible with Network Address Translation (NAT). The router is programmed to recognize some of these applications and to work correctly with them, but other applications might not function well. In some cases, one local computer can run the application correctly if the IP address for that computer is entered as the default DMZ server. WARNING: DMZ servers pose a security risk. A computer designated as the default DMZ server loses much of the protection of the firewall and is exposed to exploits from the Internet. If compromised, the DMZ server computer can be used to attack other computers on your network. The router usually detects and discards incoming traffic from the Internet that is not a response to one of your local computers or a service that you configured on the Port Forwarding/Port Triggering page. Instead of discarding this traffic, you can specify that the router forwards the traffic to one computer on your network. This computer is called the default DMZ server. To set up a default DMZ server: 1. Launch a web browser from a computer or mobile device that is connected to the router network. 2. Enter http://www.routerlogin.net. Manage the WAN and LAN 117 Network Settings User Manual
-
 1
1 -
2
-
3
-
4
-
5
-
6
-
7
-
8
-
9
-
10
-
11
-
12
-
13
-
14
-
15
-
16
-
17
-
18
-
19
-
20
-
21
-
22
-
23
-
24
-
25
-
26
-
27
-
28
-
29
-
30
-
31
-
32
-
33
-
34
-
35
-
36
-
37
-
38
-
39
-
40
-
41
-
42
-
43
-
44
-
45
-
46
-
47
-
48
-
49
-
50
-
51
-
52
-
53
-
54
-
55
-
56
-
57
-
58
-
59
-
60
-
61
-
62
-
63
-
64
-
65
-
66
-
67
-
68
-
69
-
70
-
71
-
72
-
73
-
74
-
75
-
76
-
77
-
78
-
79
-
80
-
81
-
82
-
83
-
84
-
85
-
86
-
87
-
88
-
89
-
90
-
91
-
92
-
93
-
94
-
95
-
96
-
97
-
98
-
99
-
100
-
101
-
102
-
103
-
104
-
105
-
106
-
107
-
108
-
109
-
110
-
111
-
 112
112 -
 113
113 -
 114
114 -
 115
115 -
 116
116 -
 117
117 -
 118
118 -
 119
119 -
 120
120 -
 121
121 -
 122
122 -
123
-
124
-
125
-
126
-
127
-
128
-
129
-
130
-
131
-
132
-
133
-
134
-
135
-
136
-
137
-
138
-
139
-
140
-
141
-
142
-
143
-
144
-
145
-
146
-
147
-
148
-
149
-
150
-
151
-
152
-
153
-
154
-
155
-
156
-
157
-
158
-
159
-
160
-
161
-
162
-
163
-
164
-
165
-
166
-
167
-
168
-
169
-
170
-
171
-
172
-
173
-
174
-
175
-
176
-
177
-
178
-
179
-
180
-
181
-
182
-
183
-
184
-
185
-
186
-
187
-
188
-
189
-
190
-
191
-
192
-
193
-
194
-
195
-
196
-
197
-
198
-
199
-
200
-
201
-
202
-
203
-
204
 |
 |