Netgear AC1750 User Manual - Page 121
Manage the LAN IP Address Settings
 |
View all Netgear AC1750 manuals
Add to My Manuals
Save this manual to your list of manuals |
Page 121 highlights
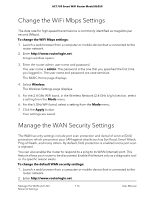
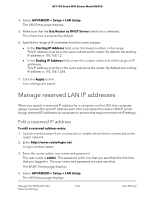
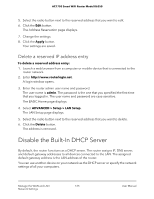
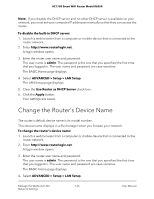
AC1750 Smart WiFi Router Model R6350 3. Enter the router user name and password. The user name is admin. The password is the one that you specified the first time that you logged in. The user name and password are case-sensitive. The BASIC Home page displays. 4. Select ADVANCED > Setup > WAN Setup. The WAN Setup page displays. 5. To disable the SIP ALG, select the Disable SIP ALG check box. The SIP ALG is enabled by default. 6. Click the Apply button. Your settings are saved. Manage the LAN IP Address Settings The router is preconfigured to use private IP addresses on the LAN side and to act as a DHCP server. The router's default LAN IP configuration is as follows: • LAN IP address. 192.168.1.1 (this is the same as www.routerlogin.net) • Subnet mask. 255.255.255.0 These addresses are part of the designated private address range for use in private networks and are suitable for most applications. The IP address and subnet mask identify which addresses are local to a specific device and which must be reached through a gateway or router. You might want to change these settings if you need a specific IP subnet that one or more devices on the network use, or if competing subnets use the same IP scheme. To change the LAN IP address settings: 1. Launch a web browser from a computer or mobile device that is connected to the router network. 2. Enter http://www.routerlogin.net. A login window opens. 3. Enter the router user name and password. The user name is admin. The password is the one that you specified the first time that you logged in. The user name and password are case-sensitive. The BASIC Home page displays. 4. Select ADVANCED > Setup > LAN Setup. Manage the WAN and LAN 121 Network Settings User Manual
-
 1
1 -
2
-
3
-
4
-
5
-
6
-
7
-
8
-
9
-
10
-
11
-
12
-
13
-
14
-
15
-
16
-
17
-
18
-
19
-
20
-
21
-
22
-
23
-
24
-
25
-
26
-
27
-
28
-
29
-
30
-
31
-
32
-
33
-
34
-
35
-
36
-
37
-
38
-
39
-
40
-
41
-
42
-
43
-
44
-
45
-
46
-
47
-
48
-
49
-
50
-
51
-
52
-
53
-
54
-
55
-
56
-
57
-
58
-
59
-
60
-
61
-
62
-
63
-
64
-
65
-
66
-
67
-
68
-
69
-
70
-
71
-
72
-
73
-
74
-
75
-
76
-
77
-
78
-
79
-
80
-
81
-
82
-
83
-
84
-
85
-
86
-
87
-
88
-
89
-
90
-
91
-
92
-
93
-
94
-
95
-
96
-
97
-
98
-
99
-
100
-
101
-
102
-
103
-
104
-
105
-
106
-
107
-
108
-
109
-
110
-
111
-
112
-
113
-
114
-
115
-
 116
116 -
 117
117 -
 118
118 -
 119
119 -
 120
120 -
 121
121 -
 122
122 -
 123
123 -
 124
124 -
 125
125 -
 126
126 -
127
-
128
-
129
-
130
-
131
-
132
-
133
-
134
-
135
-
136
-
137
-
138
-
139
-
140
-
141
-
142
-
143
-
144
-
145
-
146
-
147
-
148
-
149
-
150
-
151
-
152
-
153
-
154
-
155
-
156
-
157
-
158
-
159
-
160
-
161
-
162
-
163
-
164
-
165
-
166
-
167
-
168
-
169
-
170
-
171
-
172
-
173
-
174
-
175
-
176
-
177
-
178
-
179
-
180
-
181
-
182
-
183
-
184
-
185
-
186
-
187
-
188
-
189
-
190
-
191
-
192
-
193
-
194
-
195
-
196
-
197
-
198
-
199
-
200
-
201
-
202
-
203
-
204
 |
 |
