Netgear FVS318G FVS318G User Manual - Page 89
Connection Name, Pre-shared Key, Remote and Local WAN IP, Addresses or Internet Name, Remote LAN IP
 |
UPC - 606449064827
View all Netgear FVS318G manuals
Add to My Manuals
Save this manual to your list of manuals |
Page 89 highlights
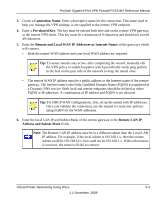
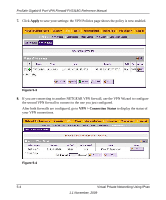
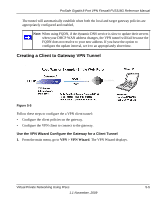
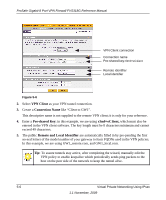
ProSafe Gigabit 8 Port VPN Firewall FVS318G Reference Manual 3. Create a Connection Name. Enter a descriptive name for the connection. This name used to help you manage the VPN settings; is not supplied to the remote VPN endpoint. 4. Enter a Pre-shared Key. The key must be entered both here and on the remote VPN gateway, or the remote VPN client. This key must be a minimum of 8 characters and should not exceed 49 characters. 5. Enter the Remote and Local WAN IP Addresses or Internet Names of the gateways which will connect. • Both the remote WAN address and your local WAN address are required. Tip: To assure tunnels stay active, after completing the wizard, manually edit the VPN policy to enable keepalive which periodically sends ping packets to the host on the peer side of the network to keep the tunnel alive. • The remote WAN IP address must be a public address or the Internet name of the remote gateway. The Internet name is the Fully Qualified Domain Name (FQDN) as registered in a Dynamic DNS service. Both local and remote endpoints should be defined as either FQDN or IP addresses. A combination of IP address and FQDN is not allowed. Tip: For DHCP WAN configurations, first, set up the tunnel with IP addresses. Once you validate the connection, use the wizard to create new policies using FQDN for the WAN addresses. 6. Enter the local LAN IP and Subnet Mask of the remote gateway in the Remote LAN IP Address and Subnet Mask fields. Note: The Remote LAN IP address must be in a different subnet than the Local LAN IP address. For example, if the local subnet is 192.168.1.x, then the remote subnet could be 192.168.10.x. but could not be 192.168.1.x. If this information is incorrect, the tunnel will fail to connect. Virtual Private Networking Using IPsec 5-3 1.1 November, 2009
-
 1
1 -
2
-
3
-
4
-
5
-
6
-
7
-
8
-
9
-
10
-
11
-
12
-
13
-
14
-
15
-
16
-
17
-
18
-
19
-
20
-
21
-
22
-
23
-
24
-
25
-
26
-
27
-
28
-
29
-
30
-
31
-
32
-
33
-
34
-
35
-
36
-
37
-
38
-
39
-
40
-
41
-
42
-
43
-
44
-
45
-
46
-
47
-
48
-
49
-
50
-
51
-
52
-
53
-
54
-
55
-
56
-
57
-
58
-
59
-
60
-
61
-
62
-
63
-
64
-
65
-
66
-
67
-
68
-
69
-
70
-
71
-
72
-
73
-
74
-
75
-
76
-
77
-
78
-
79
-
80
-
81
-
82
-
83
-
 84
84 -
 85
85 -
 86
86 -
 87
87 -
 88
88 -
 89
89 -
 90
90 -
 91
91 -
 92
92 -
 93
93 -
 94
94 -
95
-
96
-
97
-
98
-
99
-
100
-
101
-
102
-
103
-
104
-
105
-
106
-
107
-
108
-
109
-
110
-
111
-
112
-
113
-
114
-
115
-
116
-
117
-
118
-
119
-
120
-
121
-
122
-
123
-
124
-
125
-
126
-
127
-
128
-
129
-
130
-
131
-
132
-
133
-
134
-
135
-
136
-
137
-
138
-
139
-
140
-
141
-
142
-
143
-
144
-
145
-
146
-
147
-
148
-
149
-
150
-
151
-
152
-
153
-
154
-
155
-
156
-
157
-
158
-
159
-
160
-
161
-
162
-
163
-
164
-
165
-
166
-
167
-
168
-
169
-
170
-
171
-
172
-
173
-
174
-
175
-
176
-
177
-
178
-
179
-
180
 |
 |