Oki PT330 PT330/331 LAN Card Manual - Page 43
Printing Using The Standard Print Client Of The Operating System
 |
View all Oki PT330 manuals
Add to My Manuals
Save this manual to your list of manuals |
Page 43 highlights
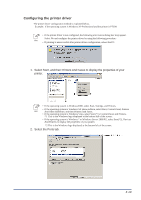
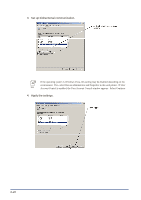
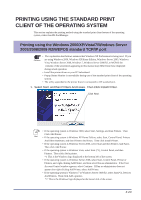
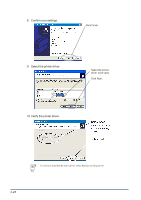
PRINTING USING THE STANDARD PRINT CLIENT OF THE OPERATING SYSTEM This section explains the printing method using the standard print client feature of the operating system, rather than PR-PortManager. Printing using the Windows 2000/XP/Vista/7/Windows Server 2003/2008/2008 R2/WEPOS standard TCP/IP port Caution • The explanation that follows assumes that Windows XP Professional is being used. If you are using Windows 2000, Windows XP Home Edition, Windows Server 2003, Windows Vista, Windows Server 2008, Windows 7, Windows Server 2008 R2, or WEPOS the contents of the screenshots appearing in this manual may differ from those displayed during actual operation. • Install the printer driver on your PC beforehand. • Popup Status Monitor is unavailable during use of the standard print client of the operating system. • The utility appended to the printer doesn't correspond to OS standard port. 1. Select Start, and then Printers And Faxes. Then Click Install Printer. Click Next. • If the operating system is Windows 2000, select Start, Settings, and then Printers. Then Click Add Printer. Hint • If the operating system is Windows XP Home Edition, select Start, Control Panel, Printers And Other Hardware, and then Printers And Faxes. Then click Install Printer. • If the operating system is Windows Server 2003, select Start and then Printers And Faxes. Then click Add Printer. • If the operating system is Windows Vista, select Start (*1), Control Panel, and then Printers. Then click Add a printer. *1 This is the Windows logo displayed at the bottom left of the screen. • If the operating system is Windows Server 2008, select Start, Control Panel, Printer or Printers, and right-clicking Add Printer, and then select Run as administrator. If the User Account Control window appears, select Continue. If Run as administrator does not appear after right-clicking Add Printer, select Add Printer. • If the operating system is Windows 7 or Windows Server 2008 R2, select Start(*2), Devices And Printers. Then click Add a printers. *2 This is the Windows logo displayed at the bottom left of the screen. 3-23
-
 1
1 -
2
-
3
-
4
-
5
-
6
-
7
-
8
-
9
-
10
-
11
-
12
-
13
-
14
-
15
-
16
-
17
-
18
-
19
-
20
-
21
-
22
-
23
-
24
-
25
-
26
-
27
-
28
-
29
-
30
-
31
-
32
-
33
-
34
-
35
-
36
-
37
-
 38
38 -
 39
39 -
 40
40 -
 41
41 -
 42
42 -
 43
43 -
 44
44 -
 45
45 -
 46
46 -
 47
47 -
 48
48 -
49
-
50
-
51
-
52
-
53
-
54
-
55
-
56
-
57
-
58
-
59
-
60
-
61
-
62
-
63
-
64
-
65
-
66
-
67
-
68
-
69
-
70
-
71
-
72
-
73
-
74
-
75
-
76
-
77
-
78
-
79
-
80
-
81
-
82
-
83
-
84
-
85
-
86
-
87
-
88
-
89
-
90
-
91
-
92
-
93
-
94
-
95
-
96
-
97
-
98
-
99
-
100
-
101
-
102
 |
 |