Ricoh Pro 8120s User Guide - Page 112
Loading Paper into Trays 2 and 3, Square the paper and load it print side down.
 |
View all Ricoh Pro 8120s manuals
Add to My Manuals
Save this manual to your list of manuals |
Page 112 highlights
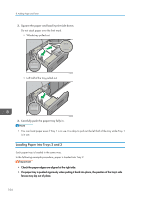
8. Adding Paper and Toner 2. Square the paper and load it print side down. Do not stack paper over the limit mark. • Whole tray pulled out CWW302 • Left half of the tray pulled out CWW303 3. Carefully push the paper tray fully in. • You can load paper even if Tray 1 is in use. It is okay to pull out the left half of the tray while Tray 1 is in use. Loading Paper into Trays 2 and 3 Each paper tray is loaded in the same way. In the following example procedure, paper is loaded into Tray 2. • Check the paper edges are aligned at the right side. • If a paper tray is pushed vigorously when putting it back into place, the position of the tray's side fences may slip out of place. 104

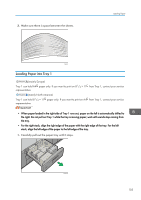
2.
Square the paper and load it print side down.
Do not stack paper over the limit mark.
•
Whole tray pulled out
CWW302
•
Left half of the tray pulled out
CWW303
3.
Carefully push the paper tray fully in.
•
You can load paper even if Tray 1 is in use. It is okay to pull out the left half of the tray while Tray 1
is in use.
Loading Paper into Trays 2 and 3
Each paper tray is loaded in the same way.
In the following example procedure, paper is loaded into Tray 2.
•
Check the paper edges are aligned at the right side.
•
If a paper tray is pushed vigorously when putting it back into place, the position of the tray's side
fences may slip out of place.
8. Adding Paper and Toner
104


