Ricoh Pro 8120s User Guide - Page 91
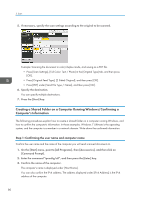
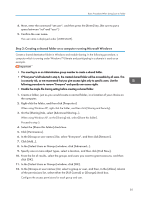
Press [Specify Other Auth. Info] on the right side of Folder Authentication., AB], [CD], [EF], [GH]
 |
View all Ricoh Pro 8120s manuals
Add to My Manuals
Save this manual to your list of manuals |
Page 91 highlights
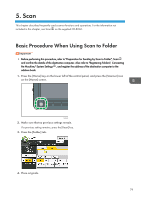
Basic Procedure When Using Scan to Folder 8. Press the key for the classification you want to use under "Select Title". The keys you can select are as follows: • [Frequent]: Added to the page that is displayed first. • [AB], [CD], [EF], [GH], [IJK], [LMN], [OPQ], [RST], [UVW], [XYZ], [1] to [10]: Added to the list of items in the selected title. You can select [Frequent] and one more key for each title. 9. Press [Auth. Info], and then press [ Next]. 10. Press [Specify Other Auth. Info] on the right side of "Folder Authentication". When [Do not Specify] is selected, the SMB User Name and SMB Password that you have specified in "Default User Name / Password (Send)" of File Transfer settings are applied. 11. Press [Change] under "Login User Name". 12. Enter the login user name of the destination computer, and then press [OK]. 13. Press [Change] under "Login Password". 14. Enter the password of the destination computer, and then press [OK]. 15. Enter the password again to confirm, and then press [OK]. 16. Press [Folder]. 83
-
 1
1 -
2
-
3
-
4
-
5
-
6
-
7
-
8
-
9
-
10
-
11
-
12
-
13
-
14
-
15
-
16
-
17
-
18
-
19
-
20
-
21
-
22
-
23
-
24
-
25
-
26
-
27
-
28
-
29
-
30
-
31
-
32
-
33
-
34
-
35
-
36
-
37
-
38
-
39
-
40
-
41
-
42
-
43
-
44
-
45
-
46
-
47
-
48
-
49
-
50
-
51
-
52
-
53
-
54
-
55
-
56
-
57
-
58
-
59
-
60
-
61
-
62
-
63
-
64
-
65
-
66
-
67
-
68
-
69
-
70
-
71
-
72
-
73
-
74
-
75
-
76
-
77
-
78
-
79
-
80
-
81
-
82
-
83
-
84
-
85
-
 86
86 -
 87
87 -
 88
88 -
 89
89 -
 90
90 -
 91
91 -
 92
92 -
 93
93 -
 94
94 -
 95
95 -
 96
96 -
97
-
98
-
99
-
100
-
101
-
102
-
103
-
104
-
105
-
106
-
107
-
108
-
109
-
110
-
111
-
112
-
113
-
114
-
115
-
116
-
117
-
118
-
119
-
120
-
121
-
122
-
123
-
124
-
125
-
126
-
127
-
128
-
129
-
130
-
131
-
132
-
133
-
134
-
135
-
136
-
137
-
138
-
139
-
140
-
141
-
142
-
143
-
144
-
145
-
146
-
147
-
148
-
149
-
150
-
151
-
152
-
153
-
154
-
155
-
156
-
157
-
158
-
159
-
160
-
161
-
162
-
163
-
164
-
165
-
166
-
167
-
168
-
169
-
170
-
171
-
172
-
173
-
174
-
175
-
176
-
177
-
178
-
179
-
180
-
181
-
182
-
183
-
184
-
185
-
186
-
187
-
188
-
189
-
190
-
191
-
192
-
193
-
194
-
195
-
196
-
197
-
198
-
199
-
200
-
201
-
202
-
203
-
204
-
205
-
206
-
207
-
208
-
209
-
210
-
211
-
212
-
213
-
214
-
215
-
216
-
217
-
218
-
219
-
220
-
221
-
222
-
223
-
224
-
225
-
226
-
227
-
228
-
229
-
230
 |
 |
