Ricoh Pro 8120s User Guide - Page 122
Loading Orientation-fixed Paper or Two-sided Paper, While lightly pinching the side fence
 |
View all Ricoh Pro 8120s manuals
Add to My Manuals
Save this manual to your list of manuals |
Page 122 highlights
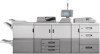
8. Adding Paper and Toner 1. While lightly pinching the side fence, align it with the paper size to be loaded. CWW323 2. Load paper face up and neatly stacked. Do not stack paper over the limit mark. CWW324 • You cannot perfect bind a booklet if the thickness of the book block's spine exceeds 23 mm (0.9 inches). • Depending on your machine, the procedure for selecting the orientation of covers and originals for the printer function might be slightly different. For details, refer to the procedure for your machine. • When loading thick paper of 251.0 g/m2 (138.8 lb. Index) or heavier in the interposer trays of the perfect binder, make sure the grain of the paper is perpendicular to the feed direction. • If you are loading sheets that are likely to stick together (such as sheets of coated paper), be sure to fan them thoroughly before loading. Fanning them will help prevent jams and allow them to be fed in one sheet at a time. • The perfect binding process may scratch glossy paper. Loading Orientation-fixed Paper or Two-sided Paper Orientation-fixed (top to bottom) or two-sided paper (for example, letterhead paper, punched paper, or copied paper) might not be printed correctly, depending on how the originals and paper are placed. 114
-
 1
1 -
2
-
3
-
4
-
5
-
6
-
7
-
8
-
9
-
10
-
11
-
12
-
13
-
14
-
15
-
16
-
17
-
18
-
19
-
20
-
21
-
22
-
23
-
24
-
25
-
26
-
27
-
28
-
29
-
30
-
31
-
32
-
33
-
34
-
35
-
36
-
37
-
38
-
39
-
40
-
41
-
42
-
43
-
44
-
45
-
46
-
47
-
48
-
49
-
50
-
51
-
52
-
53
-
54
-
55
-
56
-
57
-
58
-
59
-
60
-
61
-
62
-
63
-
64
-
65
-
66
-
67
-
68
-
69
-
70
-
71
-
72
-
73
-
74
-
75
-
76
-
77
-
78
-
79
-
80
-
81
-
82
-
83
-
84
-
85
-
86
-
87
-
88
-
89
-
90
-
91
-
92
-
93
-
94
-
95
-
96
-
97
-
98
-
99
-
100
-
101
-
102
-
103
-
104
-
105
-
106
-
107
-
108
-
109
-
110
-
111
-
112
-
113
-
114
-
115
-
116
-
 117
117 -
 118
118 -
 119
119 -
 120
120 -
 121
121 -
 122
122 -
 123
123 -
 124
124 -
 125
125 -
 126
126 -
 127
127 -
128
-
129
-
130
-
131
-
132
-
133
-
134
-
135
-
136
-
137
-
138
-
139
-
140
-
141
-
142
-
143
-
144
-
145
-
146
-
147
-
148
-
149
-
150
-
151
-
152
-
153
-
154
-
155
-
156
-
157
-
158
-
159
-
160
-
161
-
162
-
163
-
164
-
165
-
166
-
167
-
168
-
169
-
170
-
171
-
172
-
173
-
174
-
175
-
176
-
177
-
178
-
179
-
180
-
181
-
182
-
183
-
184
-
185
-
186
-
187
-
188
-
189
-
190
-
191
-
192
-
193
-
194
-
195
-
196
-
197
-
198
-
199
-
200
-
201
-
202
-
203
-
204
-
205
-
206
-
207
-
208
-
209
-
210
-
211
-
212
-
213
-
214
-
215
-
216
-
217
-
218
-
219
-
220
-
221
-
222
-
223
-
224
-
225
-
226
-
227
-
228
-
229
-
230
 |
 |
