Ricoh Pro 8120s User Guide - Page 93
Locating the SMB folder using Browse Network, Deleting an SMB Registered Folder
 |
View all Ricoh Pro 8120s manuals
Add to My Manuals
Save this manual to your list of manuals |
Page 93 highlights
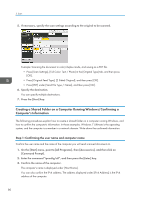
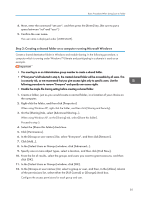
Basic Procedure When Using Scan to Folder If the network does not allow automatic obtaining of IP addresses, include the destination computer's IP address in the path. For example: if the IP address of the destination computer is "192.168.0.191", and the folder name is "Share", the path will be \\192.168.0.191\Share. 3. Press [OK]. If the format of the entered path is not correct, a message appears. Press [Exit], and then enter the path again. Locating the SMB folder using Browse Network 1. Press [Browse Network]. The client computers sharing the same network as the machine appear. Network display only lists client computers you are authorized to access. 2. Select the group that contains the destination computer. 3. Select the computer name of the destination computer. Shared folders under it appear. You can press [Up One Level] to switch between levels. 4. Select the folder you want to register. 5. Press [OK]. Deleting an SMB Registered Folder 1. Press the [User Tools] key. 2. Press [Address Book Mangmnt]. 3. Check that [Program / Change] is selected. 4. Select the name whose folder you want to delete. Press the name key, or enter the registered number using the number keys. You can search by the registered name, user code, folder name, or e-mail address. 85
-
 1
1 -
2
-
3
-
4
-
5
-
6
-
7
-
8
-
9
-
10
-
11
-
12
-
13
-
14
-
15
-
16
-
17
-
18
-
19
-
20
-
21
-
22
-
23
-
24
-
25
-
26
-
27
-
28
-
29
-
30
-
31
-
32
-
33
-
34
-
35
-
36
-
37
-
38
-
39
-
40
-
41
-
42
-
43
-
44
-
45
-
46
-
47
-
48
-
49
-
50
-
51
-
52
-
53
-
54
-
55
-
56
-
57
-
58
-
59
-
60
-
61
-
62
-
63
-
64
-
65
-
66
-
67
-
68
-
69
-
70
-
71
-
72
-
73
-
74
-
75
-
76
-
77
-
78
-
79
-
80
-
81
-
82
-
83
-
84
-
85
-
86
-
87
-
 88
88 -
 89
89 -
 90
90 -
 91
91 -
 92
92 -
 93
93 -
 94
94 -
 95
95 -
 96
96 -
 97
97 -
 98
98 -
99
-
100
-
101
-
102
-
103
-
104
-
105
-
106
-
107
-
108
-
109
-
110
-
111
-
112
-
113
-
114
-
115
-
116
-
117
-
118
-
119
-
120
-
121
-
122
-
123
-
124
-
125
-
126
-
127
-
128
-
129
-
130
-
131
-
132
-
133
-
134
-
135
-
136
-
137
-
138
-
139
-
140
-
141
-
142
-
143
-
144
-
145
-
146
-
147
-
148
-
149
-
150
-
151
-
152
-
153
-
154
-
155
-
156
-
157
-
158
-
159
-
160
-
161
-
162
-
163
-
164
-
165
-
166
-
167
-
168
-
169
-
170
-
171
-
172
-
173
-
174
-
175
-
176
-
177
-
178
-
179
-
180
-
181
-
182
-
183
-
184
-
185
-
186
-
187
-
188
-
189
-
190
-
191
-
192
-
193
-
194
-
195
-
196
-
197
-
198
-
199
-
200
-
201
-
202
-
203
-
204
-
205
-
206
-
207
-
208
-
209
-
210
-
211
-
212
-
213
-
214
-
215
-
216
-
217
-
218
-
219
-
220
-
221
-
222
-
223
-
224
-
225
-
226
-
227
-
228
-
229
-
230
 |
 |
