Ricoh Pro 8120s User Guide - Page 113

Loading Paper into the Multi Bypass Tray (Tray 7), and Adding Paper

Page 113 highlights

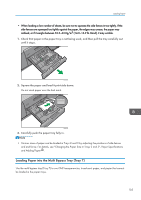
Loading Paper • When loading a low number of sheets, be sure not to squeeze the side fences in too tightly. If the side fences are squeezed too tightly against the paper, the edges may crease, the paper may misfeed, or if it weighs between 52.3-63.0g/m2 (14.0-16.9 lb. Bond), it may wrinkle. 1. Check that paper in the paper tray is not being used, and then pull the tray carefully out until it stops. CWW306 2. Square the paper and load it print side down. Do not stack paper over the limit mark. CWW307 3. Carefully push the paper tray fully in. • Various sizes of paper can be loaded in Trays 2 and 3 by adjusting the positions of side fences and end fence. For details, see "Changing the Paper Size in Trays 2 and 3", Paper Specifications and Adding Paper . Loading Paper into the Multi Bypass Tray (Tray 7) Use the multi bypass tray (Tray 7) to use OHP transparencies, translucent paper, and paper that cannot be loaded in the paper trays. 105

  • 1
  • 2
  • 3
  • 4
  • 5
  • 6
  • 7
  • 8
  • 9
  • 10
  • 11
  • 12
  • 13
  • 14
  • 15
  • 16
  • 17
  • 18
  • 19
  • 20
  • 21
  • 22
  • 23
  • 24
  • 25
  • 26
  • 27
  • 28
  • 29
  • 30
  • 31
  • 32
  • 33
  • 34
  • 35
  • 36
  • 37
  • 38
  • 39
  • 40
  • 41
  • 42
  • 43
  • 44
  • 45
  • 46
  • 47
  • 48
  • 49
  • 50
  • 51
  • 52
  • 53
  • 54
  • 55
  • 56
  • 57
  • 58
  • 59
  • 60
  • 61
  • 62
  • 63
  • 64
  • 65
  • 66
  • 67
  • 68
  • 69
  • 70
  • 71
  • 72
  • 73
  • 74
  • 75
  • 76
  • 77
  • 78
  • 79
  • 80
  • 81
  • 82
  • 83
  • 84
  • 85
  • 86
  • 87
  • 88
  • 89
  • 90
  • 91
  • 92
  • 93
  • 94
  • 95
  • 96
  • 97
  • 98
  • 99
  • 100
  • 101
  • 102
  • 103
  • 104
  • 105
  • 106
  • 107
  • 108
  • 109
  • 110
  • 111
  • 112
  • 113
  • 114
  • 115
  • 116
  • 117
  • 118
  • 119
  • 120
  • 121
  • 122
  • 123
  • 124
  • 125
  • 126
  • 127
  • 128
  • 129
  • 130
  • 131
  • 132
  • 133
  • 134
  • 135
  • 136
  • 137
  • 138
  • 139
  • 140
  • 141
  • 142
  • 143
  • 144
  • 145
  • 146
  • 147
  • 148
  • 149
  • 150
  • 151
  • 152
  • 153
  • 154
  • 155
  • 156
  • 157
  • 158
  • 159
  • 160
  • 161
  • 162
  • 163
  • 164
  • 165
  • 166
  • 167
  • 168
  • 169
  • 170
  • 171
  • 172
  • 173
  • 174
  • 175
  • 176
  • 177
  • 178
  • 179
  • 180
  • 181
  • 182
  • 183
  • 184
  • 185
  • 186
  • 187
  • 188
  • 189
  • 190
  • 191
  • 192
  • 193
  • 194
  • 195
  • 196
  • 197
  • 198
  • 199
  • 200
  • 201
  • 202
  • 203
  • 204
  • 205
  • 206
  • 207
  • 208
  • 209
  • 210
  • 211
  • 212
  • 213
  • 214
  • 215
  • 216
  • 217
  • 218
  • 219
  • 220
  • 221
  • 222
  • 223
  • 224
  • 225
  • 226
  • 227
  • 228
  • 229
  • 230

When loading a low number of sheets, be sure not to squeeze the side fences in too tightly. If the
side fences are squeezed too tightly against the paper, the edges may crease, the paper may
misfeed, or if it weighs between 52.3–63.0g/m
2
(14.0–16.9 lb. Bond), it may wrinkle.
1.
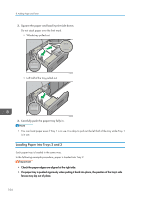
Check that paper in the paper tray is not being used, and then pull the tray carefully out
until it stops.
CWW306
2.
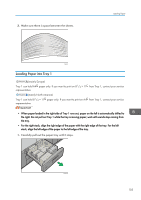
Square the paper and load it print side down.
Do not stack paper over the limit mark.
CWW307
3.
Carefully push the paper tray fully in.
Various sizes of paper can be loaded in Trays 2 and 3 by adjusting the positions of side fences
and end fence. For details, see "Changing the Paper Size in Trays 2 and 3", Paper Specifications
and Adding Paper
.
Loading Paper into the Multi Bypass Tray (Tray 7)
Use the multi bypass tray (Tray 7) to use OHP transparencies, translucent paper, and paper that cannot
be loaded in the paper trays.
Loading Paper
105