Samsung SCH R500 User Manual (ENGLISH) - Page 56
Messages, Outbox, Erase, Options, RESEND - unlock codes
 |
View all Samsung SCH R500 manuals
Add to My Manuals
Save this manual to your list of manuals |
Page 56 highlights
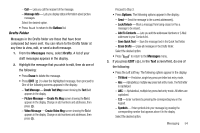
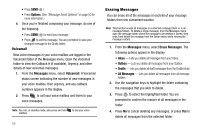
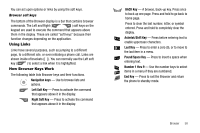
Messages and Lock Mode Your phone can still receive messages while in Lock Mode. The time and date of the message appear in the display, but you cannot access the message until you enter the lock code. (For more information, refer to "Lock Phone" on page 116.) Outbox Your phone stores outgoing messages in the Outbox, regardless of whether the message was successfully sent to, or received by, the addressee. Tip: Verify whether and when a message or e-mail was successfully received by enabling the Delivery Ack message send option. (See "Message Send Options" on page 50 for more information.) 1. From the Messages menu, select Outbox. A list of your outgoing messages appears in the display. 2. Use the Navigation key to highlight a message, then do one of the following: • Press Erase to delete the message. • Press OPEN ( ) to view the highlighted message, then proceed to Step 3. • Press Options. The following options appear in the display: - Forward - Send the message to another addressee. - Resend - Re-send the message. 53 - Lock / Unlock - Block a message from being erased or free a message to be erased. - Add To Contacts - Lets you add the addressee Numbers or E-Mail addresses to your Contacts list. - Erase Outbox - Erase all messages in the Outbox folder. - Message Info - Lets you display status information about picture messages. Select the desired option. • Press CLR to return to the Messages menu. 3. While viewing a selected message, do one of the following: • Press Erase to delete the message. • Press RESEND ( ) to resend a message to the original addressee. • Press Options, The following options appear in the display: - Play Again - Picture Messages only - Replay a sound file included with a Picture message. - Forward - Send the message to another addressee. - Erase - Erase this message, if Unlocked. - Lock / Unlock - Block a message from being erased or free a message to be erased. - Save Quick Text - Save the message text in the Quick Text folder. - Add To Contacts - Lets you add the addressee Numbers or E-Mail addresses to your Contacts list. - Go To URL - Launches the Browser to access a URL in this message.
-
 1
1 -
2
-
3
-
4
-
5
-
6
-
7
-
8
-
9
-
10
-
11
-
12
-
13
-
14
-
15
-
16
-
17
-
18
-
19
-
20
-
21
-
22
-
23
-
24
-
25
-
26
-
27
-
28
-
29
-
30
-
31
-
32
-
33
-
34
-
35
-
36
-
37
-
38
-
39
-
40
-
41
-
42
-
43
-
44
-
45
-
46
-
47
-
48
-
49
-
50
-
 51
51 -
 52
52 -
 53
53 -
 54
54 -
 55
55 -
 56
56 -
 57
57 -
 58
58 -
 59
59 -
 60
60 -
 61
61 -
62
-
63
-
64
-
65
-
66
-
67
-
68
-
69
-
70
-
71
-
72
-
73
-
74
-
75
-
76
-
77
-
78
-
79
-
80
-
81
-
82
-
83
-
84
-
85
-
86
-
87
-
88
-
89
-
90
-
91
-
92
-
93
-
94
-
95
-
96
-
97
-
98
-
99
-
100
-
101
-
102
-
103
-
104
-
105
-
106
-
107
-
108
-
109
-
110
-
111
-
112
-
113
-
114
-
115
-
116
-
117
-
118
-
119
-
120
-
121
-
122
-
123
-
124
-
125
-
126
-
127
-
128
-
129
-
130
-
131
-
132
-
133
-
134
-
135
-
136
-
137
-
138
-
139
-
140
-
141
-
142
-
143
-
144
-
145
-
146
-
147
-
148
-
149
-
150
-
151
-
152
-
153
-
154
-
155
-
156
 |
 |