Samsung SCH R500 User Manual (ENGLISH) - Page 80
Options, Settings, Reset Settings, Camera
 |
View all Samsung SCH R500 manuals
Add to My Manuals
Save this manual to your list of manuals |
Page 80 highlights
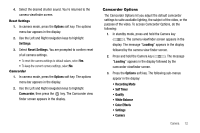
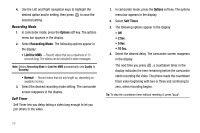
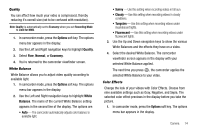
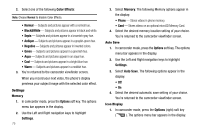
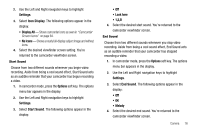
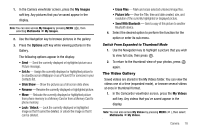
Reset Settings 1. In camcorder mode, press the Options soft key. The options menu bar appears in the display. 2. Use the Left and Right navigation keys to highlight Settings. 3. Select Reset Settings. You are prompted to confirm reset of all camcorder settings. • Select the Yes option to reset the camcorder settings to default values. • Select the No option to keep the current camcorder settings. Camera 1. In camcorder mode, press the Options soft key. The options menu bar appears in the display. 2. Use the Left and Right navigation keys to highlight Camera, then press . The Camera viewfinder screen appears in the display. Zoom Zoom lets you temporarily enlarge the pictures you take. Increasing the Zoom (1 - 9) enlarges your pictures or videos (0 is normal). 77 ᮣ In camera or camcorder viewfinder screen, use the Left and Right navigation keys to adjust the Zoom (the screen image enlarges to show the affects of your changes). The next time you press , the camera takes an enlarged picture or the camcorder takes an enlarged video according to your selected Zoom setting. Brightness Brightness lets you temporarily lighten the pictures you take. Increasing the Brightness (-4 - +4) lightens your pictures (0 is normal). ᮣ In camera or camcorder viewfinder screen, use the Up and Down navigation keys to adjust the Brightness (the screen image lightens or darkens to show the affects of your changes). The next time you press , the camera takes a lighter or darker picture or the camcorder records a lighter or darker video according to your selected Brightness setting. The Photo Gallery Saved pictures are stored in the My Images folder. You can browse the pictures one at a time (expanded mode), or view several pictures at once in thumbnail format.
-
 1
1 -
2
-
3
-
4
-
5
-
6
-
7
-
8
-
9
-
10
-
11
-
12
-
13
-
14
-
15
-
16
-
17
-
18
-
19
-
20
-
21
-
22
-
23
-
24
-
25
-
26
-
27
-
28
-
29
-
30
-
31
-
32
-
33
-
34
-
35
-
36
-
37
-
38
-
39
-
40
-
41
-
42
-
43
-
44
-
45
-
46
-
47
-
48
-
49
-
50
-
51
-
52
-
53
-
54
-
55
-
56
-
57
-
58
-
59
-
60
-
61
-
62
-
63
-
64
-
65
-
66
-
67
-
68
-
69
-
70
-
71
-
72
-
73
-
74
-
 75
75 -
 76
76 -
 77
77 -
 78
78 -
 79
79 -
 80
80 -
 81
81 -
 82
82 -
 83
83 -
 84
84 -
 85
85 -
86
-
87
-
88
-
89
-
90
-
91
-
92
-
93
-
94
-
95
-
96
-
97
-
98
-
99
-
100
-
101
-
102
-
103
-
104
-
105
-
106
-
107
-
108
-
109
-
110
-
111
-
112
-
113
-
114
-
115
-
116
-
117
-
118
-
119
-
120
-
121
-
122
-
123
-
124
-
125
-
126
-
127
-
128
-
129
-
130
-
131
-
132
-
133
-
134
-
135
-
136
-
137
-
138
-
139
-
140
-
141
-
142
-
143
-
144
-
145
-
146
-
147
-
148
-
149
-
150
-
151
-
152
-
153
-
154
-
155
-
156
 |
 |