Samsung SCH R500 User Manual (ENGLISH) - Page 66
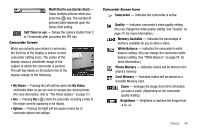
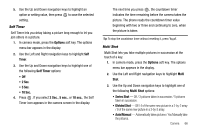
Multi Shot in use Divided Shot
 |
View all Samsung SCH R500 manuals
Add to My Manuals
Save this manual to your list of manuals |
Page 66 highlights
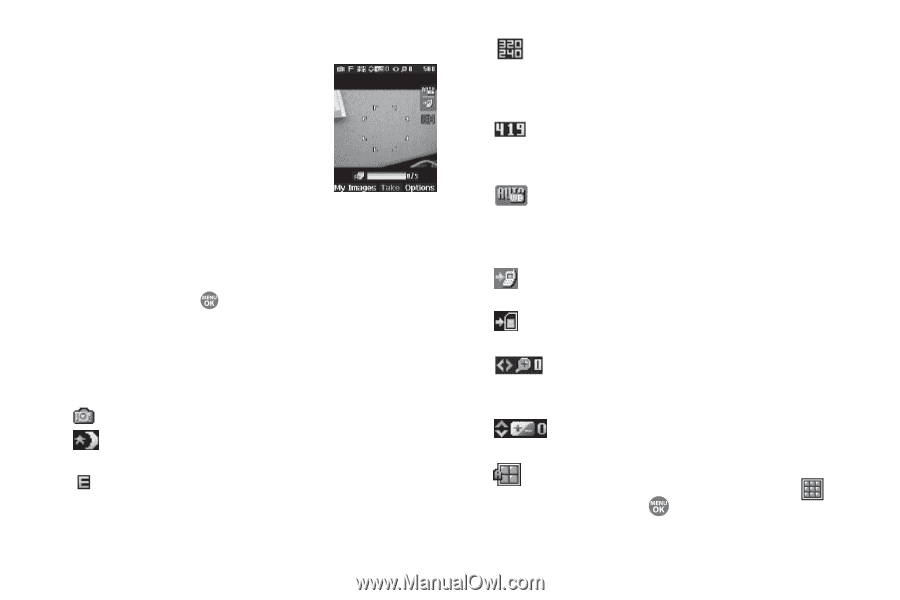
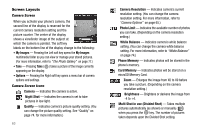
Screen Layouts Camera Screen When you activate your phone's camera, the second line of the display is reserved for the current camera resolution setting and the picture counter. The center of the display shows a viewfinder image of the subject at which the camera is pointed. The soft key labels on the bottom line of the display change to the following: • My Images - Pressing the Left soft key opens the My Images multimedia folder so you can view or manage your stored pictures. (For more information, refer to "The Photo Gallery" on page 77.) • Take - Pressing Take ( ) takes a picture of the image currently appearing on the display. • Options - Pressing the Right soft key opens a menu bar of camera options and settings. Camera Screen Icons Camera - Indicates the camera is active. Night Shot - Indicates the camera is set to take pictures in low light. Quality - Indicates camera's picture quality setting. (You can change the picture quality setting. See "Quality" on page 74. for more information.) 63 Camera Resolution - Indicates camera's current resolution setting. (You can change the camera resolution setting. For more information, refer to "Camera Options" on page 65.) Photo Limit - Indicates the available number of photos you can take. (Depending on the camera resolution setting.) White Balance - Indicates camera's white balance setting. (You can change the camera white balance setting. For more information, refer to "White Balance" on page 74.) Phone Memory - Indicates photos will be stored in the phone's memory. Card Memory - Indicates photos will be stored on a microSD Memory Card. Zoom - Enlarges the image from X0 to X9 before you take a picture. (Depending on the camera resolution setting.) Brightness - Brightens or darkens the image from -4 to +4. Multi Shot in use (Divided Shot) - Takes multiple pictures automatically (as shown) or manually ( ) when you press the key. The number of pictures taken depends upon the Divided Shot setting.
-
 1
1 -
2
-
3
-
4
-
5
-
6
-
7
-
8
-
9
-
10
-
11
-
12
-
13
-
14
-
15
-
16
-
17
-
18
-
19
-
20
-
21
-
22
-
23
-
24
-
25
-
26
-
27
-
28
-
29
-
30
-
31
-
32
-
33
-
34
-
35
-
36
-
37
-
38
-
39
-
40
-
41
-
42
-
43
-
44
-
45
-
46
-
47
-
48
-
49
-
50
-
51
-
52
-
53
-
54
-
55
-
56
-
57
-
58
-
59
-
60
-
 61
61 -
 62
62 -
 63
63 -
 64
64 -
 65
65 -
 66
66 -
 67
67 -
 68
68 -
 69
69 -
 70
70 -
 71
71 -
72
-
73
-
74
-
75
-
76
-
77
-
78
-
79
-
80
-
81
-
82
-
83
-
84
-
85
-
86
-
87
-
88
-
89
-
90
-
91
-
92
-
93
-
94
-
95
-
96
-
97
-
98
-
99
-
100
-
101
-
102
-
103
-
104
-
105
-
106
-
107
-
108
-
109
-
110
-
111
-
112
-
113
-
114
-
115
-
116
-
117
-
118
-
119
-
120
-
121
-
122
-
123
-
124
-
125
-
126
-
127
-
128
-
129
-
130
-
131
-
132
-
133
-
134
-
135
-
136
-
137
-
138
-
139
-
140
-
141
-
142
-
143
-
144
-
145
-
146
-
147
-
148
-
149
-
150
-
151
-
152
-
153
-
154
-
155
-
156
 |
 |