Sony PDWHD1500 User Manual (PDW-HD1500 Operation Manual for Firmware Version 1 - Page 14
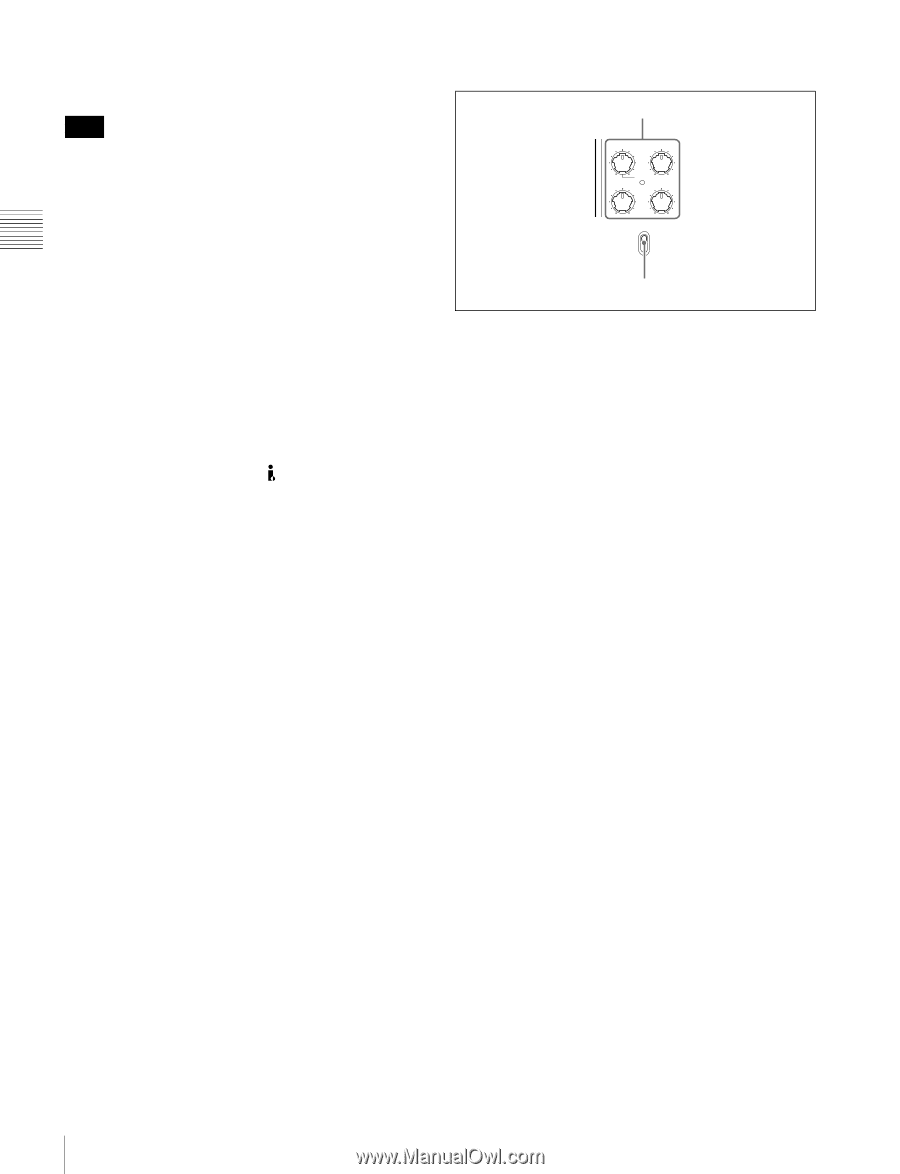
CH-1/ALL CH, CH-2 to CH-4 audio level, KEY INHI switch
 |
View all Sony PDWHD1500 manuals
Add to My Manuals
Save this manual to your list of manuals |
Page 14 highlights
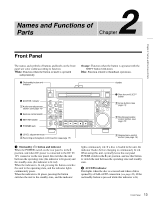
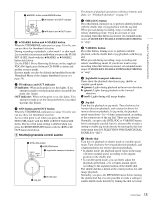
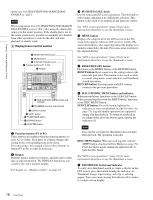
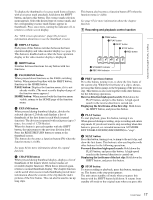
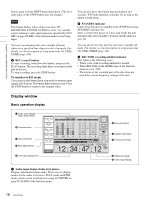
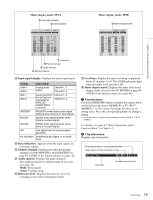
Chapter 2 Names and Functions of Parts access to the disc is completed before the unit switches to the standby state. Note While the ACCESS indicator is lit, do not turn off the POWER switch on the rear panel or disconnect the power cord. This could lead to a loss of data from the disc. c Remote control switch Different positions of the switch allow different operations as follows. NET: Enables access to the network. The indicator lights when an external network device is being accessed. In this state, operation from the front panel is not possible. LOCAL: Enables operation from the front panel. REMOTE: Enables remote control of this unit from the following devices: • Devices connected to the REMOTE(9P) connector on the rear panel • Devices connected to the SD/HDSDI INPUT connector with SDI remote control functions • Devices connected to the (i.LINK) S400 connector Use setup menu item 214 REMOTE INTERFACE to select which of the connectors is used for remote control (see page 109). See "Setup Menu" on page 99 for more information about how to make extended menu settings. d KEY INHI switch This turns key operation inhibit mode on or off. Use setup menu item 118 KEY INHIBIT SWITCH EFFECTIVE AREA to specify the keys to inhibit. e PHONES jack The jack is a standard stereo jack. Connect stereo headphones to monitor the audio during recording, playback, and editing. (Non-audio signals are muted.) The monitored channel is selected with MONITR L and MONITR R on page P2 AUDIO of the function menu (see page 43). f LEVEL (volume) adjustment knob Adjust the volume of headphones or speakers with the knob. You can also cause this to simultaneously adjust the output volume from the AUDIO MONITOR R, L connectors on the rear panel. To do this, set setup menu item 114 AUDIO MONITOR OUTPUT LEVEL to "var". g Disc slot and EJECT button Insert a disc in the disc slot. To remove the disc, press the EJECT button. 1 Audio level adjustment section 1 CH-1/ALL CH, CH-2 to CH-4 adjustment knobs CH-1 CH-3 ALL CH CH-2 CH-4 NET LOCAL REMOTE VARIABLE KEY INHI REC ON PRE- SET OFF PB 2 VARIABLE switch a CH-1/ALL CH, CH-2 to CH-4 (audio level) adjustment knobs Depending on the setting of the VARIABLE switch, these adjust the input audio or playback audio levels of channels 1 to 4. You can adjust levels of channels 5 to 8 using the function menu. See page 44 for details. By the setting of setup menu item 131 AUDIO VOLUME, you can enable the CH-1/ALL CH knob to simultaneously adjust all eight channels. When this simultaneous adjustment is enabled, the ALL CH indicator lights. b VARIABLE (audio level adjustment selector) switch This selects whether input audio levels or playback audio levels are adjusted by the CH-1/ALL CH and CH-2 to CH4 adjustment knobs for channels 1 to 4, or by the function menu setting for channels 5 to 8. REC: Adjust the input audio levels. The playback audio levels are fixed at their preset values. PRESET: The audio levels are fixed at their preset values. PB: Adjust the playback audio levels. The input audio levels are fixed at their preset values. 2 Arrow buttons The four arrow buttons are also used as the MARK1 button, MARK2 button, IN button, and OUT button. The correspondence with these buttons is as follows. V button: MARK1 button v button: MARK2 button B button: IN button b button: OUT button You can use these buttons for thumbnail selection, menu setting operations, setting In/Out points, and so on. 14 Front Panel
-
 1
1 -
2
-
3
-
4
-
5
-
6
-
7
-
8
-
 9
9 -
 10
10 -
 11
11 -
 12
12 -
 13
13 -
 14
14 -
 15
15 -
 16
16 -
 17
17 -
 18
18 -
 19
19 -
20
-
21
-
22
-
23
-
24
-
25
-
26
-
27
-
28
-
29
-
30
-
31
-
32
-
33
-
34
-
35
-
36
-
37
-
38
-
39
-
40
-
41
-
42
-
43
-
44
-
45
-
46
-
47
-
48
-
49
-
50
-
51
-
52
-
53
-
54
-
55
-
56
-
57
-
58
-
59
-
60
-
61
-
62
-
63
-
64
-
65
-
66
-
67
-
68
-
69
-
70
-
71
-
72
-
73
-
74
-
75
-
76
-
77
-
78
-
79
-
80
-
81
-
82
-
83
-
84
-
85
-
86
-
87
-
88
-
89
-
90
-
91
-
92
-
93
-
94
-
95
-
96
-
97
-
98
-
99
-
100
-
101
-
102
-
103
-
104
-
105
-
106
-
107
-
108
-
109
-
110
-
111
-
112
-
113
-
114
-
115
-
116
-
117
-
118
-
119
-
120
-
121
-
122
-
123
-
124
-
125
-
126
-
127
-
128
-
129
-
130
-
131
-
132
-
133
-
134
-
135
-
136
-
137
-
138
-
139
-
140
-
141
-
142
-
143
-
144
-
145
-
146
-
147
-
148
-
149
-
150
-
151
-
152
-
153
-
154
-
155
-
156
-
157
-
158
 |
 |